
Category: wx
wxPython window
wxpython button
To create a button simply call wx.Button(). When creating a button with wx.Button() it is important to parse the panel as first argument. We attach it to a panel because attaching to the frame would make it full screen.
A panel gives you to option to position widgets anywhere in the window. The parameter (10,10) is the position on the panel. The id argument is necessary, but it is equal to -1 (wx.ID_ANY == -1). The 3rd parameter is the text on the button.
Related course:
Creating GUI Applications with wxPython
You can use the code below to create a button in wxPython:
#!/usr/bin/python |
The function onButton() is called if the button is pressed. We bind (connect) it with button.Bind(wx.EVT_BUTTON, onButton).
Output:
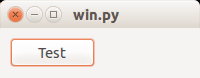
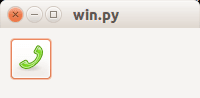
Image on button
wxPython supports having images on buttons. Only a minor change is needed to display an image on a button. While the function is called wx.BitmapButton, it supports other image formats.
bmp = wx.Bitmap("call-start.png", wx.BITMAP_TYPE_ANY) |
The first line loads the image, the second line creates the button.
Full code:
#!/usr/bin/python |
Output:
Related course:
Creating GUI Applications with wxPython
wxpython dialog
In this tutorial, you’ll learn how to display various types of dialogs using wxPython, a popular GUI toolkit for Python.
Dialogs play an essential role in user interaction, informing users or seeking confirmation on certain operations. With wxPython, showing these dialogs is straightforward.
Related Course: Creating GUI Applications with wxPython
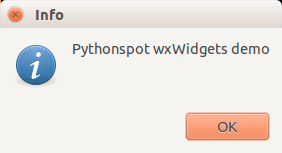
Information Dialog in wxPython
An information dialog is a simple way to convey messages to users. Here’s how you can display one using wxPython:
1 | import wx |
The first parameter is the message text, the second specifies the dialog title, and the last one defines the dialog’s behavior and appearance.
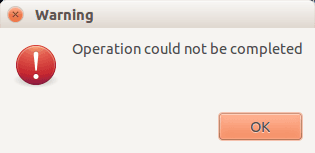
Other wxPython Dialogs: Warning, Error, and Default
By tweaking the parameters, you can also create other dialog types. Let’s look at a few examples:
1 | import wx |
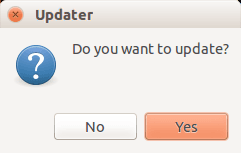
Creating a Question Dialog in wxPython
wxPython also allows for creating question dialogs, which can be used to seek yes/no responses from users:
1 | import wx |
Once again, remember that wxPython makes it convenient to create and manage GUI applications. The dialogs shown are just a small part of its capabilities.
Learn More: Creating GUI Applications with wxPython
Navigate the tutorial: [
wx.filedialog
python dialog box input
wxpython menu
wx python
While working with wxPython, it’s essential to grasp object orientation even if it hasn’t been the main focus of our series. This guide will help you understand how to design a tab interface with wxPython.
Recommended Course: Creating GUI Applications with wxPython
The Mainframe class constructs the frame, similar to previous examples. Other classes serve as the contents for the tabs. Within the main frame, we establish a panel and a notebook (which acts as the tab holder). Following that, we initiate tab objects:
tab1 = TabOne(nb) |
We then attach these tab objects to the tab holder:
nb.AddPage(tab1, "Tab 1") |
Here’s the complete code for better clarity:
import wx |
Output Image: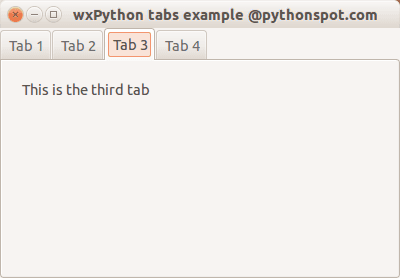
Enrich your knowledge with: Creating GUI Applications with wxPython
wxpython
The official wxPython site has several screenshots and downloads for these platforms. wxPython is based on wxWidgets.
Related course: Creating GUI Applications with wxPython
Install wxPython
First download and install WxPython, the Python bindings for wxWidgets.sudo apt-get install python-wxgtk2.8 python-wxtools wx2.8-doc wx2.8-examples wx2.8-headers wx2.8-i18n |
Then install a GUI creator called wxglade:
sudo apt-get install wxglade |
Using a GUI builder such as wxGlade will save you a lot of time, regardless of the GUI library you use. You can easily make complex graphical interfaces because you can simply drag and drop.
Creating our first GUI with Python and wxWidgets:
Start wxglade. You will see its user interface:
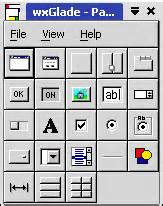
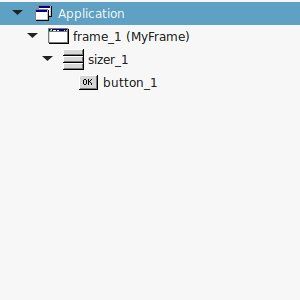
Press on tiny window on the top left, below the file icon.

Press OK. An empty window will now appear. Press on the tiny [OK] button in the wxGlade panel and press on the frame. The button will now appear. Press on Application in the tree window.
Set the output file in the wxproperties window.
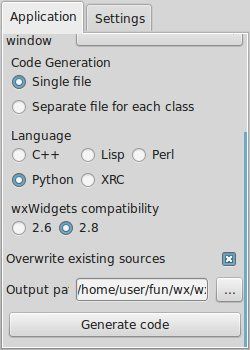
If you look at the window note you can select multiple programming languages and two versions of wxWidgets. Select Python and wxWidgets 2.8. Finally press Generate code. (Do NOT name the file wx.py because the import needs wx, save it as window.py or something else).
Running wxglade code:
Run:
python window.py |
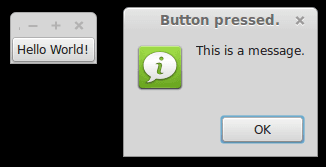
And a window with a button will appear. Pressing the button will not do anything. To start a function when pressing the button, we need to define a so called Callback. This can be as simple as:
def OnButton(self, Event, button_label): |
Finally we bind the button to the callback function using:
self.button_1.Bind(wx.EVT_BUTTON, self.OnButton ) |
Pressing the button will now write a message to the command line. Instead of the boring command line message, we want to show a message box. This can be done using this command:
wx.MessageBox( "This is a message.", "Button pressed."); |
wxPython example code
The full code below:
#!/usr/bin/env python |
Related course: Creating GUI Applications with wxPython