
pyqt5 layout
Python hosting: Host, run, and code Python in the cloud!
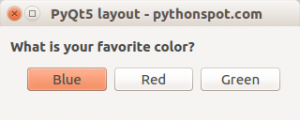
PyQt5 layouts are essential for designing interactive GUI applications. One such layout is the horizontal layout which allows you to dynamically add widgets such as buttons, text fields, images, and others, in a horizontal direction.
Using PyQt5’s horizontal layout, you can seamlessly align your widgets to create visually appealing interfaces for your applications. In this guide, we will delve into the steps to add buttons horizontally using the PyQt5 horizontal layout.
Interested in mastering PyQt5? Check out this course:
Designing with the Horizontal Layout
Before we dive in, let’s take a comprehensive look at the code, followed by a detailed explanation:
1 | import sys |
Decoding the Code
Let’s decipher how the horizontal layout works in PyQt5:
Initialization: The method
self.createHorizontalLayout()is called inside theinitUI()method. This sets up the foundation for the horizontal layout.Box Creation: A box with a title and a horizontal layout is established with:
1
2
self.horizontalGroupBox = QGroupBox("What is your favorite color?")
layout = QHBoxLayout()Widget Addition: Widgets (for example, qpushbutton) are produced and incorporated into the layout sequentially:
1
2
3
buttonBlue = QPushButton('Blue', self)
buttonBlue.clicked.connect(self.on_click)
layout.addWidget(buttonBlue)Box Assignment: The title-box is designated to encompass the horizontal layout:
1
self.horizontalGroupBox.setLayout(layout)
Window Integration: The box is integrated into the main window through:
1
2
3
windowLayout = QVBoxLayout()
windowLayout.addWidget(self.horizontalGroupBox)
self.setLayout(windowLayout)
If you’re intrigued by layouts, PyQt5 also offers the flexibility to create vertical layouts using a qvboxlayout.
For more hands-on examples and insights: Download PyQT5 Examples
Navigate to learn more: ← Previous | Next →
Leave a Reply: