
Category: database
Python hosting: Host, run, and code Python in the cloud!
Reading CSV files in Python
Reading CSV files using Python 3 is what you will learn in this article. The file data contains comma separated values (csv). The comma is known as the delimiter, it may be another character such as a semicolon.
Related course
Python Programming Bootcamp: Go from zero to hero
Read CSV
An example csv file:
01/01/2016, 4 02/01/2016, 2 03/01/2016, 10 04/01/2016, 8 |
The process will be:

Read CSV file
The most basic method to read a csv file is:
import csv with open('file.csv') as csvDataFile: csvReader = csv.reader(csvDataFile) for row in csvReader: print(row) |
We import the csv module. We read every row in the file. Every row is returned as an array and can be accessed as such, to print the first cells we could simply write:
print(row[0]) |
We would want to have the data in arrays, we can achieve that using:
import csv dates = [] scores = [] with open('file.csv') as csvDataFile: csvReader = csv.reader(csvDataFile) for row in csvReader: dates.append(row[0]) scores.append(row[1]) print(dates) print(scores) |
We creates two arrays: dates and scores. We use the append method to add the cells to the arrays.
If you want to use a different delimiter simply change the reader call:
csvReader = csv.reader(delimiter=';') |
Load CSV function
If you have many files in an identical format, you can create a function for loading the data:
import csv def readMyFile(filename): dates = [] scores = [] with open(filename) as csvDataFile: csvReader = csv.reader(csvDataFile) for row in csvReader: dates.append(row[0]) scores.append(row[1]) return dates, scores dates,scores = readMyFile('file.csv') print(dates) print(scores) |
Given a filename, the function will read and parse the csv data. Its added to the arrays dates and scores and returned.
Python Database Programming: SQLite (tutorial)
In this tutorial you will learn how to use the SQLite database management system with Python. You will learn how to use SQLite, SQL queries, RDBMS and more of this cool stuff!
Related course:
Master SQL Databases with Python
Pyton Database
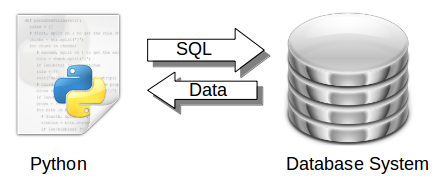
Data is retrieved from a database system using the SQL language.
Python has bindings for many database systems including MySQL, Postregsql, Oracle, Microsoft SQL Server and Maria DB.
One of these database management systems (DBMS) is called SQLite. SQLite was created in the year 2000 and is one of the many management systems in the database zoo.
SQL is a special-purpose programming language designed for managing data held in a databases. The language has been around since 1986 and is worth learning. The is an old funny video about SQL
SQLite

It is a self-contained, serverless, zero-configuration, transactional SQL database engine. The SQLite project is sponsored by Bloomberg and Mozilla.
Install SQLite:
Use this command to install SQLite:
$ sudo apt-get install sqlite |
Verify if it is correctly installed. Copy this program and save it as test1.py
#!/usr/bin/python # -*- coding: utf-8 -*- import sqlite3 as lite import sys con = None try: con = lite.connect('test.db') cur = con.cursor() cur.execute('SELECT SQLITE_VERSION()') data = cur.fetchone() print "SQLite version: %s" % data except lite.Error, e: print "Error %s:" % e.args[0] sys.exit(1) finally: if con: con.close() |
Execute with:
$ python test1.py |
It should output:
SQLite version: 3.8.2 |
What did the script above do?
The script connected to a new database called test.db with this line:
con = lite.connect('test.db') |
It then queries the database management system with the command
SELECT SQLITE_VERSION() |
which in turn returned its version number. That line is known as an SQL query.
SQL Create and Insert
The script below will store data into a new database called user.db
#!/usr/bin/python # -*- coding: utf-8 -*- import sqlite3 as lite import sys con = lite.connect('user.db') with con: cur = con.cursor() cur.execute("CREATE TABLE Users(Id INT, Name TEXT)") cur.execute("INSERT INTO Users VALUES(1,'Michelle')") cur.execute("INSERT INTO Users VALUES(2,'Sonya')") cur.execute("INSERT INTO Users VALUES(3,'Greg')") |
SQLite is a database management system that uses tables. These tables can have relations with other tables: it’s called relational database management system or RDBMS. The table defines the structure of the data and can hold the data. A database can hold many different tables. The table gets created using the command:
cur.execute("CREATE TABLE Users(Id INT, Name TEXT)") |
We add records into the table with these commands:
cur.execute("INSERT INTO Users VALUES(2,'Sonya')") cur.execute("INSERT INTO Users VALUES(3,'Greg')") |
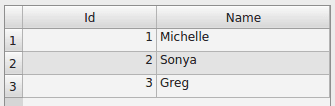
The first value is the ID. The second value is the name. Once we run the script the data gets inserted into the database table Users:
SQLite query data
We can explore the database using two methods: the command line and a graphical interface.
From console: To explore using the command line type these commands:
sqlite3 user.db .tables SELECT * FROM Users; |
This will output the data in the table Users.
sqlite> SELECT * FROM Users; 1|Michelle 2|Sonya 3|Greg |
From GUI: If you want to use a GUI instead, there is a lot of choice. Personally I picked sqllite-man but there are many others. We install using:
sudo apt-get install sqliteman |
We start the application sqliteman. A gui pops up.
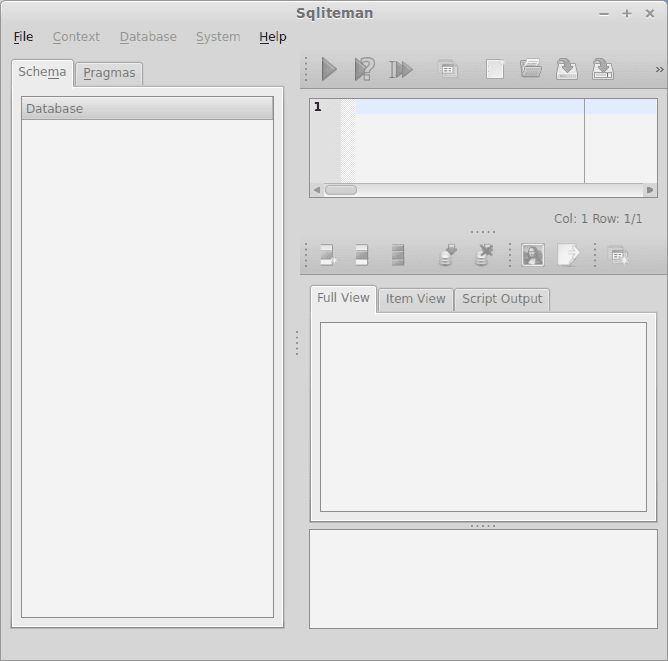
Press File > Open > user.db. It appears like not much has changed, do not worry, this is just the user interface. On the left is a small tree view, press Tables > users. The full table including all records will be showing now.
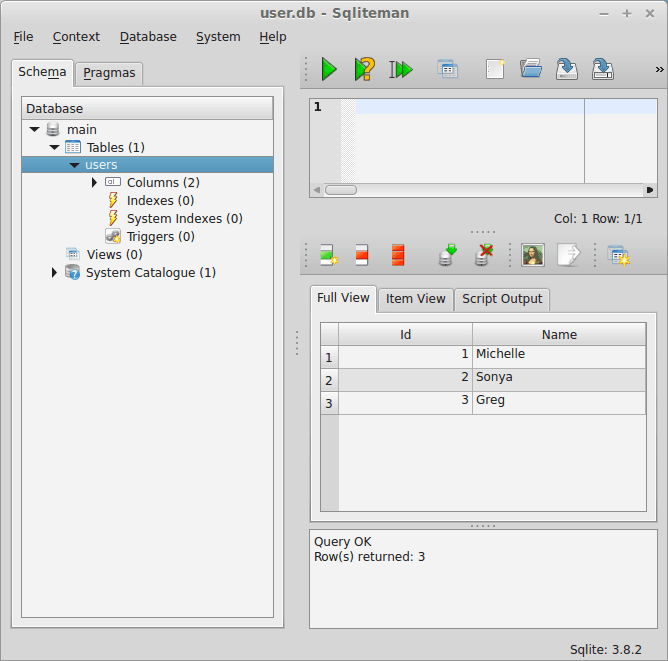
This GUI can be used to modify the records (data) in the table and to add new tables.
The SQL database query language
SQL has many commands to interact with the database. You can try the commands below from the command line or from the GUI:
sqlite3 user.db SELECT * FROM Users; SELECT count(*) FROM Users; SELECT name FROM Users; SELECT * FROM Users WHERE id = 2; DELETE FROM Users WHERE id = 6; |
We can use those queries in a Python program:
#!/usr/bin/python # -*- coding: utf-8 -*- import sqlite3 as lite import sys con = lite.connect('user.db') with con: cur = con.cursor() cur.execute("SELECT * FROM Users") rows = cur.fetchall() for row in rows: print row |
This will output all data in the Users table from the database:
$ python get.py (1, u'Michelle') (2, u'Sonya') (3, u'Greg') |
Creating a user information database
We can structure our data across multiple tables. This keeps our data structured, fast and organized. If we would have a single table to store everything, we would quickly have a big chaotic mess. What we will do is create multiple tables and use them in a combination. We create two tables:
Users:

Jobs:

To create these tables, you can do that by hand in the GUI or use the script below:
# -*- coding: utf-8 -*- import sqlite3 as lite import sys con = lite.connect('system.db') with con: cur = con.cursor() cur.execute("CREATE TABLE Users(Id INT, Name TEXT)") cur.execute("INSERT INTO Users VALUES(1,'Michelle')") cur.execute("INSERT INTO Users VALUES(2,'Howard')") cur.execute("INSERT INTO Users VALUES(3,'Greg')") cur.execute("CREATE TABLE Jobs(Id INT, Uid INT, Profession TEXT)") cur.execute("INSERT INTO Jobs VALUES(1,1,'Scientist')") cur.execute("INSERT INTO Jobs VALUES(2,2,'Marketeer')") cur.execute("INSERT INTO Jobs VALUES(3,3,'Developer')") |
The jobs table has an extra parameter, Uid. We use that to connect the two tables in an SQL query:
SELECT users.name, jobs.profession FROM jobs INNER JOIN users ON users.ID = jobs.uid |
You can incorporate that SQL query in a Python script:
#!/usr/bin/python # -*- coding: utf-8 -*- import sqlite3 as lite import sys con = lite.connect('system.db') with con: cur = con.cursor() cur.execute("SELECT users.name, jobs.profession FROM jobs INNER JOIN users ON users.ID = jobs.uid") rows = cur.fetchall() for row in rows: print row |
It should output:
$ python get2.py (u'Michelle', u'Scientist') (u'Howard', u'Marketeer') (u'Greg', u'Developer') |
You may like: Databases and data analysis
MySQL with Python
In this tutorial you will learn how to use a widely used database management system called MySQL in Python. You do not need any previous knowledge of MySQL to use this tutorial, but there is a lot more to MySQL than covered in this short introductory tutorial.
Related course
Master SQL Databases with Python
MySQL tutorial
Data is stored in a collection of tables with each table consisting of a set of rows and columns. This is similar to how data is stored in SQLite. To interact with the data stored in tables we use a special-purpose programming language called SQL.
Step 1: Install MySQL
First you must install a MySQL driver, use the specific installation method below.
On Windows:
Install MySQLdb using the installer.
On Linux:
Install MySQLdb using:
sudo apt-get install python-mysqldb yum install mysql-python |
depending on your version.
On Mac:
Follow the installation instructions from stackoverflow
MySQL server has to be running before going to the next step.
Step 2: Setup the database
Make sure you have database access, from the command line type:
mysql -u USERNAME -p |
MySQL will then ask your password. Type these commands:
mysql> CREATE DATABASE pythonspot; mysql> USE pythonspot; |
We go on the create the table:
CREATE TABLE IF NOT EXISTS examples ( id int(11) NOT NULL AUTO_INCREMENT, description varchar(45), PRIMARY KEY (id) ); |
Then we can insert data into the table (these are SQL queries):
INSERT INTO examples(description) VALUES ("Hello World"); INSERT INTO examples(description) VALUES ("MySQL Example"); INSERT INTO examples(description) VALUES ("Flask Example"); |
You can now grab all records from the table using a SQL query:
mysql> SELECT * FROM examples; +----+---------------+ | id | description | +----+---------------+ | 1 | Hello World | | 2 | MySQL Example | | 3 | Flask Example | +----+---------------+ 3 rows in set (0.01 sec) |
Step 3: Getting the data from Python
You can access the database directly from Python using the MySQLdb module.
#!/usr/bin/python import MySQLdb db = MySQLdb.connect(host="localhost", # your host user="root", # username passwd="root", # password db="pythonspot") # name of the database # Create a Cursor object to execute queries. cur = db.cursor() # Select data from table using SQL query. cur.execute("SELECT * FROM examples") # print the first and second columns for row in cur.fetchall() : print row[0], " ", row[1] |
Output:
1 Hello World 2 MySQL Example 3 Flask Example |
Python Database PostgreSQL
In this article you will learn how to use the PostgreSQL database with Python. PostgreSQL is an relational database management system (rdbms). PostgreSQL supports foreign keys, joins, views, triggers, stored procedures and much more.
Related course
Master SQL with Python Programming
Installation
Install PostgreSQL
For this tutorial you will need the PostgreSQL dbms and the psycopg2 module.
On an Ubuntu system you can install the PostgreSQL database system with this command:
sudo apt-get install postgresql postgresql-contrib |
Test if the PostgreSQL database system is up and running with this command:
sudo /etc/init.d/postgresql status |
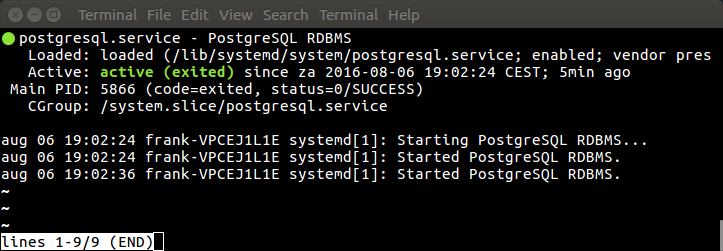
If you do not see the above screen, try one of these commands:
sudo service postgresql start sudo service postgresql restart |
Install psycopg2
Psycopg is a PostgreSQL database adapter for Python.
This command installs the module:
sudo apt-get install python-psycopg2 |
We create a database and database user (also called a role)
sudo -u postgres createuser -D -A -P pythonspot sudo -u postgres createdb -O pythonspot testdb |
Reload the database:
sudo /etc/init.d/postgresql reload |
Python PostgreSQL
Create table and Insert data
Run this program :
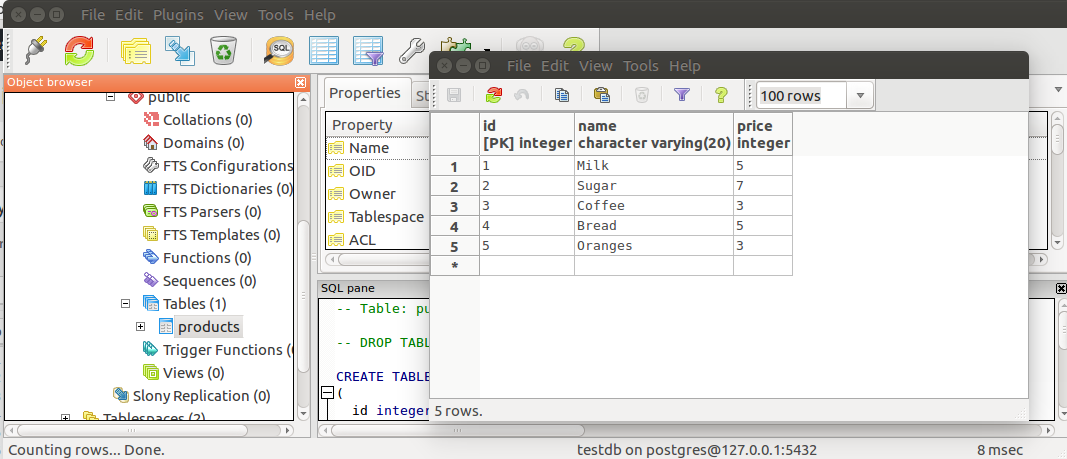
#!/usr/bin/python # -*- coding: utf-8 -*- import psycopg2 import sys con = None try: con = psycopg2.connect("host='localhost' dbname='testdb' user='pythonspot' password='password'") cur = con.cursor() cur.execute("CREATE TABLE Products(Id INTEGER PRIMARY KEY, Name VARCHAR(20), Price INT)") cur.execute("INSERT INTO Products VALUES(1,'Milk',5)") cur.execute("INSERT INTO Products VALUES(2,'Sugar',7)") cur.execute("INSERT INTO Products VALUES(3,'Coffee',3)") cur.execute("INSERT INTO Products VALUES(4,'Bread',5)") cur.execute("INSERT INTO Products VALUES(5,'Oranges',3)") con.commit() except psycopg2.DatabaseError, e: if con: con.rollback() print 'Error %s' % e sys.exit(1) finally: if con: con.close() |
It will create a database table (this datastructure holds the data). Data is inserted into the table using:
cur.execute("INSERT INTO Products VALUES(5,'Oranges',3)") |
The line below is mandatory, it executes all sql queries:
con.commit() |
Read data
Data can be read using the SELECT SQL query. A list is returned for every row:
#!/usr/bin/python # -*- coding: utf-8 -*- import psycopg2 import sys con = None try: con = psycopg2.connect("host='localhost' dbname='testdb' user='pythonspot' password='password'") cur = con.cursor() cur.execute("SELECT * FROM Products") while True: row = cur.fetchone() if row == None: break print("Product: " + row[1] + "\t\tPrice: " + str(row[2])) except psycopg2.DatabaseError, e: if con: con.rollback() print 'Error %s' % e sys.exit(1) finally: if con: con.close() |
Update data
PostgreSQL table data can be updated with this code:
#!/usr/bin/python # -*- coding: utf-8 -*- import psycopg2 import sys con = None try: con = psycopg2.connect("host='localhost' dbname='testdb' user='pythonspot' password='password'") cur = con.cursor() cur.execute("UPDATE Products SET Price=%s WHERE Id=%s", (10, 4)) con.commit() except psycopg2.DatabaseError, e: if con: con.rollback() print 'Error %s' % e sys.exit(1) finally: if con: con.close() |
Delete data
Delete data from a PostgreSQL table with this code:
#!/usr/bin/python # -*- coding: utf-8 -*- import psycopg2 import sys con = None try: con = psycopg2.connect("host='localhost' dbname='testdb' user='pythonspot' password='password'") cur = con.cursor() cur.execute("DELETE FROM Products WHERE Id=" + str(4)) con.commit() except psycopg2.DatabaseError, e: if con: con.rollback() print 'Error %s' % e sys.exit(1) finally: if con: con.close() |
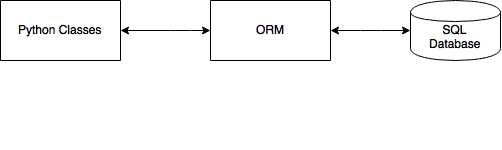
ORM with SqlAlchemy
An object relational mapper maps a relational database system to objects. If you are unfamiliar with object orientated programming, read this tutorial first. The ORM is independent of which relational database system is used. From within Python, you can talk to objects and the ORM will map it to the database. In this article you will learn to use the SqlAlchemy ORM.
What an ORM does is shown in an illustration below:

Related courses
Creating a class to feed the ORM
We create the file tabledef.py. In this file we will define a class Student. An abstract visualization of the class below:
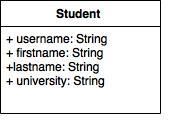
Observe we do not define any methods, only variables of the class. This is because we will map this class to the database and thus won’t need any methods.
This is the contents of tabledef.py:
from sqlalchemy import * from sqlalchemy import create_engine, ForeignKey from sqlalchemy import Column, Date, Integer, String from sqlalchemy.ext.declarative import declarative_base from sqlalchemy.orm import relationship, backref engine = create_engine('sqlite:///student.db', echo=True) Base = declarative_base() ######################################################################## class Student(Base): """""" __tablename__ = "student" id = Column(Integer, primary_key=True) username = Column(String) firstname = Column(String) lastname = Column(String) university = Column(String) #---------------------------------------------------------------------- def __init__(self, username, firstname, lastname, university): """""" self.username = username self.firstname = firstname self.lastname = lastname self.university = university # create tables Base.metadata.create_all(engine) |
Execute with:
python tabledef.py |
The ORM created the database file tabledef.py. It will output the SQL query to the screen, in our case it showed:
CREATE TABLE student ( id INTEGER NOT NULL, username VARCHAR, firstname VARCHAR, lastname VARCHAR, university VARCHAR, PRIMARY KEY (id) ) |
Thus, while we defined a class, the ORM created the database table for us. This table is still empty.
Inserting data into the database
The database table is still empty. We can insert data into the database using Python objects. Because we use the SqlAlchemy ORM we do not have to write a single SQL query. We now simply create Python objects that we feed to the ORM. Save the code below as dummy.py
import datetime from sqlalchemy import create_engine from sqlalchemy.orm import sessionmaker from tabledef import * engine = create_engine('sqlite:///student.db', echo=True) # create a Session Session = sessionmaker(bind=engine) session = Session() # Create objects user = Student("james","James","Boogie","MIT") session.add(user) user = Student("lara","Lara","Miami","UU") session.add(user) user = Student("eric","Eric","York","Stanford") session.add(user) # commit the record the database session.commit() |
Execute with:
python dummy.py |
The ORM will map the Python objects to a relational database. This means you do not have any direct interaction from your application, you simply interact with objects. If you open the database with SQLiteman or an SQLite database application you’ll find the table has been created:
Query the data
We can query all items of the table using the code below. Note that Python will see every record as a unique object as defined by the Students class. Save the code as demo.py
import datetime from sqlalchemy import create_engine from sqlalchemy.orm import sessionmaker from tabledef import * engine = create_engine('sqlite:///student.db', echo=True) # create a Session Session = sessionmaker(bind=engine) session = Session() # Create objects for student in session.query(Student).order_by(Student.id): print student.firstname, student.lastname |
On execution you will see:
James Boogie Lara Miami Eric York |
To select a single object use the filter() method. A demonstration below:
import datetime from sqlalchemy import create_engine from sqlalchemy.orm import sessionmaker from tabledef import * engine = create_engine('sqlite:///student.db', echo=True) # create a Session Session = sessionmaker(bind=engine) session = Session() # Select objects for student in session.query(Student).filter(Student.firstname == 'Eric'): print student.firstname, student.lastname |
Output:
Eric York |
Finally, if you do not want the ORM the output any of the SQL queries change the create_engine statement to:
engine = create_engine('sqlite:///student.db', echo=False) |