
Login to your Flask app with Google
Python hosting: PythonAnywhere — host, run and code Python in the cloud. Free tier available.
In this article you will learn how to use Google for login authentication in a Flask app. Instead of using a custom user login system, you could use Google to authenticate with your website. Your visitors may already have an account on Google, so why not use it to login?
To do so, we use a protocol called OAuth. From wikipedia:
OAuth is a protocol that utilizes tokens in order to access resources on behalf of a resource owner. Think giving a user the ability to give out a valet key to certain portions of your site. Many sites, such as Google, Facebook, and Twitter use OAuth for authenticating third party clients in order to access certain user resources.Don't worry if that sounds vague, we'll take you through the steps.
Related course
Getting started Visit https://code.google.com/apis/console/ and press on credentials. Click "Create new Client ID".
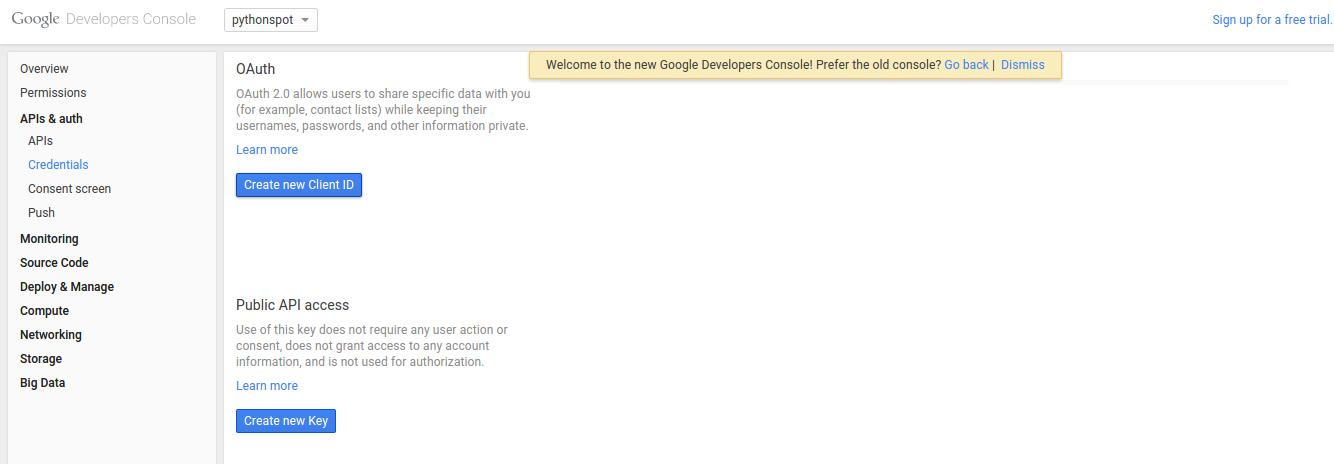 Google oAuth Credentials
You will see this screen popup:
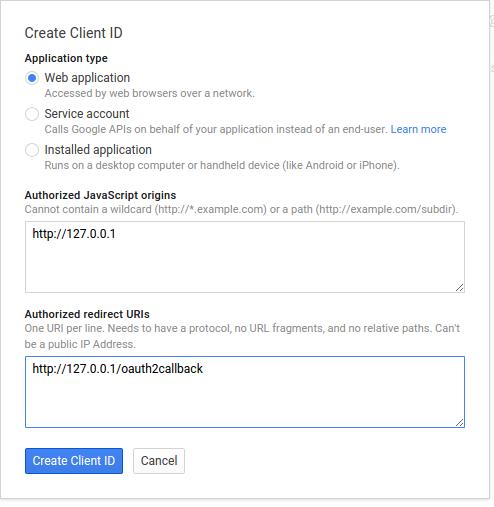 create oauth
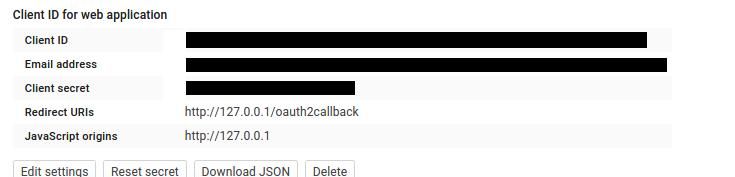
Type your information and press "Create Client ID". You then have a Client ID and Client secret which you will need.
Login authentication with Google We use a module called flask_oauth to authenticate with Google. It is maintained by Armin Ronacher, the creator of Flask, so you can be sure the module does not die. The module uses OAuth, a protocol that gives tokens in order to access resources. Other modules may not have as good support.
Copy the code below and set the client id and client secret that you got from Google above. Just replace the lines:
GOOGLE_CLIENT_ID = 'PUT CLIENT ID'
GOOGLE_CLIENT_SECRET = 'PUT CLIENT SECRET'
Save the program as app.py
from flask import Flask, redirect, url_for, session
from flask_oauth import OAuth
# You must configure these 3 values from Google APIs console
# https://code.google.com/apis/console
GOOGLE_CLIENT_ID = 'PUT CLIENT ID'
GOOGLE_CLIENT_SECRET = 'PUT CLIENT SECRET'
REDIRECT_URI = '/oauth2callback'  # one of the Redirect URIs from Google APIs console
SECRET_KEY = 'development key'
DEBUG = True
app = Flask(__name__)
app.debug = DEBUG
app.secret_key = SECRET_KEY
oauth = OAuth()
google = oauth.remote_app('google',
base_url='https://www.google.com/accounts/',
authorize_url='https://accounts.google.com/o/oauth2/auth',
request_token_url=None,
request_token_params={'scope': 'https://www.googleapis.com/auth/userinfo.email',
'response_type': 'code'},
access_token_url='https://accounts.google.com/o/oauth2/token',
access_token_method='POST',
access_token_params={'grant_type': 'authorization_code'},
consumer_key=GOOGLE_CLIENT_ID,
consumer_secret=GOOGLE_CLIENT_SECRET)
@app.route('/')
def index():
access_token = session.get('access_token')
if access_token is None:
return redirect(url_for('login'))
access_token = access_token[0]
from urllib2 import Request, urlopen, URLError
headers = {'Authorization': 'OAuth '+access_token}
req = Request('https://www.googleapis.com/oauth2/v1/userinfo',
None, headers)
try:
res = urlopen(req)
except URLError, e:
if e.code == 401:
# Unauthorized - bad token
session.pop('access_token', None)
return redirect(url_for('login'))
return res.read()
return res.read()
@app.route('/login')
def login():
callback=url_for('authorized', _external=True)
return google.authorize(callback=callback)
@app.route(REDIRECT_URI)
@google.authorized_handler
def authorized(resp):
access_token = resp['access_token']
session['access_token'] = access_token, ''
return redirect(url_for('index'))
@google.tokengetter
def get_access_token():
return session.get('access_token')
def main():
app.run()
if __name__ == '__main__':
main()
Execute using:
python app.py
* Running on http://127.0.0.1:5000/
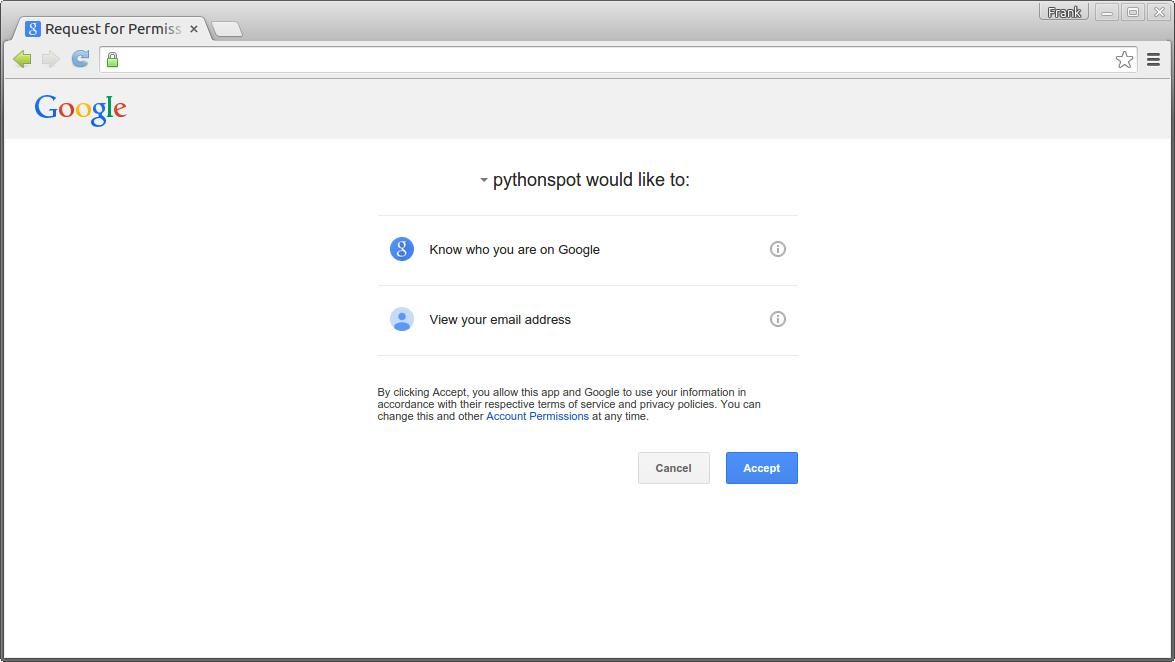
* Restarting with reloaderYou can then open the link to see the login screen. The app will simply return your account information encoded in JSON format once you accept.
 Login to your Flask app with Google
Finally, you can validate if the access token is set on new routes. Download Flask Examples