python logo

qboxlayout


Python hosting: Host, run, and code Python in the cloud!

An instance of the QBoxLayout in PyQt5 provides a versatile method to manage widget layouts. It allocates space into distinct boxes, with each box entirely filled by a specific widget. The orientation - vertical or horizontal - is determined by the type of class used to create the object.

For vertical placement of widgets, QVBoxLayout is employed. Similarly, QHBoxLayout is used for horizontal placement of widgets. It’s essential to note that QVBoxLayout inherits from the overarching QBoxLayout class.

Related course:

Understanding QVBoxLayout - The Vertical Layout Technique
The QVBoxLayout class offers a simple yet efficient way to stack widgets vertically. As it inherits from QBoxLayout, it retains the overall functionality while specializing in vertical positioning.
qvboxlayout

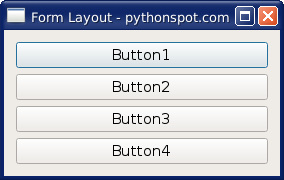
Below is a practical example that demonstrates how to add button widgets to a QVBoxLayout instance and subsequently incorporate the layout instance into a window:

1
2
3
4
5
6
7
8
9
10
11
12
13
14
15
16
17
18
19
20
21
22
23
24
25
26
27
28
29
30
31
32
from PyQt5.QtWidgets import (QApplication, QComboBox, QDialog,
QDialogButtonBox, QFormLayout, QGridLayout, QGroupBox, QHBoxLayout,
QLabel, QLineEdit, QMenu, QMenuBar, QPushButton, QSpinBox, QTextEdit,
QVBoxLayout)

import sys

class Dialog(QDialog):
NumGridRows = 3
NumButtons = 4

def __init__(self):
super(Dialog, self).__init__()

b1=QPushButton("Button1")
b2=QPushButton("Button2")
b3=QPushButton("Button3")
b4=QPushButton("Button4")

mainLayout = QVBoxLayout()
mainLayout.addWidget(b1)
mainLayout.addWidget(b2)
mainLayout.addWidget(b3)
mainLayout.addWidget(b4)

self.setLayout(mainLayout)
self.setWindowTitle("Form Layout - pythonspot.com")

if __name__ == '__main__':
app = QApplication(sys.argv)
dialog = Dialog()
sys.exit(dialog.exec_())

Want more PyQt5 examples? Download PyQT5 Examples Here.

Previous Tutorial | Next Tutorial


Leave a Reply: