Tag: wxwidgets
wxpython button
To create a button simply call wx.Button(). When creating a button with wx.Button() it is important to parse the panel as first argument. We attach it to a panel because attaching to the frame would make it full screen.
A panel gives you to option to position widgets anywhere in the window. The parameter (10,10) is the position on the panel. The id argument is necessary, but it is equal to -1 (wx.ID_ANY == -1). The 3rd parameter is the text on the button.
Related course:
Creating GUI Applications with wxPython
You can use the code below to create a button in wxPython:
#!/usr/bin/python |
The function onButton() is called if the button is pressed. We bind (connect) it with button.Bind(wx.EVT_BUTTON, onButton).
Output:

Image on button
wxPython supports having images on buttons. Only a minor change is needed to display an image on a button. While the function is called wx.BitmapButton, it supports other image formats.
bmp = wx.Bitmap("call-start.png", wx.BITMAP_TYPE_ANY) |
The first line loads the image, the second line creates the button.
Full code:
#!/usr/bin/python |
Output:

Related course:
Creating GUI Applications with wxPython
wxPython window
wxPython is a GUI toolkit for the Python programming language. wxPython can be used to create graphical user interfaces (GUI).
Applications made with wxPython have a native appearance on all platforms. The application will appear as native application unlike QT or Tk which have a custom QT or Tk look. It runs on all major desktop platforms.
Currently supported operating systems are Microsoft Windows (32-bit), most Unix or unix-like systems, and Macintosh OS X.
Related course: Creating GUI Applications with wxPython
The wxPython module is based on the C++ GUI library wxWidgets.
wxPython window
To open a window with wxPython, run the code below:
#!/usr/bin/python |
The line wx.App() creates an application object. Each wx program needs to have one .App() object.
The method wx.Frame() returns a new window which can contain widgets.
app.Mainloop() puts the application in the main loop and listens for events.
Window size and position
You can set the position and size with the SetDimensions() function:
#!/usr/bin/python |
The parameters of the function are: x (left), y (top), width and height. The function not only sets the screen resolution but also the position on the screen.
Center a window
To put the window in the center of the screen call:
frame.Centre() |
Related course: Creating GUI Applications with wxPython
python dialog box input
Input dialogs let your user give you feedback or input. They appear in desktop applications once in a while.
wxPython supports input dialogs, they are included with the framework.
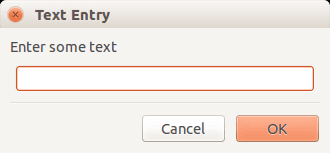
A typical wxPython dialog may look like:

Related course: Creating GUI Applications with wxPython
wxPython input dialog
The example code below creates an input dialog with wxPython:
#!/usr/bin/python |
A wxPython textbox can be added to a window using the function:
|
Where the first argument is the frame, the second argument is the label and the last argument is the window title.
The function below displays the dialog and waits for a user to press one of the buttons:
|
You can get the button pressed by picking one of these:
|
(the result is either one of these)
After input is been given, you can get the input text using dlg.GetValue() function.
Related course: Creating GUI Applications with wxPython
