
Category: pro
Python hosting: Host, run, and code Python in the cloud!
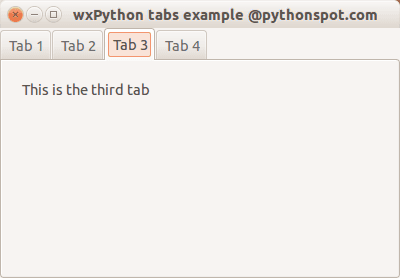
wxPython tabs
While we did not heavily use object orientation for the wxPython series yet for simplicity reasons, we cannot go around it. In this tutorial you will learn how to create a tab interface with wxPython.
The class Mainframe creates the frame as we did in the previous examples. The other classes are the contents of the tabs. We create a panel and notebook (tab holder) in the main frame. Then we create tab objects :
tab1 = TabOne(nb) tab2 = TabTwo(nb) ... |
which we attach to the tab holder using:
nb.AddPage(tab1, "Tab 1") nb.AddPage(tab2, "Tab 2") ... |
Full code:
import wx # Define the tab content as classes: class TabOne(wx.Panel): def __init__(self, parent): wx.Panel.__init__(self, parent) t = wx.StaticText(self, -1, "This is the first tab", (20,20)) class TabTwo(wx.Panel): def __init__(self, parent): wx.Panel.__init__(self, parent) t = wx.StaticText(self, -1, "This is the second tab", (20,20)) class TabThree(wx.Panel): def __init__(self, parent): wx.Panel.__init__(self, parent) t = wx.StaticText(self, -1, "This is the third tab", (20,20)) class TabFour(wx.Panel): def __init__(self, parent): wx.Panel.__init__(self, parent) t = wx.StaticText(self, -1, "This is the last tab", (20,20)) class MainFrame(wx.Frame): def __init__(self): wx.Frame.__init__(self, None, title="wxPython tabs example @pythonspot.com") # Create a panel and notebook (tabs holder) p = wx.Panel(self) nb = wx.Notebook(p) # Create the tab windows tab1 = TabOne(nb) tab2 = TabTwo(nb) tab3 = TabThree(nb) tab4 = TabFour(nb) # Add the windows to tabs and name them. nb.AddPage(tab1, "Tab 1") nb.AddPage(tab2, "Tab 2") nb.AddPage(tab3, "Tab 3") nb.AddPage(tab4, "Tab 4") # Set noteboook in a sizer to create the layout sizer = wx.BoxSizer() sizer.Add(nb, 1, wx.EXPAND) p.SetSizer(sizer) if __name__ == "__main__": app = wx.App() MainFrame().Show() app.MainLoop() |
Output:
wxPython GUI tutorial
The official wxPython site has several screenshots and downloads for these platforms. wxPython is based on wxWidgets.
Install wxPython
First download and install WxPython, the Python bindings for wxWidgets.
sudo apt-get install python-wxgtk2.8 python-wxtools wx2.8-doc wx2.8-examples wx2.8-headers wx2.8-i18n |
Then install a GUI creator called wxglade:
sudo apt-get install wxglade |
Using a GUI builder such as wxGlade will save you a lot of time, regardless of the GUI library you use. You can easily make complex graphical interfaces because you can simply drag and drop.
Creating our first GUI with Python and wxWidgets:
Start wxglade. You will see its user interface:
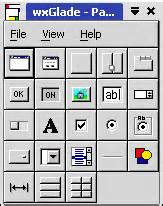
Press on tiny window on the top left, below the file icon.

Press OK. An empty window will now appear. Press on the tiny [OK] button in the wxGlade panel and press on the frame. The button will now appear. Press on Application in the tree window.
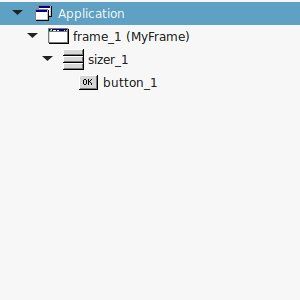
Set the output file in the wxproperties window.
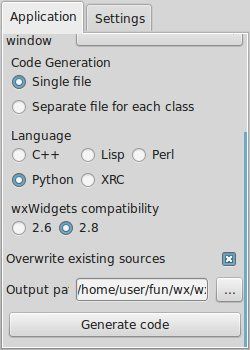
If you look at the window note you can select multiple programming languages and two versions of wxWidgets. Select Python and wxWidgets 2.8. Finally press Generate code. (Do NOT name the file wx.py because the import needs wx, save it as window.py or something else).
Running wxglade code:
Run:
python window.py |
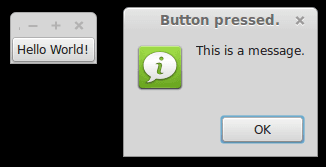
And a window with a button will appear. Pressing the button will not do anything. To start a function when pressing the button, we need to define a so called Callback. This can be as simple as:
def OnButton(self, Event, button_label): print "In OnButton:", button_label |
Finally we bind the button to the callback function using:
self.button_1.Bind(wx.EVT_BUTTON, self.OnButton ) |
Pressing the button will now write a message to the command line. Instead of the boring command line message, we want to show a message box. This can be done using this command:
wx.MessageBox( "This is a message.", "Button pressed."); |
wxPython example code
The full code below:
#!/usr/bin/env python # -*- coding: UTF-8 -*- # # generated by wxGlade 0.6.8 on Fri Jan 23 22:59:56 2015 # import wx # begin wxGlade: dependencies import gettext # end wxGlade # begin wxGlade: extracode # end wxGlade class MyFrame(wx.Frame): def __init__(self, *args, **kwds): # begin wxGlade: MyFrame.__init__ kwds["style"] = wx.DEFAULT_FRAME_STYLE wx.Frame.__init__(self, *args, **kwds) self.button_1 = wx.Button(self, wx.ID_ANY, _("Hello World!")) self.button_1.Bind(wx.EVT_BUTTON, self.OnButton ) self.__set_properties() self.__do_layout() # end wxGlade def __set_properties(self): # begin wxGlade: MyFrame.__set_properties self.SetTitle(_("wxWidgets button example. pythonspot.com ")) # end wxGlade def __do_layout(self): # begin wxGlade: MyFrame.__do_layout sizer_1 = wx.BoxSizer(wx.VERTICAL) sizer_1.Add(self.button_1, 0, 0, 0) self.SetSizer(sizer_1) sizer_1.Fit(self) self.Layout() # end wxGlade def OnButton(event, button_label): wx.MessageBox( "This is a message.", "Button pressed."); # end of class MyFrame if __name__ == "__main__": gettext.install("app") # replace with the appropriate catalog name app = wx.PySimpleApp(0) wx.InitAllImageHandlers() frame_1 = MyFrame(None, wx.ID_ANY, "") app.SetTopWindow(frame_1) frame_1.Show() app.MainLoop() |