
Category: pro
Python hosting: Host, run, and code Python in the cloud!
tutorials
Fun tricks with Python
You may like:
Game programming with Python
Starting a simple HTTP web server
A simple HTTP Server can be started in seconds.
python -m SimpleHTTPServer |
For Python3:
python -m http.server |
Once started you can open http://127.0.0.1:8000/. The browser will show you the contents of the directory.
A funny text
Try the statement below to display a poem by Tim Peters.
import this |
XKCD web comic
You can open a comic on XKCD using:
import antigravity |
Using Zip to combine arrays
You can zip the two arrays with:
b = [[1, 2, 3, 4], [6, 5, 4, 3]] zip(*b) [(1, 6), (2, 5), (3, 4), (4, 3)] |
Reverse a list
To reverse a list, you could implement a function. But why go through the trouble if it’s already implemented?
b = [1,2,3,4,5] b.reverse() print b [5, 4, 3, 2, 1] |
Reverse a string
Instead of creating a method to reverse a string you can use:
s = "Hello world" s = s[::-1] print s dlrow olleH |
Swapping variables
You do not need to define a temporary variable to swap to variables in Python:
a = 1 b = 3 b,a = a,b print a print b 1 |
If you know of any tips or tricks, leave a comment. 🙂
An Introduction to Building Quantum Computing Applications with Python
So we want to make a quantum application with Python, but since we do not own any quantum computer we need to have a simulator first. Simulation will not have the same performance as an actual quantum computer but we will be able to run applications. We have a choice from three simulators: PyQu , QuTip and Qitensor. We decided to pick QuTip as it has a very large code base and as it has the most recent changes. PyQu hasn’t been updated since 2010 and Qitensor since a year or so.
Related course:
Quantum Physics: an overview of a weird world
Installing
We use a Unix machine in this tutorial, but you should be fine with any other operating system. Install using:
sudo add-apt-repository ppa:jrjohansson/qutip-releases
sudo apt-get update
sudo apt-get install python-qutip
We then start Python from the command line and type the commands listed below ( >>> ).
$ python Python 2.7.6 (default, Mar 22 2014, 22:59:38) [GCC 4.8.2] on linux2 Type "help", "copyright", "credits" or "license" for more information. >>> from qutip import * >>> about() QuTiP: Quantum Toolbox in Python Copyright (c) 2011 and later. Paul D. Nation & Robert J. Johansson QuTiP Version: 3.1.0 Numpy Version: 1.8.2 Scipy Version: 0.13.3 Cython Version: 0.20.1post0 Matplotlib Version: 1.3.1 Fortran mcsolver: True scikits.umfpack: False Python Version: 2.7.6 Platform Info: Linux (i686) Installation path: /usr/lib/python2.7/dist-packages/qutip |
This indicates that Qutip has been correctly installed.
The Quantum data structure
In quantum systems we need a data structure that is capable of encapsulating the properties of a quantum operator and ket/bra vectors, we use the Qobj data structure for that. In other words, to effectively simulate a quantum application we need to use the appropriate data structure. Consider the example below:
#!/usr/bin/env python from qutip import * from scipy import * r = rand(4, 4) print Qobj(r) |
And execute with:
python quantum.py |
This will output the quantum object:
Quantum object: dims = [[4], [4]], shape = [4, 4], type = oper, isherm = False Qobj data = [[ 0.25529374 0.75548592 0.85680266 0.1438253 [ 0.75070138 0.68628867 0.97435624 0.77396516] [ 0.69819458 0.81714756 0.2604015 0.69051901] [ 0.0898242 0.05292657 0.49134431 0.4433644 ]] |
If you want to specify user input yourself you could use:
#!/usr/bin/env python from qutip import * from scipy import * x = array([[1],[2],[3],[4],[5]]) q = Qobj(x) print q |
This quantum object will simply hold your user given data:
Quantum object: dims = [[5], [1]], shape = [5, 1], type = ket Qobj data = [[ 1.] [ 2.] [ 3.] [ 4.] [ 5.]] |
Quantum states and operators
A quantum system is not a simple two-level system, it has multiple states. QuTip includes some predefined states and quantum operators which are listed here.
Qubits and operators
We create a Qubit to hold data. Th Qubit is the quantum analogue of the classical bit. Unlike traditional bits, the qubit can be in a superposition of both states at the same time, a property which is fundamental to quantum computing. The code below will create a qubit:
#!/usr/bin/env python from qutip import * from scipy import * spin = basis(2, 0) print spin |
You can now apply quantum system operators on the qubit:
#!/usr/bin/env python from qutip import * from scipy import * spin = basis(2, 0) print sigmam() * spin print sigmap() * spin |
Combining qubits
To describe the states of two coupled qubits we need to take the tensor product of the state vectors for each of the system components. Let us try that:
#!/usr/bin/env python from qutip import * from scipy import * q1 = basis(2, 0) q2 = basis(2,0) print q1 print q2 print tensor(q1,q2) |
The output we will get is:
Quantum object: dims = [[2], [1]], shape = [2, 1], type = ket Qobj data = [[ 1.] [ 0.]] Quantum object: dims = [[2], [1]], shape = [2, 1], type = ket Qobj data = [[ 1.] [ 0.]] Quantum object: dims = [[2, 2], [1, 1]], shape = [4, 1], type = ket Qobj data = [[ 1.] [ 0.] [ 0.] [ 0.]] |
Whats next?
We have built some very simply quantum applications using this simple introduction. Perhaps you want to create an actually useful application, if so you could study more about quantum computing and complete the tutorial at http://qutip.org/docs/2.2.0/index.html
Building an IRC (ro)bot
There are tons of (ro)bots out there for IRC (Internet Relay Chat). So how do you start and build one in Python, just for fun?
You will need a program that connects with an IRC server and acts like a traditional IRC client. IRC servers never ask for any type of complicated human verification such as solving captchas, which is why we can simply connect with a script. The script itself will use network sockets, a library that is often used to provide network interactions in many programming languages including Python and C/C++.
Related course
Mastering Python – Networking and Security
IRC and Python
To communicate with an IRC server, you need to use the IRC protocol. The IRC protocol has distinct messages such as PRIVMSG, USER, NICK and JOIN. If you are curious, you could read the entire protocol. But following this tutorial may be a lot simpler 😉 Authentication is achieved using only a few steps:
The IRC protocol is a layer on top of the IP protocol. To create a socket we use the command:
irc = socket.socket(socket.AF_INET, socket.SOCK_STREAM) |
socket.AF_INET tells the library to use the network protocol IPv4. The second argument tells the library to use stream sockets, which are traditionally implemented on the TCP protocol. (IRC works over TCP/IP). We then must use the commands to authenticate with the server:
USER botname botname botname: phrase
NICK botname
JOIN #channel |
Sometimes the IDENT command is neccesary too. Summing up, we get this class (save it as irc.py):
import socket import sys class IRC: irc = socket.socket() def __init__(self): self.irc = socket.socket(socket.AF_INET, socket.SOCK_STREAM) def send(self, chan, msg): self.irc.send("PRIVMSG " + chan + " " + msg + "n") def connect(self, server, channel, botnick): #defines the socket print "connecting to:"+server self.irc.connect((server, 6667)) #connects to the server self.irc.send("USER " + botnick + " " + botnick +" " + botnick + " :This is a fun bot!n") #user authentication self.irc.send("NICK " + botnick + "n") self.irc.send("JOIN " + channel + "n") #join the chan def get_text(self): text=self.irc.recv(2040) #receive the text if text.find('PING') != -1: self.irc.send('PONG ' + text.split() [1] + 'rn') return text |
Now that we have the network connectivity class, we can use it as an instance. We will keep our (ro)bot simple for explanatory purposes. The bot will reply “Hello!” if it gets the message “hello” in the channel it resides.
from irc import * import os import random channel = "#testit" server = "irc.freenode.net" nickname = "reddity" irc = IRC() irc.connect(server, channel, nickname) while 1: text = irc.get_text() print text if "PRIVMSG" in text and channel in text and "hello" in text: irc.send(channel, "Hello!") |
Save it as bot.py and run with python bot.py. Connect with a traditional irc client (mirc,hexchat,irsii) to the the channel and observe the experiment has worked! You can now extend it with any cool features you can imagine.
Creating a gmail wordcloud
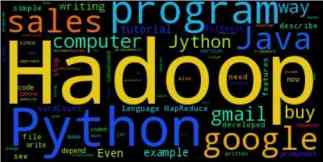
We have created a python program that generates a wordcloud based on your gmail account. The output may look something like this depending on the contents of your emails.
First you will need a small script that interacts with the gmail service. We have created a small script that interact with gmail. It relies on gmaillib installed and you will need to set: allow “less-secure” applications to access gmail server: https://www.google.com/settings/security/lesssecureapps
Gmail example:
#!/usr/bin/env python import gmaillib from collections import Counter def getMails(cnt,account, start,amount): emails = account.inbox(start, amount) for email in emails: cnt[email.sender_addr] += 1 amountOfMails = 100 cnt = Counter() username = raw_input("Gmail account: ") password = raw_input("Password: ") account = gmaillib.account(username, password) getMails(cnt,account,0,amountOfMails) print cnt |
If this script runs successfully you have almost all requirements installed. You will also need the library called wordcloud. We rebuild the system such that we get one long string containing the message bodies, which we feed as input to the wordcloud instance. The variable amount contains the number of mails to fetch. We have set it to 100 but you could set it to all messages using get_inbox_count() or you could simply fetch all emails of the last week.
Final program:
#!/usr/bin/env python import gmaillib from collections import Counter from wordcloud import WordCloud import matplotlib.pyplot as plt amount = 100 cnt = Counter() username = raw_input("Gmail account: ") password = raw_input("Password: ") account = gmaillib.account(username, password) emails = account.inbox(0, amount) data = "" for email in emails: data = data + str(email.body) wordcloud = WordCloud().generate(data) plt.imshow(wordcloud) plt.axis("off") plt.show() |
Requests: HTTP for Humans
If you want to request data from webservers, the traditional way to do that in Python is using the urllib library. While this library is effective, you could easily create more complexity than needed when building something. Is there another way?
Requests is an Apache2 Licensed HTTP library, written in Python. It’s powered by httplib and urllib3, but it does all the hard work for you.
To install type:
git clone https://github.com/kennethreitz/requests.git cd requests sudo python setup.py install |
The Requests library is now installed. We will list some examples below:
Related course
Python BeautifulSoup: Extract Web Data Beautifully
Grabbing raw html using HTTP/HTTPS requests
We can now query a website as :
import requests r = requests.get('http://pythonspot.com/') print r.content |
Save it and run with:
python website.py
It will output the raw HTML code.
Download binary image using Python
from PIL import Image from StringIO import StringIO import requests r = requests.get('http://1.bp.blogspot.com/_r-MQun1PKUg/SlnHnaLcw6I/AAAAAAAAA_U$ i = Image.open(StringIO(r.content)) i.show() |
An image retrieved using python
Website status code (is the website online?)
import requests r = requests.get('http://pythonspot.com/') print r.status_code |
This returns 200 (OK). A list of status codes can be found here: https://en.wikipedia.org/wiki/List_of_HTTP_status_codes
Retrieve JSON from a webserver
You can easily grab a JSON object from a webserver.
import requests import requests r = requests.get('https://api.github.com/events') print r.json() |
HTTP Post requests using Python
from StringIO import StringIO import requests payload = {'key1': 'value1', 'key2': 'value2'} r = requests.post("http://httpbin.org/post", data=payload) print(r.text) |
SSL verification, verify certificates using Python
from StringIO import StringIO import requests print requests.get('https://github.com', verify=True) |
Extract data from the HTTP response header
With every request you send to a HTTP server, the server will send you some additional data. You can get extract data from an HTTP response using:
#!/usr/bin/env python import requests r = requests.get('http://pythonspot.com/') print r.headers |
This will return the data in JSON format. We can parse the data encoded in JSON format to a Python dict.
#!/usr/bin/env python import requests import json r = requests.get('http://pythonspot.com/') jsondata = str(r.headers).replace('\'','"') headerObj = json.loads(jsondata) print headerObj['server'] print headerObj['content-length'] print headerObj['content-encoding'] print headerObj['content-type'] print headerObj['date'] print headerObj['x-powered-by'] |
Extract data from HTML response
Once you get the data from a server, you can parse it using python string functions or use a library. BeautifulSoup is often used. An example code that gets the page title and links:
from bs4 import BeautifulSoup import requests # get html data r = requests.get('http://stackoverflow.com/') html_doc = r.content # create a beautifulsoup object soup = BeautifulSoup(html_doc) # get title print soup.title # print all links for link in soup.find_all('a'): print(link.get('href')) |