Category: pro
Python hosting: Host, run, and code Python in the cloud!
Flask web forms
In this tutorial you will learn how to do form validation with Flask. Forms play an important role in all web applications.
We use WTForms, a module for validation of forms. We will start with a simple form containing one field asking for a name.
Related course:
Python Flask: Make Web Apps with Python
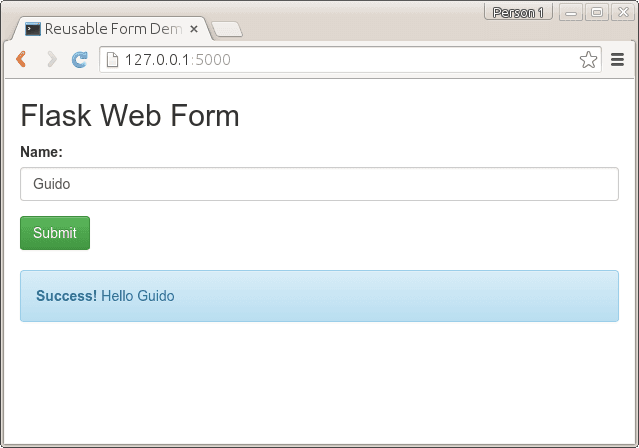
from flask import Flask, render_template, flash, request from wtforms import Form, TextField, TextAreaField, validators, StringField, SubmitField # App config. DEBUG = True app = Flask(__name__) app.config.from_object(__name__) app.config['SECRET_KEY'] = '7d441f27d441f27567d441f2b6176a' class ReusableForm(Form): name = TextField('Name:', validators=[validators.required()]) @app.route("/", methods=['GET', 'POST']) def hello(): form = ReusableForm(request.form) print form.errors if request.method == 'POST': name=request.form['name'] print name if form.validate(): # Save the comment here. flash('Hello ' + name) else: flash('All the form fields are required. ') return render_template('hello.html', form=form) if __name__ == "__main__": app.run() |
We then create the template hello.html in the /templates/ directory:
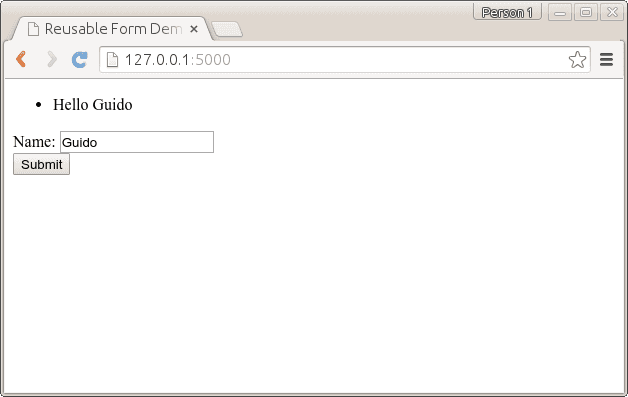
<title>Reusable Form Demo</title> {% with messages = get_flashed_messages(with_categories=true) %} {% if messages %} <ul> {% for message in messages %} <li>{{ message[1] }}</li> {% endfor %}</ul> {% endif %} {% endwith %} <form action="" method="post"> {{ form.csrf }} <div class="input text"> {{ form.name.label }} {{ form.name }}</div> <div class="input submit"> <input type="submit" value="Submit"></div> </form> |
Start the application and open it in your webbrowser at http://127.0.0.1:5000.
python miniapp.py * Running on http://127.0.0.1:5000/ * Restarting with reloader |
If you will submit an empty form, you will get an error. But if you enter your name, it will greet you. Form validation is handled by the wtforms module, but because we gave the argument
name = TextField('Name:', validators=[validators.required()]) |
the field cannot be empty. Other parameters can be given here.
css with Flask
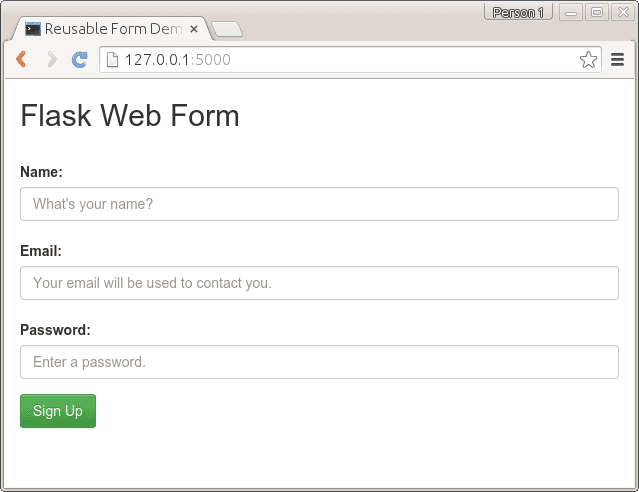
We use bootstrap to style the form.Bootstrap is a popular HTML, CSS, and JS framework for developing responsive, mobile first projects on the web. It makes front-end web development faster and easier. The output will be:
You can get the bootstrap files from http://getbootstrap.com/getting-started/#download and extract them in a new directory /static/. The code remains almost the same, but the template is changed. Code:
from flask import Flask, render_template, flash, request from wtforms import Form, TextField, TextAreaField, validators, StringField, SubmitField # App config. DEBUG = True app = Flask(__name__) app.config.from_object(__name__) app.config['SECRET_KEY'] = '7d441f27d441f27567d441f2b6176a' class ReusableForm(Form): name = TextField('Name:', validators=[validators.required()]) @app.route("/", methods=['GET', 'POST']) def hello(): form = ReusableForm(request.form) print form.errors if request.method == 'POST': name=request.form['name'] print name if form.validate(): # Save the comment here. flash('Hello ' + name) else: flash('Error: All the form fields are required. ') return render_template('hello.html', form=form) if __name__ == "__main__": app.run() |
We added bootstrap to the template hello.html:
<title>Reusable Form Demo</title> <link rel="stylesheet" media="screen" href="static/bootstrap.min.css"> <link rel="stylesheet" href="static/bootstrap-theme.min.css"> <meta name="viewport" content="width=device-width, initial-scale=1.0"> <div class="container"> <h2>Flask Web Form</h2> <form action="" method="post" role="form"> {{ form.csrf }} <div class="form-group"> <label for="name">Name:</label> <input type="text" class="form-control" id="name" name="name" placeholder="What's your name?"></div> <button type="submit" class="btn btn-success">Submit</button> </form>{% with messages = get_flashed_messages(with_categories=true) %} {% if messages %} {% for message in messages %} {% if "Error" not in message[1]: %} <div class="alert alert-info"> <strong>Success! </strong> {{ message[1] }}</div> {% endif %} {% if "Error" in message[1]: %} <div class="alert alert-warning"> {{ message[1] }}</div> {% endif %} {% endfor %} {% endif %} {% endwith %} </div> |
Flask registration form
We use the same principle to create a registration form asking for name, email and password. We update the Form class:
class ReusableForm(Form): name = TextField('Name:', validators=[validators.required()]) email = TextField('Email:', validators=[validators.required(), validators.Length(min=6, max=35)]) password = TextField('Password:', validators=[validators.required(), validators.Length(min=3, max=35)]) def reset(self): blankData = MultiDict([ ('csrf', self.reset_csrf() ) ]) self.process(blankData) |
And we can get the variables passed using:
name=request.form['name'] password=request.form['password'] email=request.form['email'] |
Full code:
from flask import Flask, render_template, flash, request from wtforms import Form, TextField, TextAreaField, validators, StringField, SubmitField # App config. DEBUG = True app = Flask(__name__) app.config.from_object(__name__) app.config['SECRET_KEY'] = '7d441f27d441f27567d441f2b6176a' class ReusableForm(Form): name = TextField('Name:', validators=[validators.required()]) email = TextField('Email:', validators=[validators.required(), validators.Length(min=6, max=35)]) password = TextField('Password:', validators=[validators.required(), validators.Length(min=3, max=35)]) @app.route("/", methods=['GET', 'POST']) def hello(): form = ReusableForm(request.form) print form.errors if request.method == 'POST': name=request.form['name'] password=request.form['password'] email=request.form['email'] print name, " ", email, " ", password if form.validate(): # Save the comment here. flash('Thanks for registration ' + name) else: flash('Error: All the form fields are required. ') return render_template('hello.html', form=form) if __name__ == "__main__": app.run() |
Update the template hello.html with this code:
<title>Reusable Form Demo</title> <link rel="stylesheet" media="screen" href="static/bootstrap.min.css"> <link rel="stylesheet" href="static/bootstrap-theme.min.css"> <meta name="viewport" content="width=device-width, initial-scale=1.0"> <div class="container"> <h2>Flask Web Form</h2> <form action="" method="post" role="form"> {{ form.csrf }} <div class="form-group"> <label for="name">Name:</label> <input type="text" class="form-control" id="name" name="name" placeholder="What's your name?"> <label for="email">Email:</label> <input type="text" class="form-control" id="email" name="email" placeholder="Your email will be used to contact you."> <label for="password">Password:</label> <input type="password" class="form-control" id="password" name="password" placeholder="Enter a password."> </div> <button type="submit" class="btn btn-success">Sign Up</button> </form>{% with messages = get_flashed_messages(with_categories=true) %} {% if messages %} {% for message in messages %} {% if "Error" not in message[1]: %} <div class="alert alert-info"> <strong>Success! </strong> {{ message[1] }}</div> {% endif %} {% if "Error" in message[1]: %} <div class="alert alert-warning"> {{ message[1] }}</div> {% endif %} {% endfor %} {% endif %} {% endwith %} </div> |
Output:
WTForms can validate email, password, numbers and many more. For a list of validators see: http://wtforms.readthedocs.org/latest/validators.html
Login to Flask App with Twitter
In this tutorial you will learn how to use Twitter for login authentication in a Flask app. Instead of using a custom user login system, you could useTwitter to authenticate with your website. Your visitors may already have an account on Twitter, so why not use it to login?
To do so, we use a protocol called OAuth. From wikipedia:
OAuth is a protocol that utilizes tokens in order to access resources on behalf of a resource owner. Think giving a user the ability to give out a valet key to certain portions of your site. Many sites, such as Google, Facebook, and Twitter use OAuth for authenticating third party clients in order to access certain user resources.
Don’t worry if that sounds vague, we’ll take you through the steps.
Related course
Python Flask: Make Web Apps with Python
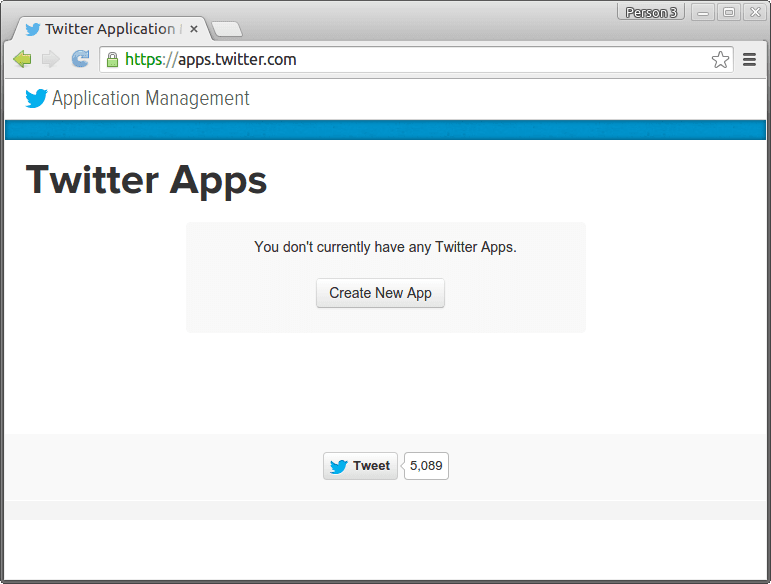
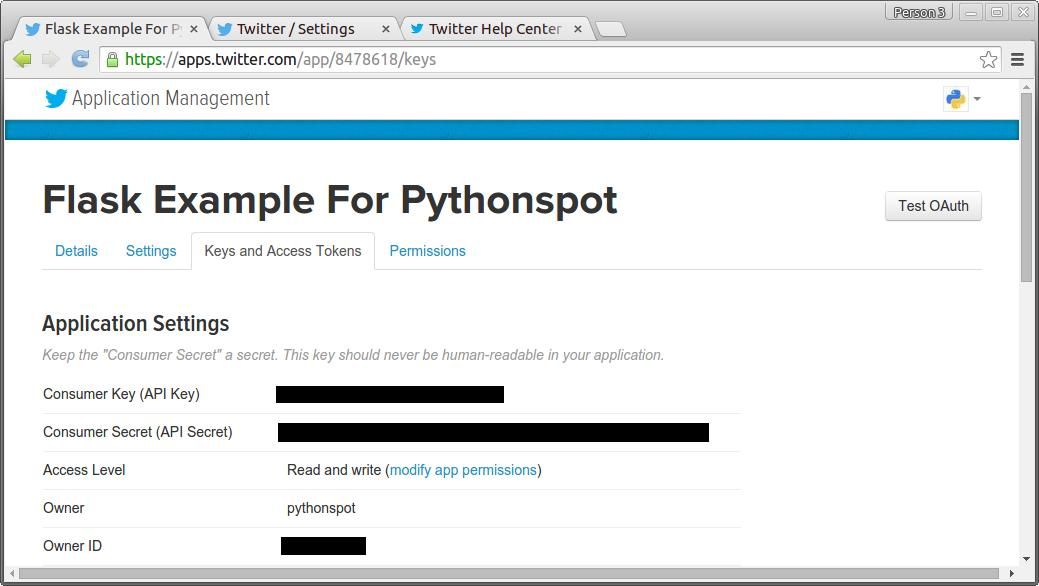
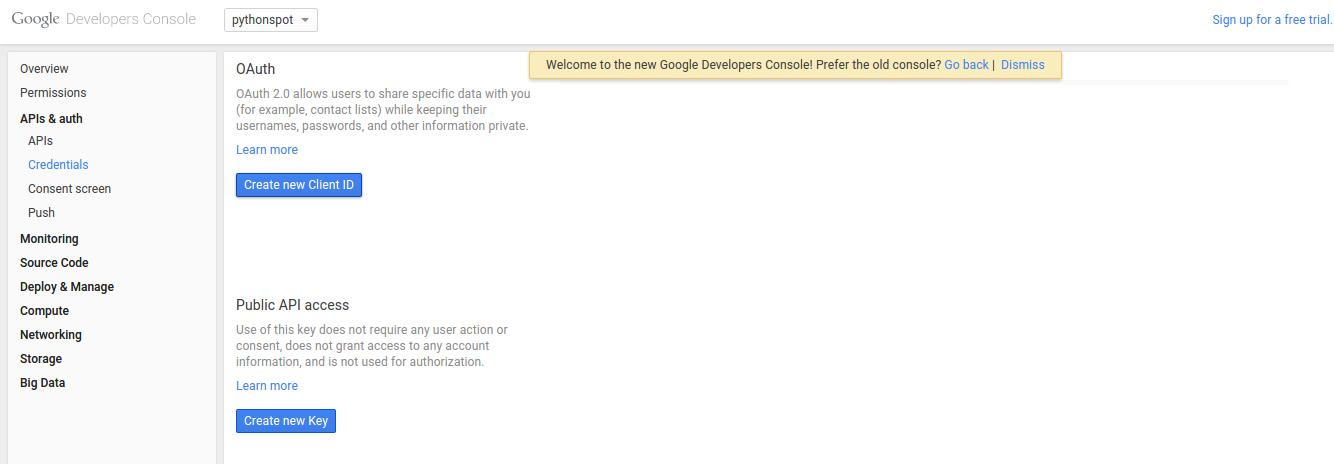
Go to https://apps.twitter.com/ and create a new app.
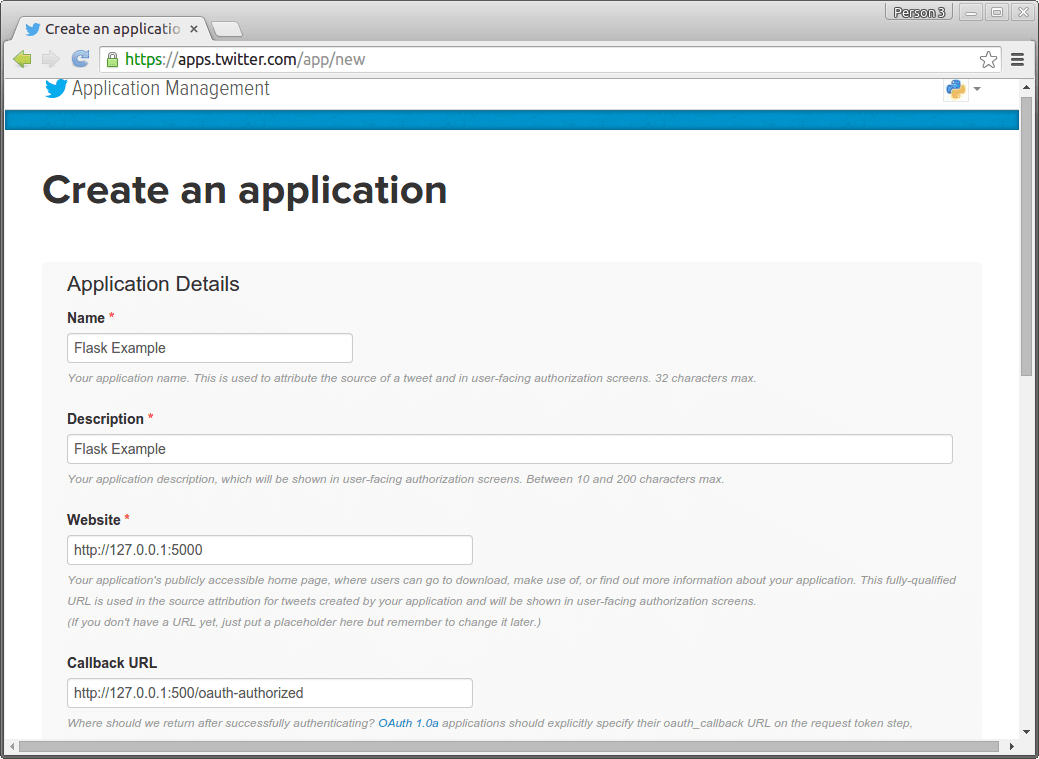
Specify your app details:
You will then see this screen:
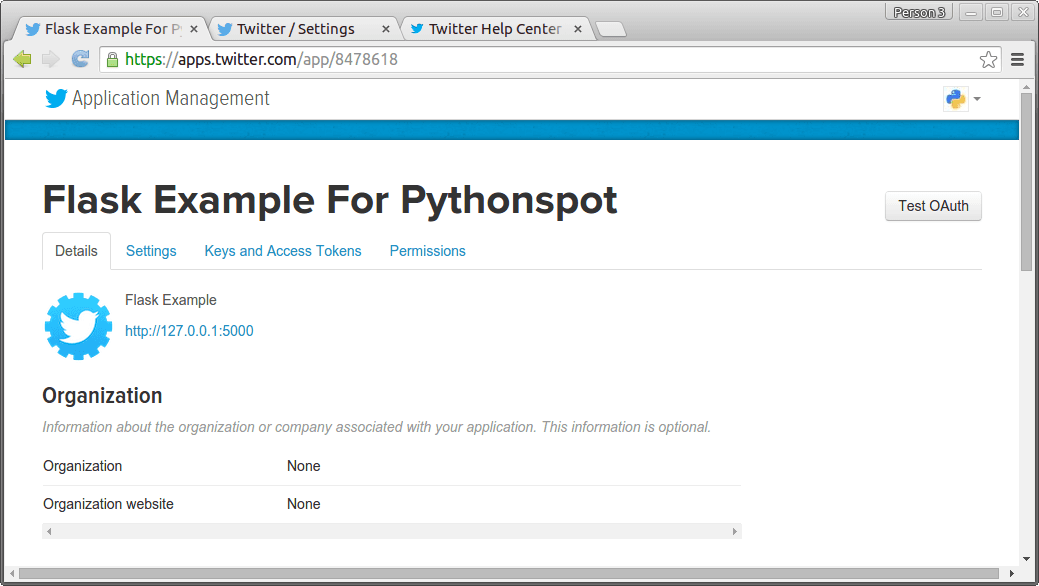
Press Keys and Access Tokens. Finally you will see your consumer_key and consumer_secret which you will need for your app.
The code
Create the file app.py and set your consumer_key and consumer_secret that you got from twitter.
from flask import Flask, request, redirect, url_for, session, g, flash, \ render_template from flask_oauth import OAuth from sqlalchemy import create_engine, Column, Integer, String from sqlalchemy.orm import scoped_session, sessionmaker from sqlalchemy.ext.declarative import declarative_base # configuration SECRET_KEY = 'development key' DEBUG = True # setup flask app = Flask(__name__) app.debug = DEBUG app.secret_key = SECRET_KEY oauth = OAuth() # Use Twitter as example remote application twitter = oauth.remote_app('twitter', # unless absolute urls are used to make requests, this will be added # before all URLs. This is also true for request_token_url and others. base_url='https://api.twitter.com/1/', # where flask should look for new request tokens request_token_url='https://api.twitter.com/oauth/request_token', # where flask should exchange the token with the remote application access_token_url='https://api.twitter.com/oauth/access_token', # twitter knows two authorizatiom URLs. /authorize and /authenticate. # they mostly work the same, but for sign on /authenticate is # expected because this will give the user a slightly different # user interface on the twitter side. authorize_url='https://api.twitter.com/oauth/authenticate', # the consumer keys from the twitter application registry. consumer_key='ADD TWITTER CONSUMER KEY', consumer_secret='ADD TWITTER CONSUMER SECRET' ) @twitter.tokengetter def get_twitter_token(token=None): return session.get('twitter_token') @app.route('/') def index(): access_token = session.get('access_token') if access_token is None: return redirect(url_for('login')) access_token = access_token[0] return render_template('index.html') @app.route('/login') def login(): return twitter.authorize(callback=url_for('oauth_authorized', next=request.args.get('next') or request.referrer or None)) @app.route('/logout') def logout(): session.pop('screen_name', None) flash('You were signed out') return redirect(request.referrer or url_for('index')) @app.route('/oauth-authorized') @twitter.authorized_handler def oauth_authorized(resp): next_url = request.args.get('next') or url_for('index') if resp is None: flash(u'You denied the request to sign in.') return redirect(next_url) access_token = resp['oauth_token'] session['access_token'] = access_token session['screen_name'] = resp['screen_name'] session['twitter_token'] = ( resp['oauth_token'], resp['oauth_token_secret'] ) return redirect(url_for('index')) if __name__ == '__main__': app.run() |
Create the directory /templates/ with the file index.html
{% block body %} <h2>Flask Login App</h2> {% if session['screen_name'] %} Hello {{ session['screen_name'] }}! {% else %} Sign in with twitter. <a href="{{ url_for('login') }}"><img src="{{ url_for('static', filename='sign-in.png') }}" alt="sign in"></a> {% endif %} {% endblock %} |
Finally create the directory /static/ with the image sign-in.png:
![]()
Start your app with:
python app.py |
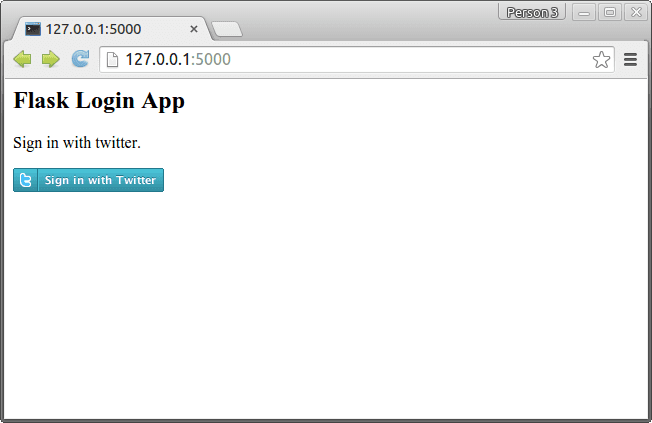
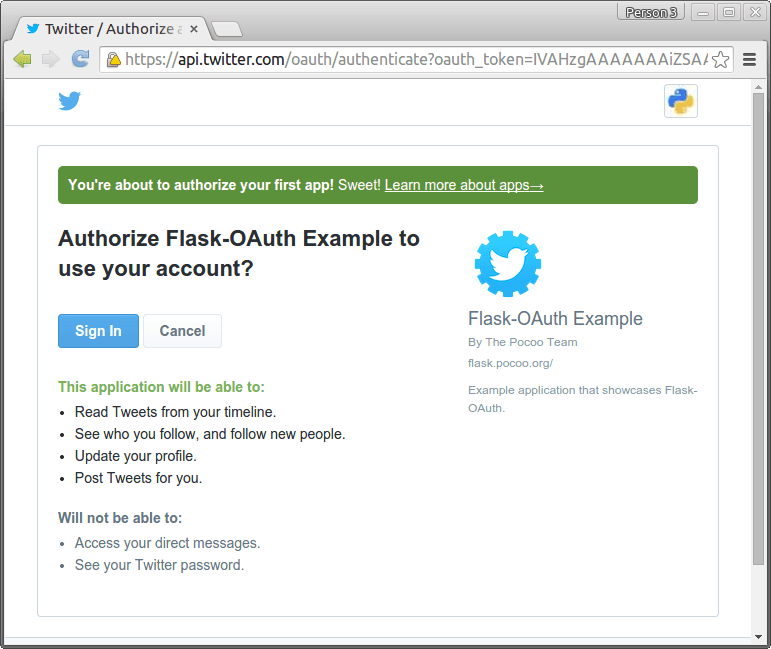
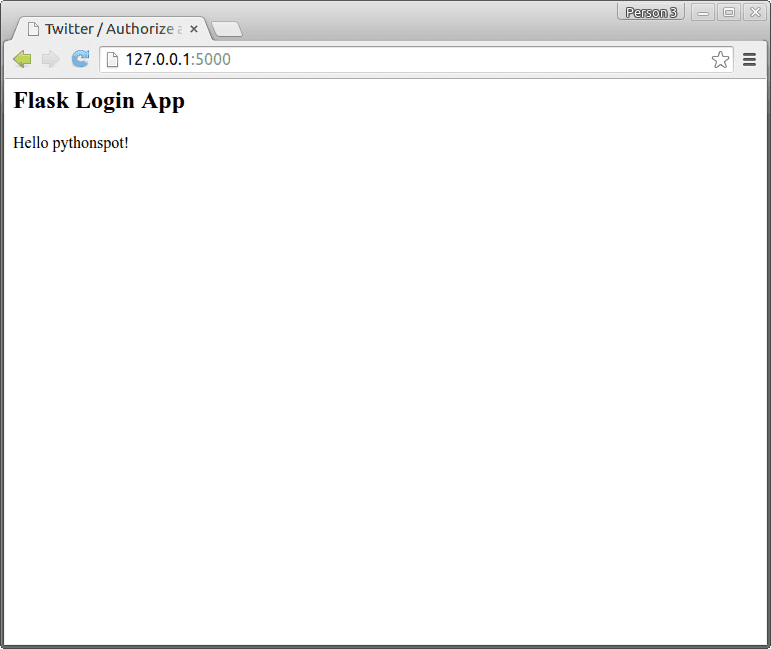
Open the app in your web-browser. Then your users can simply follow the steps to login:
Login to your Flask app with Google
In this article you will learn how to use Google for login authentication in a Flask app. Instead of using a custom user login system, you could use Google to authenticate with your website. Your visitors may already have an account on Google, so why not use it to login?
To do so, we use a protocol called OAuth. From wikipedia:
OAuth is a protocol that utilizes tokens in order to access resources on behalf of a resource owner. Think giving a user the ability to give out a valet key to certain portions of your site. Many sites, such as Google, Facebook, and Twitter use OAuth for authenticating third party clients in order to access certain user resources.
Don’t worry if that sounds vague, we’ll take you through the steps.
Related course
Python Flask: Make Web Apps with Python
You will see this screen popup:
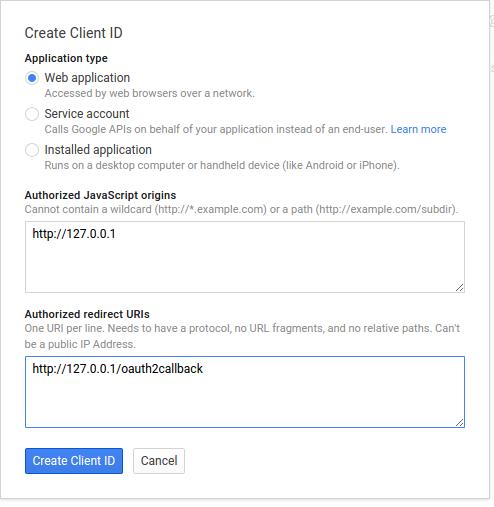
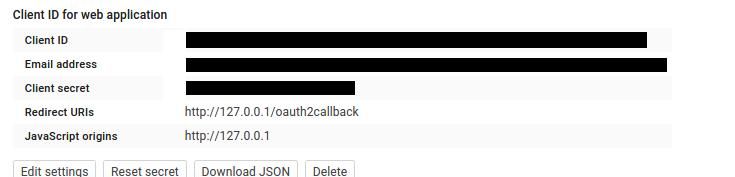
Type your information and press “Create Client ID”. You then have a Client ID and Client secret which you will need.
Login authentication with Google
We use a module called flask_oauth to authenticate with Google. It is maintained by Armin Ronacher, the creator of Flask, so you can be sure the module does not die. The module uses OAuth, a protocol that gives tokens in order to access resources. Other modules may not have as good support.
Copy the code below and set the client id and client secret that you got from Google above. Just replace the lines:
GOOGLE_CLIENT_ID = 'PUT CLIENT ID' GOOGLE_CLIENT_SECRET = 'PUT CLIENT SECRET' |
Save the program as app.py
from flask import Flask, redirect, url_for, session from flask_oauth import OAuth # You must configure these 3 values from Google APIs console # https://code.google.com/apis/console GOOGLE_CLIENT_ID = 'PUT CLIENT ID' GOOGLE_CLIENT_SECRET = 'PUT CLIENT SECRET' REDIRECT_URI = '/oauth2callback' # one of the Redirect URIs from Google APIs console SECRET_KEY = 'development key' DEBUG = True app = Flask(__name__) app.debug = DEBUG app.secret_key = SECRET_KEY oauth = OAuth() google = oauth.remote_app('google', base_url='https://www.google.com/accounts/', authorize_url='https://accounts.google.com/o/oauth2/auth', request_token_url=None, request_token_params={'scope': 'https://www.googleapis.com/auth/userinfo.email', 'response_type': 'code'}, access_token_url='https://accounts.google.com/o/oauth2/token', access_token_method='POST', access_token_params={'grant_type': 'authorization_code'}, consumer_key=GOOGLE_CLIENT_ID, consumer_secret=GOOGLE_CLIENT_SECRET) @app.route('/') def index(): access_token = session.get('access_token') if access_token is None: return redirect(url_for('login')) access_token = access_token[0] from urllib2 import Request, urlopen, URLError headers = {'Authorization': 'OAuth '+access_token} req = Request('https://www.googleapis.com/oauth2/v1/userinfo', None, headers) try: res = urlopen(req) except URLError, e: if e.code == 401: # Unauthorized - bad token session.pop('access_token', None) return redirect(url_for('login')) return res.read() return res.read() @app.route('/login') def login(): callback=url_for('authorized', _external=True) return google.authorize(callback=callback) @app.route(REDIRECT_URI) @google.authorized_handler def authorized(resp): access_token = resp['access_token'] session['access_token'] = access_token, '' return redirect(url_for('index')) @google.tokengetter def get_access_token(): return session.get('access_token') def main(): app.run() if __name__ == '__main__': main() |
Execute using:
python app.py * Running on http://127.0.0.1:5000/ * Restarting with reloader |
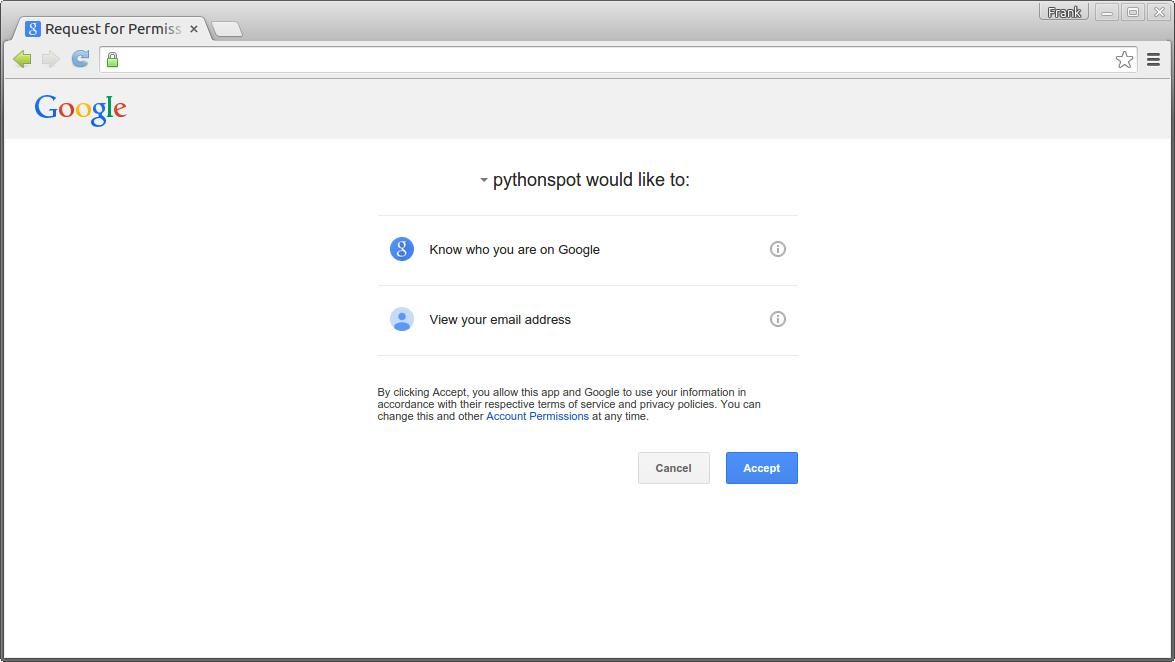
You can then open the link to see the login screen. The app will simply return your account information encoded in JSON format once you accept.
Finally, you can validate if the access token is set on new routes.
Download Flask Examples
JSON encoding and decoding with Python
Introduction
JSON (JavaScript Object Notation) is frequently used between a server and a web application. An example of JSON data:
{ "persons": [ { "city": "Seattle", "name": "Brian" }, { "city": "Amsterdam", "name": "David" } ] } |
The json module enables you to convert between JSON and Python Objects.
JSON conversion examples
Convert JSON to Python Object (Dict)
To convert JSON to a Python dict use this:
import json json_data = '{"name": "Brian", "city": "Seattle"}' python_obj = json.loads(json_data) print python_obj["name"] print python_obj["city"] |
Convert JSON to Python Object (List)
JSON data can be directly mapped to a Python list.
import json array = '{"drinks": ["coffee", "tea", "water"]}' data = json.loads(array) for element in data['drinks']: print element |
Convert JSON to Python Object (float)
Floating points can be mapped using the decimal library.
import json from decimal import Decimal jsondata = '{"number": 1.573937639}' x = json.loads(jsondata, parse_float=Decimal) print x['number'] |
Convert JSON to Python Object (Example)
JSON data often holds multiple objects, an example of how to use that below:
import json json_input = '{"persons": [{"name": "Brian", "city": "Seattle"}, {"name": "David", "city": "Amsterdam"} ] }' try: decoded = json.loads(json_input) # Access data for x in decoded['persons']: print x['name'] except (ValueError, KeyError, TypeError): print "JSON format error" |
Convert Python Object (Dict) to JSON
If you want to convert a Python Object to JSON use the json.dumps() method.
import json from decimal import Decimal d = {} d["Name"] = "Luke" d["Country"] = "Canada" print json.dumps(d, ensure_ascii=False) # result {"Country": "Canada", "Name": "Luke"} |
Converting JSON data to Python objects
JSON data can be converted (deserialized) to Pyhon objects using the json.loads() function. A table of the mapping:
| JSON | Python |
|---|---|
| object | dict |
| array | list |
| string | str |
| number (int) | int |
| number (real) | float |
| true | True |
| false | False |
| null | None |
Pretty printing
If you want to display JSON data you can use the json.dumps() function.
import json json_data = '{"name": "Brian", "city": "Seattle"}' python_obj = json.loads(json_data) print json.dumps(python_obj, sort_keys=True, indent=4) |
Flask, JSON and the Google Charts API
This tutorial will teach you how to build a Flask app that combined with JSON and the Google Charts API. If you have no experience with Flask before I recommend reading my previous tutorials, they are great fun!
Related course
Python Flask: Make Web Apps with Python
$ pip install Flask |
Create a file called hello.py
from flask import Flask app = Flask(__name__) @app.route("/") def hello(): return "Hello World!" if __name__ == "__main__": app.run() |
Finally run the web app using this command:
$ python hello.py * Running on http://localhost:5000/ |
Open http://localhost:5000/ in your webbrowser, and “Hello World!” should appear.
Get JSON data
To display awesome charts we first need some data. There are two common ways to get data in web apps: data from servers using an API (usually JSON) and data from databases. I use the Fixer.io JSON API to get some financial data, but any JSON API should do. If you are unfamiliar with JSON, see this article.
We wrote this script to get the exchange rates:
import json import urllib2 def getExchangeRates(): rates = [] response = urllib2.urlopen('http://api.fixer.io/latest') data = response.read() rdata = json.loads(data, parse_float=float) rates.append( rdata['rates']['USD'] ) rates.append( rdata['rates']['GBP'] ) rates.append( rdata['rates']['JPY'] ) rates.append( rdata['rates']['AUD'] ) return rates rates = getExchangeRates() print rates |
Google Charts API with Flask
With the Google Charts API you can display live data on your site. There are a lot of great charts there that are easy to add to your Flask app. We simply give the data that we got from the server through JSON and parsed, to the Google Charts API.
Create a flask app with the directory /templates/ for your templates. This is the main Flask code:
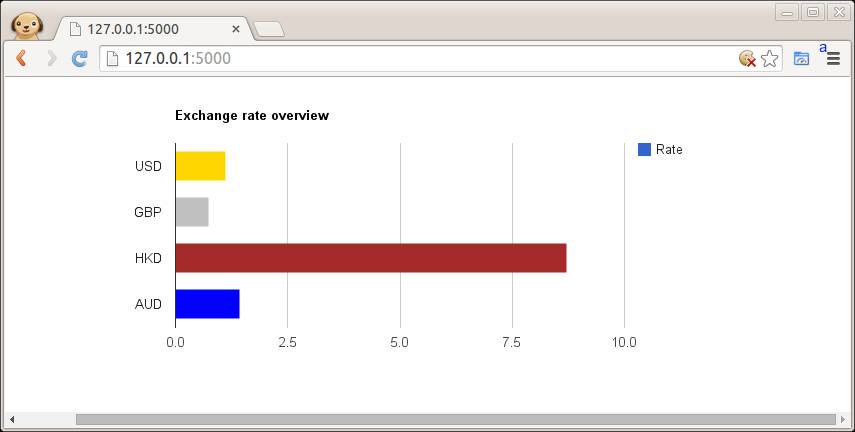
from flask import Flask, flash, redirect, render_template, request, session, abort import os import json import urllib2 tmpl_dir = os.path.join(os.path.dirname(os.path.abspath(__file__)), 'templates') app = Flask(__name__, template_folder=tmpl_dir) def getExchangeRates(): rates = [] response = urllib2.urlopen('http://api.fixer.io/latest') data = response.read() rdata = json.loads(data, parse_float=float) rates.append( rdata['rates']['USD'] ) rates.append( rdata['rates']['GBP'] ) rates.append( rdata['rates']['HKD'] ) rates.append( rdata['rates']['AUD'] ) return rates @app.route("/") def index(): rates = getExchangeRates() return render_template('test.html',**locals()) @app.route("/hello") def hello(): return "Hello World!" if __name__ == "__main__": app.run() |
And we have this template:
{% block body %} <script type="text/javascript" src="https://www.google.com/jsapi"></script> <div id="chart_div" style="width: 900px; height: 300px;"> <div> <script type="text/javascript">//<![CDATA[ google.load('visualization', '1', {packages: ['corechart', 'bar']});<br /> google.setOnLoadCallback(drawBasic);</p> <p>function drawBasic() {</p> <p> var data = google.visualization.arrayToDataTable([<br /> ['Currency', 'Rate', { role: 'style' }],<br /> ['USD', {{rates[0]}}, 'gold'],<br /> ['GBP', {{rates[1]}}, 'silver'],<br /> ['HKD', {{rates[2]}}, 'brown'],<br /> ['AUD', {{rates[3]}}, 'blue']<br /> ]);</p> <p> var options = {<br /> title: 'Exchange rate overview',<br /> chartArea: {width: '50%'},<br /> hAxis: {<br /> title: '',<br /> minValue: 0<br /> },<br /> vAxis: {<br /> title: ''<br /> }<br /> };</p> <p> var chart = new google.visualization.BarChart(document.getElementById('chart_div'));</p> <p> chart.draw(data, options);<br /> }<br /> //]]> </p> <p></script> {% endblock %} |
Result: