python logo


Category: vision

template matching python from scratch

Template matching is a technique for finding areas of an image that are similar to a patch (template). Its application may be robotics or manufacturing.

Related course:
Master Computer Vision with OpenCV

Introduction
A patch is a small image with certain features. The goal of template matching is to find the patch/template in an image.

template matching opencv 
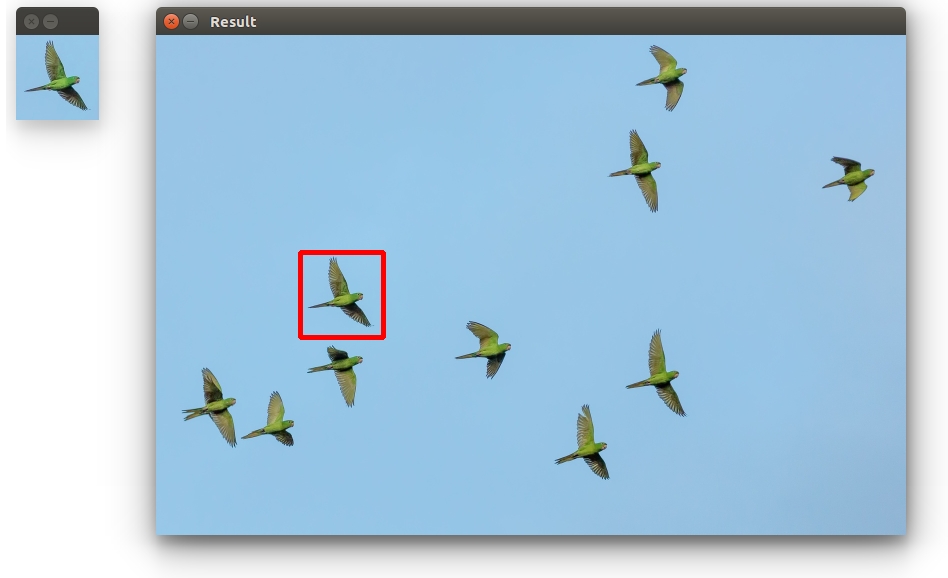
Template matching with OpenCV and Python. Template (left), result image (right)

Download Code

To find them we need both:


  • Source Image (S) : The space to find the matches in

  • Template Image (T) : The template image


The template image T is slided over the source image S (moved over the source image), and the program tries to find matches using statistics.

Template matching example


Lets have a look at the code:

import numpy as np
import cv2

image = cv2.imread('photo.jpg')
template = cv2.imread('template.jpg')

# resize images
image = cv2.resize(image, (0,0), fx=0.5, fy=0.5)
template = cv2.resize(template, (0,0), fx=0.5, fy=0.5)

# Convert to grayscale
imageGray = cv2.cvtColor(image, cv2.COLOR_BGR2GRAY)
templateGray = cv2.cvtColor(template, cv2.COLOR_BGR2GRAY)

# Find template
result = cv2.matchTemplate(imageGray,templateGray, cv2.TM_CCOEFF)
min_val, max_val, min_loc, max_loc = cv2.minMaxLoc(result)
top_left = max_loc
h,w = templateGray.shape
bottom_right = (top_left[0] + w, top_left[1] + h)
cv2.rectangle(image,top_left, bottom_right,(0,0,255),4)

# Show result
cv2.imshow("Template", template)
cv2.imshow("Result", image)

cv2.moveWindow("Template", 10, 50);
cv2.moveWindow("Result", 150, 50);

cv2.waitKey(0)

Related course:
Master Computer Vision with OpenCV

Explanation


First we load both the source image and template image with imread().  We resize themand convert them to grayscale for faster detection:


image = cv2.imread('photo.jpg')
template = cv2.imread('template.jpg')
image = cv2.resize(image, (0,0), fx=0.5, fy=0.5)
template = cv2.resize(template, (0,0), fx=0.5, fy=0.5)
imageGray = cv2.cvtColor(image, cv2.COLOR_BGR2GRAY)
templateGray = cv2.cvtColor(template, cv2.COLOR_BGR2GRAY)

We use the cv2.matchTemplate(image,template,method) method to find the most similar area in the image.  The third argument is the statistical method.

Template Matching Pick the right statistical method for your application. TM_CCOEFF (right), TM_SQDIFF(left)

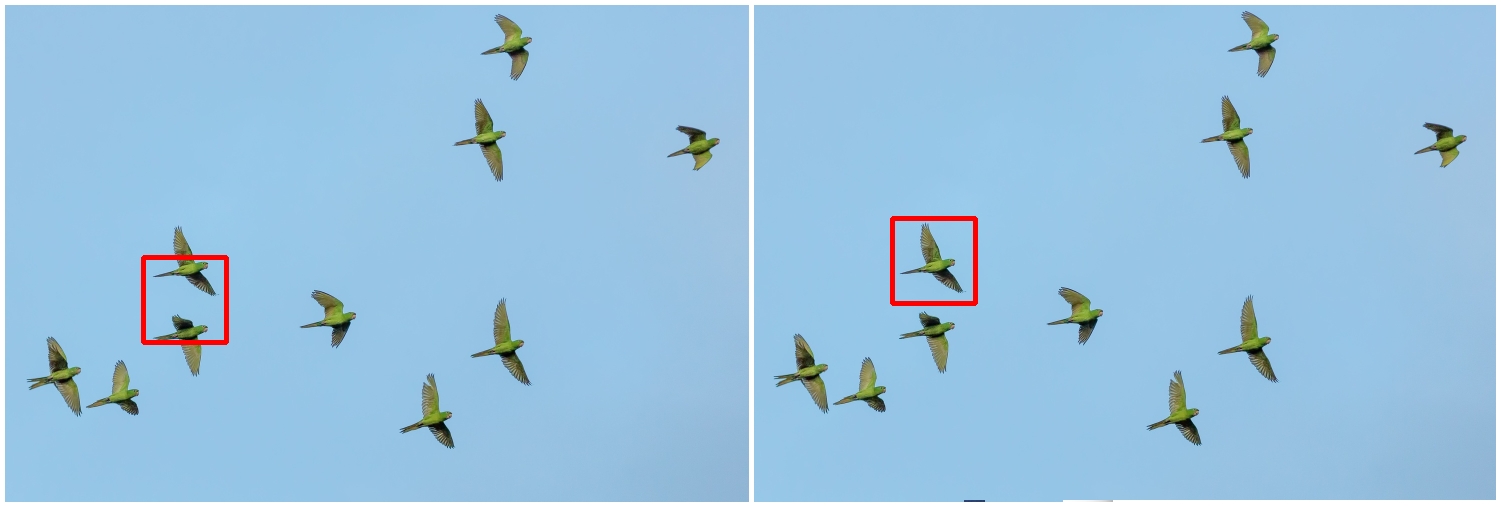
This method has six matching methods: CV_TM_SQDIFF, CV_TM_SQDIFF_NORMED, CV_TM_CCORR, CV_TM_CCORR_NORMED, CV_TM_CCOEFF and CV_TM_CCOEFF_NORMED.
which are simply different statistical comparison methods

Finally, we get the rectangle variables and display the image.

Limitations


Template matching is not scale invariant nor is it rotation invariant. It is a very basic and straightforward method where we find the most correlating area. Thus, this method of object detection depends on the kind of application you want to build. For non scale and rotation changing input, this method works great.

You may like: Robotics or Car tracking with cascades.

Download Computer Vision Examples + Course

Car tracking with cascades

Car Tracking with OpenCV Car Tracking with OpenCV

In this tutorial we will look at vehicle tracking using haar features. We have a haar cascade file trained on cars.

The program will detect regions of interest, classify them as cars and show rectangles around them.

Related course:
Master Computer Vision with OpenCV

Detecting with cascades

Lets start with the basic cascade detection program:

#! /usr/bin/python

import cv2

face_cascade = cv2.CascadeClassifier('cars.xml')
vc = cv2.VideoCapture('road.avi')

if vc.isOpened():
rval , frame = vc.read()
else:
rval = False

while rval:
rval, frame = vc.read()

# car detection.
cars = face_cascade.detectMultiScale(frame, 1.1, 2)

ncars = 0
for (x,y,w,h) in cars:
cv2.rectangle(frame,(x,y),(x+w,y+h),(0,0,255),2)
ncars = ncars + 1

# show result
cv2.imshow("Result",frame)
cv2.waitKey(1);
vc.release()

This will detect cars in the screen but also noise and the screen will be jittering sometimes. To avoid all of these, we have to improve our car tracking algorithm.  We decided to come up with a simple solution.

Related course:
Master Computer Vision with OpenCV

Car tracking algorithm


For every frame:
  • Detect potential regions of interest
  • Filter detected regions based on vertical,horizontal similarity
  • If its a new region, add to the collection
  • Clear collection every 30 frames

Removing false positives
The mean square error function is used to remove false positives. We compare vertical and horizontal sides of the images. If the difference is to large or to small it cannot be a car.

ROI detection
A car may not be detected in every frame. If a new car is detected, its added to the collection.
We keep this collection for 30 frames, then clear it.

#!/usr/bin/python

import cv2
import numpy as np

def diffUpDown(img):
# compare top and bottom size of the image
# 1. cut image in two
# 2. flip the top side
# 3. resize to same size
# 4. compare difference
height, width, depth = img.shape
half = height/2
top = img[0:half, 0:width]
bottom = img[half:half+half, 0:width]
top = cv2.flip(top,1)
bottom = cv2.resize(bottom, (32, 64))
top = cv2.resize(top, (32, 64))
return ( mse(top,bottom) )

def diffLeftRight(img):
# compare left and right size of the image
# 1. cut image in two
# 2. flip the right side
# 3. resize to same size
# 4. compare difference
height, width, depth = img.shape
half = width/2
left = img[0:height, 0:half]
right = img[0:height, half:half + half-1]
right = cv2.flip(right,1)
left = cv2.resize(left, (32, 64))
right = cv2.resize(right, (32, 64))
return ( mse(left,right) )

def mse(imageA, imageB):
err = np.sum((imageA.astype("float") - imageB.astype("float")) ** 2)
err /= float(imageA.shape[0] * imageA.shape[1])
return err

def isNewRoi(rx,ry,rw,rh,rectangles):
for r in rectangles:
if abs(r[0] - rx) < 40 and abs(r[1] - ry) < 40:
return False
return True

def detectRegionsOfInterest(frame, cascade):
scaleDown = 2
frameHeight, frameWidth, fdepth = frame.shape
# Resize
frame = cv2.resize(frame, (frameWidth/scaleDown, frameHeight/scaleDown))
frameHeight, frameWidth, fdepth = frame.shape

# haar detection.
cars = cascade.detectMultiScale(frame, 1.2, 1)

newRegions = []
minY = int(frameHeight*0.3)

# iterate regions of interest
for (x,y,w,h) in cars:
roi = [x,y,w,h]
roiImage = frame[y:y+h, x:x+w]

carWidth = roiImage.shape[0]
if y > minY:
diffX = diffLeftRight(roiImage)
diffY = round(diffUpDown(roiImage))
if diffX > 1600 and diffX < 3000 and diffY > 12000:
rx,ry,rw,rh = roi
newRegions.append( [rx*scaleDown,ry*scaleDown,rw*scaleDown,rh*scaleDown] )

return newRegions

def detectCars(filename):
rectangles = []
cascade = cv2.CascadeClassifier('cars.xml')
vc = cv2.VideoCapture(filename)

if vc.isOpened():
rval , frame = vc.read()
else:
rval = False

roi = [0,0,0,0]
frameCount = 0

while rval:
rval, frame = vc.read()
frameHeight, frameWidth, fdepth = frame.shape

newRegions = detectRegionsOfInterest(frame, cascade)
for region in newRegions:
if isNewRoi(region[0],region[1],region[2],region[3],rectangles):
rectangles.append(region)

for r in rectangles:
cv2.rectangle(frame,(r[0],r[1]),(r[0]+r[2],r[1]+r[3]),(0,0,255),3)

frameCount = frameCount + 1
if frameCount > 30:
frameCount = 0
rectangles = []

# show result
cv2.imshow("Result",frame)
cv2.waitKey(1);
vc.release()

detectCars('road.avi')

Final notes
The cascades are not  rotation invariant, scale and translation invariant. In addition, Detecting vehicles with haar cascades may work reasonably well, but there is gain with other algorithms (salient points).

You may like:

Download Computer Vision Examples + Course