Tag: matplot
Matplotlib legend
Matplotlib has native support for legends. Legends can be placed in various positions: A legend can be placed inside or outside the chart and the position can be moved.
The legend() method adds the legend to the plot. In this article we will show you some examples of legends using matplotlib.
Related course
Matplotlib legend inside
To place the legend inside, simply call legend():
|

Matplotlib legend on bottom
To place the legend on the bottom, change the legend() call to:
|
Take into account that we set the number of columns two ncol=2 and set a shadow.
The complete code would be:
|

Matplotlib legend on top
To put the legend on top, change the bbox_to_anchor values:
|
Code:
|

Legend outside right
We can put the legend ouside by resizing the box and puting the legend relative to that:
|
Code:
|

matplotlib save figure
If you want to save matplotlib figures as individual files, you can do this with the savefig function. If you want to save figures in a single file, use the saveas function instead.
Matplotlib is a python plotting library which produces publication quality figures in a variety of hardcopy formats and interactive environments across platforms.
Related course
The course below is all about data visualization:
Data Visualization with Matplotlib and Python
Save figure
For those who didn’t know, matplotlib savefig creates a file of the current figure as a PNG (with transparency), and saves it to your filesystem.
So Matplotlib can save plots directly to a file using savefig(). In this article we won’t cover the installation of matplotlib, if you want to install it see the installation faq.
Savefig is useful when you need to save a figure for viewing outside of matplotlib, such as in another program, or when you want to use a vector graphics program (Inkscape, Illustrator, etc.) to modify it.
It’s also useful if you want to save a copy of a figure in the same directory as your matplotlib script.
The method can be used like this:
|
It can make an image from the figure. It decides on the image format based on the extension. For example to save a jpg image named figure1. jpg. The figure image must have an extension of jpg, png, or pdf.
The savefig method
The savefig() method is part of the matplotlib.pyplot module. This saves the contents of your figure to an image file.
It must have the output file as the first argument. You can add the full path, relative path or no path. If you don’t define a path, it will save the image in the current working directory.
The most basic program you can do is just 5 lines of code:
import matplotlib.pyplot as plt |
This works for larger plots too:
|
To change the format, simply change the extension like so:
|
You can open your file with any external image program, because it’s just a regular image. If you use Linux, you can use the command below:
|
or open it in an image or pdf viewer if you saved it as pdf

Additional savefig options
A number of new savefig options have been added to matplotlib. Backwards compatibility is maintained.
The options are:
savefig(filename, dpi=None, format='png', bbox_inches='tight', pad_inches=0.2, bbox=None, pad=None, dashes=None, loc='upper left', rot=0, vmax='I', vmin='I', hmax='I', hmin='I') |
The output file name extension and format is controlled by the extension and format parameters; the above are defaults.
Useful parameters are:
filename the output file to save, if no path is included it will save it in the same directory as your program
transparent if you a transparent background set it to True
bbox_inches change the size of the white space around the image, in most cases tight is ideal
Save as PDF file
To save your matplotlib chart as a pdf, just change the file extension to .pdf
|
The file will be saved in your working directory.
Save as SVG file
SVG is another vector-based graphics format, which lets you zoom in without losing quality. Not every program can open the svg image files.
To save as an SVG file, just change the extension to SVG
|
Save as JPEG file
If you save as jpeg file, you can include the quality parameter. This lets you save some disk space, but at the cost of image quality.
|
In general I recommend going with vector graphics formats like svg or pdf, because the quality is higher. If you don’t care about quality and just want to email the image or show it on a website, you could use png or jpeg.
matplotlib update plot
Updating a matplotlib plot is straightforward. Create the data, the plot and update in a loop.
Setting interactive mode on is essential: plt.ion(). This controls if the figure is redrawn every draw() command. If it is False (the default), then the figure does not update itself.
Update plot example
Copy the code below to test an interactive plot.
|

Explanation
We create the data to plot using:
|
Turn on interacive mode using:
|
Configure the plot (the ‘b-‘ indicates a blue line):
|
And finally update in a loop:
|
matplotlib time axis
Matplotlib supports plots with time on the horizontal (x) axis. The data values will be put on the vertical (y) axis. In this article we’ll demonstrate that using a few examples.
It is required to use the Python datetime module, a standard module.
Related course
Plot time
You can plot time using a timestamp:
|
If you want to change the interval use one of the lines below:
|
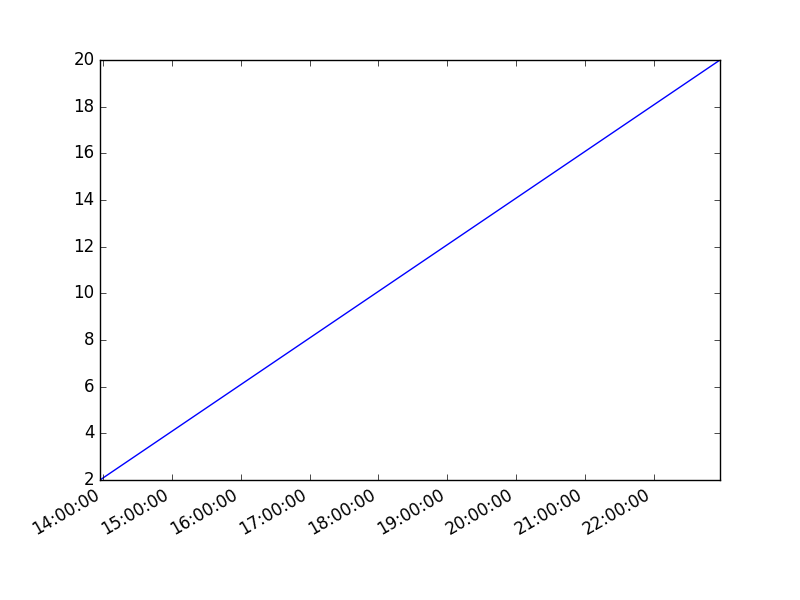
Time plot from specific hour/minute
To start from a specific date, create a new timestamp using datetime.datetime(year, month, day, hour, minute).
Full example:
|
matplotlib heatmap
A heatmap can be created using Matplotlib and numpy.
Related courses
If you want to learn more on data visualization, this course is good:
Heatmap example
The histogram2d function can be used to generate a heatmap.
We create some random data arrays (x,y) to use in the program. We set bins to 64, the resulting heatmap will be 64x64. If you want another size change the number of bins.
|
Result:

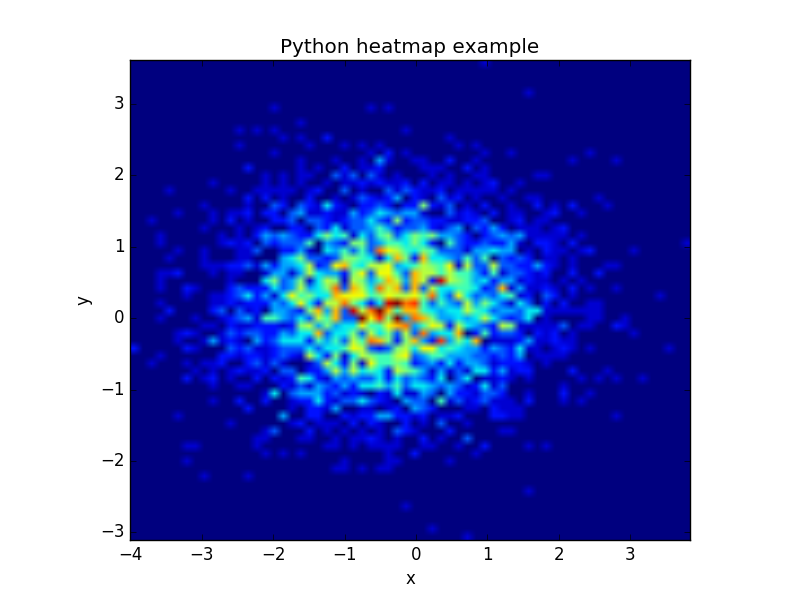
The datapoints in this example are totally random and generated using np.random.randn()
subplot python
The Matplotlib subplot() function can be called to plot two or more plots in one figure. Matplotlib supports all kind of subplots including 2x1 vertical, 2x1 horizontal or a 2x2 grid.
Related courses
Horizontal subplot
Use the code below to create a horizontal subplot
|

Vertical subplot
By changing the subplot parameters we can create a vertical plot
|

Subplot grid
To create a 2x2 grid of plots, you can use this code:
|

python plot matrix
A correlation diagram can be created using Matplotlib. Matplotlib is the most used plotting library for Python. It can be included in all the graphical toolkits that are available for Python.
Related courses
Matrix definition
To start we define a 2x2 matrix and a list called groups. The matrix is defined inside the brackets (double [[ and ]] if written on a single line).
|
Visual:

Matrix correlation
The code below generates a Matrix correlation diagram using Matplotlib.
|
Initially we define the matrix (m) and the list (groups).
We set the length to be equal to the length of the groups. On the x axis and y axis we set the group names.