Category: pro
Python hosting: Host, run, and code Python in the cloud!
web
Flask getting started: Hello World
In this tutorial you’ll learn how to build a web app with Python.
We’ll use a micro-framework called Flask. It has a small core but is extensible with many plugins such as SQLAlchemy, Babel, CouchDB, MongoDB etc.
Some Flask example apps are:
- flaskr — a microblog
- minitwit — a twitter clone
- flask website — static pages + mailinglist archives
Related course
Python Flask: Make Web Apps with Python
Installing Flask
Install Flask using the command below:
pip install Flask |
Flask hello world app
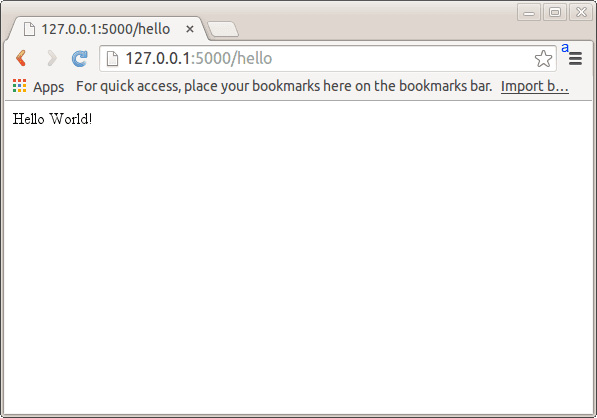
Create a file called hello.py
from flask import Flask app = Flask(__name__) @app.route("/") def hello(): return "Hello World!" if __name__ == "__main__": app.run() |
Finally run the web app using this command:
$ python hello.py * Running on http://localhost:5000/ |
Open http://localhost:5000/ in your webbrowser, and “Hello World!” should appear.
Flask with static html files
You can use the Flask framework and use static files together.
Flask will give you URL routing, many features and all the Python benefits.
You may want an application that is partly dynamic and partly static. Or you may simply want to browse with URL routing. In this article we will teach you how to load static HTML files with Flask.
Related course
Python Flask: Make Web Apps with Python
from flask import Flask, render_template app = Flask(__name__) @app.route('/<string:page_name>/') def render_static(page_name): return render_template('%s.html' % page_name)</string:page_name> if __name__ == '__main__': app.run() |
This application initializes a Flask app with the method:
app.run() |
The app creates an URL route for any possible page and links that to static html files with:
@app.route('/<string:page_name>/') def render_static(page_name): return render_template('%s.html' % page_name) |
Create a directory /templates/ and add the file hello.html:
<title>Hello World Template</title> Hello World |
Start the server with:
$ python app.py * Running on http://127.0.0.1:5000/ |
Then any .html file is accesible using URL routing.
For example the static file hello.html can be accessed using http://127.0.0.1:5000/hello. You can store any css file in the /static/ directory.
Jinja2 Template engine
Jinja2 is a template engine for Python. You can use it when rendering data to web pages. For every link you visit, you want to show the data with the formatting. By using a template engine we can seperate display logic (html, css) from the actual Python code. Let’s start with an example
Related course
Python Flask: Make Web Apps with Python
- /app
- /app/templates
And create the file user.html in /app/templates:
<title>{% block title %}{% endblock %}</title> <ul> {% for user in users %} <li>{{ user }}</li> {% endfor %}</ul> |
Then create the code app.py in /app/app.py:
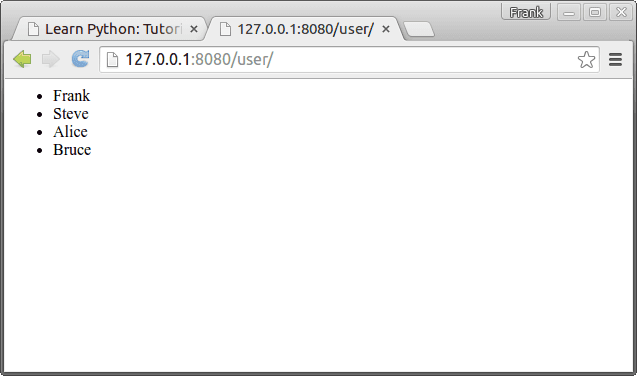
from flask import Flask, flash, redirect, render_template, request from random import randint app = Flask(__name__) @app.route("/") def index(): return "Flask App!" @app.route("/user/") def hello(): users = [ "Frank", "Steve", "Alice", "Bruce" ] return render_template( 'user.html', **locals()) if __name__ == "__main__": app.run(host='0.0.0.0', port=8080) |
Finally execute with:
python app.py * Running on http://0.0.0.0:8080/ |
You can then open http://127.0.0.1:8080/user/ in your browser. This will output the data formatted according to html:
About Jinja
A Jinja2 template is simply a text file that does not need to have a specific extension such as .html, .xml.
A template may contain tags and special delimiters:
| Delimiters | Usage |
|---|---|
| {% … %} | Statements |
| {{ … }} | Expressions to print to the template output |
| {# … #} | Comments not included in the template output |
| # … ## | Line Statements |
In the example above we have two statements and one expression. We have not included any comments.
Base template and child templates
A Jinja2 template can extend a base template. On a webpage with many sites you may want these pages look similar. In /templates/ create a file called base.html with this code:
{% block head %} <link rel="stylesheet" href="style.css"> <title>{% block title %}{% endblock %} - My Webpage</title> {% endblock %} <div id="content">{% block content %}{% endblock %}</div> <div id="footer"> {% block footer %} Copyright 2015 by <a href="https://pythonspot.com/">pythonspot</a>. {% endblock %}</div> |
We did not set a style.css, but you could set one. Change /templates/user.html to:
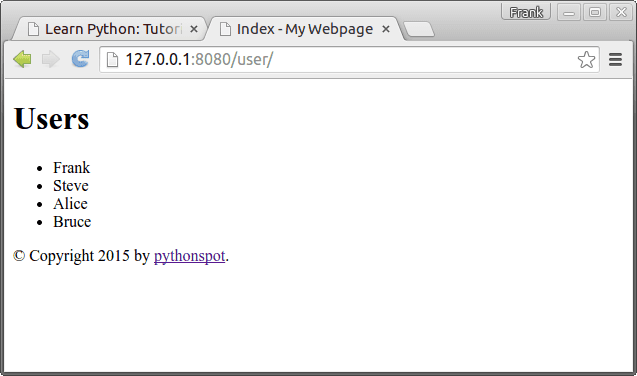
{% extends "base.html" %} {% block title %}Index{% endblock %} {% block head %} {{ super() }} <style type="text/css"> .important { color: #336699; }<br /> </style> {% endblock %} {% block content %} <h1>Users</h1> <p class="important"></p> <ul> {% for user in users %} <li>{{ user }}</li> {% endfor %}</ul> {% endblock %} |
Restart the app with:
python app.py * Running on http://0.0.0.0:8080/ |
Output:
Flask and great looking charts using Chart.js
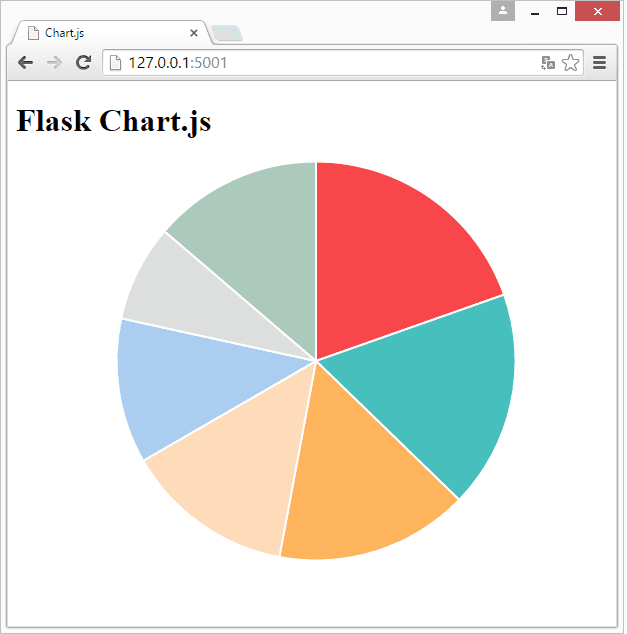
Chart.js is a javascript library to create simple and clean charts. All of them are HTML5 based, responsive, modular, interactive and there are in total 6 charts.
Related course
Python Flask: Make Web Apps with Python
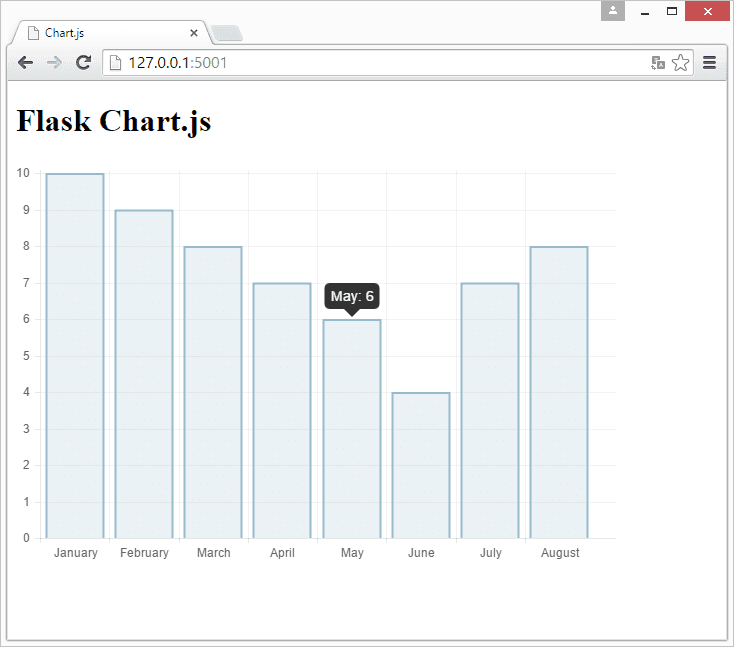
We will start by creating a web application that displays a bar chart from a Python array. Create a directory /templates/ and add the file chart.html with this content:
<meta charset="utf-8"/> <title>Chart.js </title> <!-- import plugin script --> <script src="static/Chart.min.js"></script> <h1>Flask Chart.js</h1> <!-- bar chart canvas element --><canvas id="chart" width="600" height="400"></canvas> <script><br /> // bar chart data<br /> var barData = {<br /> labels : [{% for item in labels %}<br /> "{{item}}",<br /> {% endfor %}],<br /> datasets : [<br /> {<br /> fillColor: "rgba(151,187,205,0.2)",<br /> strokeColor: "rgba(151,187,205,1)",<br /> pointColor: "rgba(151,187,205,1)",<br /> data : [{% for item in values %}<br /> {{item}},<br /> {% endfor %}]<br /> }<br /> ]<br /> } <p> // get bar chart canvas<br /> var mychart = document.getElementById("chart").getContext("2d");</p> <p> steps = 10<br /> max = 10<br /> // draw bar chart<br /> new Chart(mychart).Bar(barData, {<br /> scaleOverride: true,<br /> scaleSteps: steps,<br /> scaleStepWidth: Math.ceil(max / steps),<br /> scaleStartValue: 0,<br /> scaleShowVerticalLines: true,<br /> scaleShowGridLines : true,<br /> barShowStroke : true,<br /> scaleShowLabels: true<br /> });</p> <p></p></script> |
Create the directory /static/ and add the file Chart.min.js to it. You can get it either from the Chart.js website or use the link. Finally go into the home directory and create app.py with this contents:
from flask import Flask from flask import Markup from flask import Flask from flask import render_template app = Flask(__name__) @app.route("/") def chart(): labels = ["January","February","March","April","May","June","July","August"] values = [10,9,8,7,6,4,7,8] return render_template('chart.html', values=values, labels=labels) if __name__ == "__main__": app.run(host='0.0.0.0', port=5001) |
Finally run:
python app.py |
Continue reading “Flask and great looking charts using Chart.js”