Python hosting : Host, run, and code Python in the cloud!
In this article you will learn to use tabs with PyQt5
Related course:
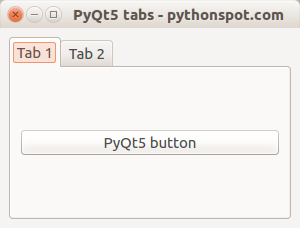
PyQt5 tabs example PyQt5
import sysfrom PyQt5.QtWidgets import QMainWindow, QApplication, QPushButton, QWidget, QAction, QTabWidget,QVBoxLayoutfrom PyQt5.QtGui import QIconfrom PyQt5.QtCore import pyqtSlotclass App (QMainWindow ): def __init__ (self ): super ().__init__() self.title = 'PyQt5 tabs - pythonspot.com' self.left = 0 self.top = 0 self.width = 300 self.height = 200 self.setWindowTitle(self.title) self.setGeometry(self.left, self.top, self.width, self.height) self.table_widget = MyTableWidget(self) self.setCentralWidget(self.table_widget) self.show() class MyTableWidget (QWidget ): def __init__ (self, parent ): super (QWidget, self).__init__(parent) self.layout = QVBoxLayout(self) self.tabs = QTabWidget() self.tab1 = QWidget() self.tab2 = QWidget() self.tabs.resize(300 ,200 ) self.tabs.addTab(self.tab1,"Tab 1" ) self.tabs.addTab(self.tab2,"Tab 2" ) self.tab1.layout = QVBoxLayout(self) self.pushButton1 = QPushButton("PyQt5 button" ) self.tab1.layout.addWidget(self.pushButton1) self.tab1.setLayout(self.tab1.layout) self.layout.addWidget(self.tabs) self.setLayout(self.layout) @pyqtSlot() def on_click (self ): print ("\n" ) for currentQTableWidgetItem in self.tableWidget.selectedItems(): print (currentQTableWidgetItem.row(), currentQTableWidgetItem.column(), currentQTableWidgetItem.text()) if __name__ == '__main__' : app = QApplication(sys.argv) ex = App() sys.exit(app.exec_())
Explanation:
To add a table to a window, we create a new class:
class MyTableWidget (QWidget )
We initialize the tab screen by creating a QTabWidget and two QWidgets for tabs.
self.tabs = QTabWidget() self.tab1 = QWidget() self.tab2 = QWidget() self.tabs.resize(300 ,200 )
We then add these tabs to the tab widget:
self.tabs.addTab(self.tab1,"Tab 1" ) self.tabs.addTab(self.tab2,"Tab 2" )
The contents of a tab are created using:
self.tab1.layout = QVBoxLayout(self) self.pushButton1 = QPushButton("PyQt5 button" ) self.tab1.layout.addWidget(self.pushButton1) self.tab1.setLayout(self.tab1.layout)
Finally we add the tabs to the widget:
self.layout.addWidget(self.tabs)
self.setLayout(self.layout)
don’t forget the to add your custom tab widget to the window:
self.table_widget = MyTableWidget(self)
self.setCentralWidget(self.table_widget)
If you are new to programming Python PyQt, I highly recommend this book.

Leave a Reply: