
Category: pro
Python hosting: Host, run, and code Python in the cloud!
tutorials
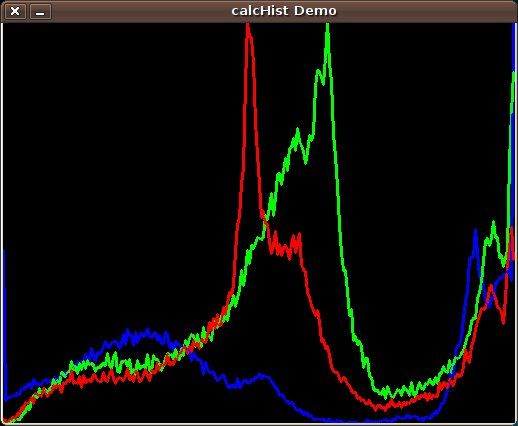
Image histogram
A histogram is collected counts of data organized into a set of bins. Every bin shows the frequency. OpenCV can generate histograms for both color and gray scale images. You may want to use histograms for computer vision tasks.
Related course
Histogram example
Given an image we can generate a histogram for the blue, green and red values.
We use the function cv.CalcHist(image, channel, mask, histSize, range)
Parameters:
- image: should be in brackets, the source image of type uint8 or float32
- channel: the color channel to select. for grayscale use [0]. color image has blue, green and red channels
- mask: None if you want a histogram of the full image, otherwise a region.
- histSize: the number of bins
- range: color range:
Histogram for a color image:
# draw histogram in python. import cv2 import numpy as np img = cv2.imread('image.jpg') h = np.zeros((300,256,3)) bins = np.arange(256).reshape(256,1) color = [ (255,0,0),(0,255,0),(0,0,255) ] for ch, col in enumerate(color): hist_item = cv2.calcHist([img],[ch],None,[256],[0,255]) cv2.normalize(hist_item,hist_item,0,255,cv2.NORM_MINMAX) hist=np.int32(np.around(hist_item)) pts = np.column_stack((bins,hist)) cv2.polylines(h,[pts],False,col) h=np.flipud(h) cv2.imshow('colorhist',h) cv2.waitKey(0) |
Image data and operations
OpenCV (cv2) can be used to extract data from images and do operations on them. We demonstrate some examples of that below:
Related courses:
Image properties
We can extract the width, height and color depth using the code below:
import cv2 import numpy as np # read image into matrix. m = cv2.imread("python.png") # get image properties. h,w,bpp = np.shape(m) # print image properties. print "width: " + str(w) print "height: " + str(h) print "bpp: " + str(bpp) |
Access pixel data
We can access the pixel data of an image directly using the matrix, example:
import cv2 import numpy as np # read image into matrix. m = cv2.imread("python.png") # get image properties. h,w,bpp = np.shape(m) # print pixel value y = 1 x = 1 print m[y][x] |
To iterate over all pixels in the image you can use:
import cv2 import numpy as np # read image into matrix. m = cv2.imread("python.png") # get image properties. h,w,bpp = np.shape(m) # iterate over the entire image. for py in range(0,h): for px in range(0,w): print m[py][px] |
Image manipulation
You can modify the pixels and pixel channels (r,g,b) directly. In the example below we remove one color channel:
import cv2 import numpy as np # read image into matrix. m = cv2.imread("python.png") # get image properties. h,w,bpp = np.shape(m) # iterate over the entire image. for py in range(0,h): for px in range(0,w): m[py][px][0] = 0 # display image cv2.imshow('matrix', m) cv2.waitKey(0) |
To change the entire image, you’ll have to change all channels: m[py][px][0], m[py][px][1], m[py][px][2].
Save image
You can save a modified image to the disk using:
cv2.imwrite('filename.png',m) |
Simple text game with Python
In this article we will demonstrate how to create a simple guessing game.
The goal of the game is to guess the right number.
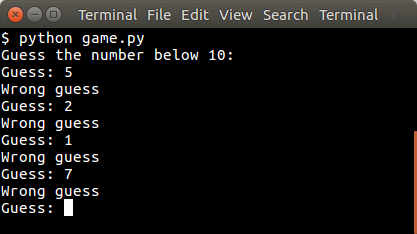
Example
An example run below:
You may like
Random number
The user will be asked to guess the random number. We first pick the random number:
from random import randint x = randint(1,9) |
The randint() function will pick a pseudo random number between 1 and 10. Then we have to continue until the correct number is found:
guess = -1 print("Guess the number below 10:") while guess != x: guess = int(raw_input("Guess: ")) if guess != x: print("Wrong guess") else: print("Guessed correctly") |
Python Guessing Game
The code below starts the game:
from random import randint x = randint(1,9) guess = -1 print "Guess the number below 10:" while guess != x: guess = int(raw_input("Guess: ")) if guess != x: print("Wrong guess") else: print("Guessed correctly") |
An example run:
Guess the number below 10: Guess: 3 Wrong guess Guess: 6 Wrong guess .. |
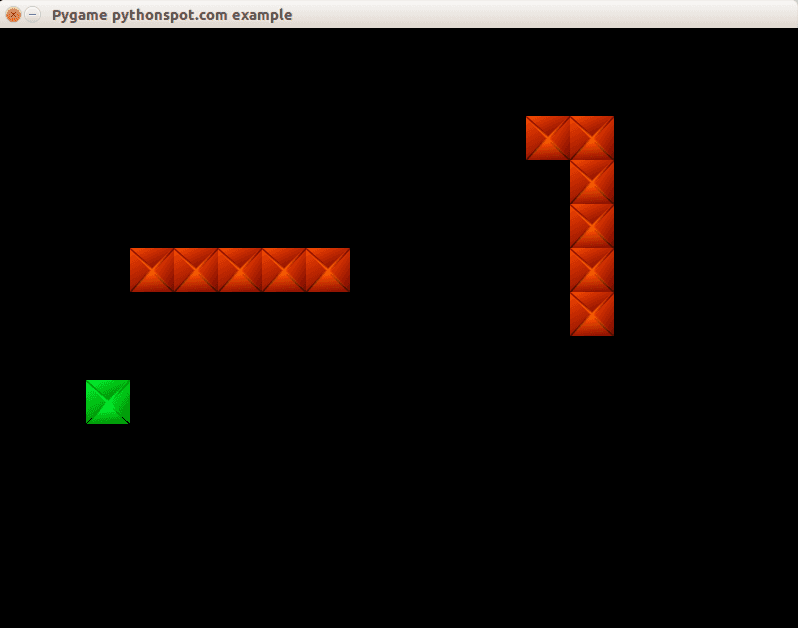
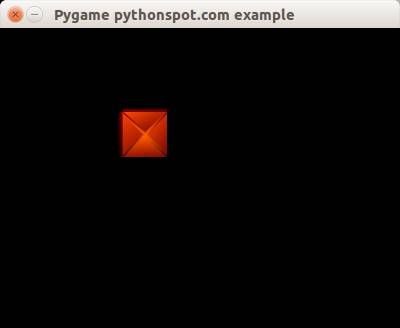
Snake AI in Pygame
In this article we will show you how to create basic game AI (Artificial Intelligence). This article will describe an AI for the game snake.
In this game (snake) both the computer and you play a snake, and the computer snake tries to catch you. In short: the opponent AI tries to determine and go to the destination point based on your location on the board.
You may like
Adding the computer player:
We extend the code with a new class called Computer which will be our computer player. This contains routines to draw and move the computer snake.
class Computer: x = [0] y = [0] step = 44 direction = 0 length = 3 updateCountMax = 2 updateCount = 0 def __init__(self, length): self.length = length for i in range(0,2000): self.x.append(-100) self.y.append(-100) # initial positions, no collision. self.x[0] = 1*44 self.y[0] = 4*44 def update(self): self.updateCount = self.updateCount + 1 if self.updateCount > self.updateCountMax: # update previous positions for i in range(self.length-1,0,-1): self.x[i] = self.x[i-1] self.y[i] = self.y[i-1] # update position of head of snake if self.direction == 0: self.x[0] = self.x[0] + self.step if self.direction == 1: self.x[0] = self.x[0] - self.step if self.direction == 2: self.y[0] = self.y[0] - self.step if self.direction == 3: self.y[0] = self.y[0] + self.step self.updateCount = 0 def moveRight(self): self.direction = 0 def moveLeft(self): self.direction = 1 def moveUp(self): self.direction = 2 def moveDown(self): self.direction = 3 def draw(self, surface, image): for i in range(0,self.length): surface.blit(image,(self.x[i],self.y[i])) |
We then call the update and drawing method of the computer.
def on_loop(self): self.player.update() self.computer.update() .... def on_render(self): self._display_surf.fill((0,0,0)) self.player.draw(self._display_surf, self._image_surf) self.apple.draw(self._display_surf, self._apple_surf) self.computer.draw(self._display_surf, self._image_surf) pygame.display.flip() |
This will make the computer snake move and be drawn on the screen. It has the same properties as the human player.
Adding the intelligence to the computer player
Because this is a simple game, we do not need to create a complete thinking machine inside the game. We simply need some basic intelligence exhibited by our computer player. Intelligence in games is often quite limited because most of the time more complexity is not neccesary or there simply is not the time available to implement clever algorithms.
The algorithm we will add will simply go to the destination. It will neglect any obstacles (the human player).
def target(self,dx,dy): if self.x[0] > dx: self.moveLeft() if self.x[0] < dx: self.moveRight() if self.x[0] == dx: if self.y[0] < dy: self.moveDown() if self.y[0] > dy: self.moveUp() |
Complete code
We end up with this complete code:
from pygame.locals import * from random import randint import pygame import time class Apple: x = 0 y = 0 step = 44 def __init__(self,x,y): self.x = x * self.step self.y = y * self.step def draw(self, surface, image): surface.blit(image,(self.x, self.y)) class Player: x = [0] y = [0] step = 44 direction = 0 length = 3 updateCountMax = 2 updateCount = 0 def __init__(self, length): self.length = length for i in range(0,2000): self.x.append(-100) self.y.append(-100) # initial positions, no collision. self.x[0] = 1*44 self.x[0] = 2*44 def update(self): self.updateCount = self.updateCount + 1 if self.updateCount > self.updateCountMax: # update previous positions for i in range(self.length-1,0,-1): self.x[i] = self.x[i-1] self.y[i] = self.y[i-1] # update position of head of snake if self.direction == 0: self.x[0] = self.x[0] + self.step if self.direction == 1: self.x[0] = self.x[0] - self.step if self.direction == 2: self.y[0] = self.y[0] - self.step if self.direction == 3: self.y[0] = self.y[0] + self.step self.updateCount = 0 def moveRight(self): self.direction = 0 def moveLeft(self): self.direction = 1 def moveUp(self): self.direction = 2 def moveDown(self): self.direction = 3 def draw(self, surface, image): for i in range(0,self.length): surface.blit(image,(self.x[i],self.y[i])) class Computer: x = [0] y = [0] step = 44 direction = 0 length = 3 updateCountMax = 2 updateCount = 0 def __init__(self, length): self.length = length for i in range(0,2000): self.x.append(-100) self.y.append(-100) # initial positions, no collision. self.x[0] = 1*44 self.y[0] = 4*44 def update(self): self.updateCount = self.updateCount + 1 if self.updateCount > self.updateCountMax: # update previous positions for i in range(self.length-1,0,-1): self.x[i] = self.x[i-1] self.y[i] = self.y[i-1] # update position of head of snake if self.direction == 0: self.x[0] = self.x[0] + self.step if self.direction == 1: self.x[0] = self.x[0] - self.step if self.direction == 2: self.y[0] = self.y[0] - self.step if self.direction == 3: self.y[0] = self.y[0] + self.step self.updateCount = 0 def moveRight(self): self.direction = 0 def moveLeft(self): self.direction = 1 def moveUp(self): self.direction = 2 def moveDown(self): self.direction = 3 def target(self,dx,dy): if self.x[0] > dx: self.moveLeft() if self.x[0] < dx: self.moveRight() if self.x[0] == dx: if self.y[0] < dy: self.moveDown() if self.y[0] > dy: self.moveUp() def draw(self, surface, image): for i in range(0,self.length): surface.blit(image,(self.x[i],self.y[i])) class Game: def isCollision(self,x1,y1,x2,y2,bsize): if x1 >= x2 and x1 <= x2 + bsize: if y1 >= y2 and y1 <= y2 + bsize: return True return False class App: windowWidth = 800 windowHeight = 600 player = 0 apple = 0 def __init__(self): self._running = True self._display_surf = None self._image_surf = None self._apple_surf = None self.game = Game() self.player = Player(5) self.apple = Apple(8,5) self.computer = Computer(5) def on_init(self): pygame.init() self._display_surf = pygame.display.set_mode((self.windowWidth,self.windowHeight), pygame.HWSURFACE) pygame.display.set_caption('Pygame pythonspot.com example') self._running = True self._image_surf = pygame.image.load("pygame.png").convert() self._apple_surf = pygame.image.load("apple.png").convert() def on_event(self, event): if event.type == QUIT: self._running = False def on_loop(self): self.computer.target(self.apple.x, self.apple.y) self.player.update() self.computer.update() # does snake eat apple? for i in range(0,self.player.length): if self.game.isCollision(self.apple.x,self.apple.y,self.player.x[i], self.player.y[i],44): self.apple.x = randint(2,9) * 44 self.apple.y = randint(2,9) * 44 self.player.length = self.player.length + 1 # does computer eat apple? for i in range(0,self.player.length): if self.game.isCollision(self.apple.x,self.apple.y,self.computer.x[i], self.computer.y[i],44): self.apple.x = randint(2,9) * 44 self.apple.y = randint(2,9) * 44 #self.computer.length = self.computer.length + 1 # does snake collide with itself? for i in range(2,self.player.length): if self.game.isCollision(self.player.x[0],self.player.y[0],self.player.x[i], self.player.y[i],40): print "You lose! Collision: " print "x[0] (" + str(self.player.x[0]) + "," + str(self.player.y[0]) + ")" print "x[" + str(i) + "] (" + str(self.player.x[i]) + "," + str(self.player.y[i]) + ")" exit(0) pass def on_render(self): self._display_surf.fill((0,0,0)) self.player.draw(self._display_surf, self._image_surf) self.apple.draw(self._display_surf, self._apple_surf) self.computer.draw(self._display_surf, self._image_surf) pygame.display.flip() def on_cleanup(self): pygame.quit() def on_execute(self): if self.on_init() == False: self._running = False while( self._running ): pygame.event.pump() keys = pygame.key.get_pressed() if (keys[K_RIGHT]): self.player.moveRight() if (keys[K_LEFT]): self.player.moveLeft() if (keys[K_UP]): self.player.moveUp() if (keys[K_DOWN]): self.player.moveDown() if (keys[K_ESCAPE]): self._running = False self.on_loop() self.on_render() time.sleep (50.0 / 1000.0); self.on_cleanup() if __name__ == "__main__" : theApp = App() theApp.on_execute() |
Conclusion
You learned how to create a basic computer player using an very simple AI algorithm.
FTP client in Python
This article will show you how to use the File Transfer Protocol (FTP) with Python from a client side perspective. We use ftplib, a library that implements the FTP protocol. Using FTP we can create and access remote files through function calls.
Related course
Python Programming Bootcamp: Go from zero to hero
Directory listing
We can list the root directory using this little snippet:
import ftplib ftp = ftplib.FTP("ftp.nluug.nl") ftp.login("anonymous", "ftplib-example-1") data = [] ftp.dir(data.append) ftp.quit() for line in data: print "-", line |
This will output the directory contents. in a simple console style output. If you want to show a specific directory you must change the directory after connecting with the ftp.cwd(‘/’) function where the parameter is the directory you want to change to.
import ftplib ftp = ftplib.FTP("ftp.nluug.nl") ftp.login("anonymous", "ftplib-example-1") data = [] ftp.cwd('/pub/') # change directory to /pub/ ftp.dir(data.append) ftp.quit() for line in data: print "-", line |
Download file
To download a file we use the retrbinary() function. An example below:
import ftplib import sys def getFile(ftp, filename): try: ftp.retrbinary("RETR " + filename ,open(filename, 'wb').write) except: print "Error" ftp = ftplib.FTP("ftp.nluug.nl") ftp.login("anonymous", "ftplib-example-1") ftp.cwd('/pub/') # change directory to /pub/ getFile(ftp,'README.nluug') ftp.quit() |
Uploading files
We can upload files using the storlines() command. This will upload the file README.nluug in the main directory. If you want to upload in another directory combine it with the cwd() function.
import ftplib import os def upload(ftp, file): ext = os.path.splitext(file)[1] if ext in (".txt", ".htm", ".html"): ftp.storlines("STOR " + file, open(file)) else: ftp.storbinary("STOR " + file, open(file, "rb"), 1024) ftp = ftplib.FTP("127.0.0.1") ftp.login("username", "password") upload(ftp, "README.nluug") |
Other functions
For other functions please refer to the official library documentation.
Maze in Pygame
In this tutorial you will learn how to build a maze game. The idea is simply to move around the maze with the arrow keys.
Related courses:
Getting started: Basic structure and event handling.
We define a class Player which holds the players position on the screen and the speed by which it moves. In addition we define the actions a Player instance can do (movements):
class Player: x = 10 y = 10 speed = 1 def moveRight(self): self.x = self.x + self.speed def moveLeft(self): self.x = self.x - self.speed def moveUp(self): self.y = self.y - self.speed def moveDown(self): self.y = self.y + self.speed |
A player object can be created and variables can be modified using the movement methods. We link those methods to the events. In Pygame we can get non-blocking keyboard input using this code:
pygame.event.pump() keys = pygame.key.get_pressed() if (keys[K_RIGHT]): print "Right arrow pressed." |
The complete code gives us the ability to move the player across the screen:
from pygame.locals import * import pygame class Player: x = 10 y = 10 speed = 1 def moveRight(self): self.x = self.x + self.speed def moveLeft(self): self.x = self.x - self.speed def moveUp(self): self.y = self.y - self.speed def moveDown(self): self.y = self.y + self.speed class App: windowWidth = 800 windowHeight = 600 player = 0 def __init__(self): self._running = True self._display_surf = None self._image_surf = None self.player = Player() def on_init(self): pygame.init() self._display_surf = pygame.display.set_mode((self.windowWidth,self.windowHeight), pygame.HWSURFACE) pygame.display.set_caption('Pygame pythonspot.com example') self._running = True self._image_surf = pygame.image.load("pygame.png").convert() def on_event(self, event): if event.type == QUIT: self._running = False def on_loop(self): pass def on_render(self): self._display_surf.fill((0,0,0)) self._display_surf.blit(self._image_surf,(self.player.x,self.player.y)) pygame.display.flip() def on_cleanup(self): pygame.quit() def on_execute(self): if self.on_init() == False: self._running = False while( self._running ): pygame.event.pump() keys = pygame.key.get_pressed() if (keys[K_RIGHT]): self.player.moveRight() if (keys[K_LEFT]): self.player.moveLeft() if (keys[K_UP]): self.player.moveUp() if (keys[K_DOWN]): self.player.moveDown() if (keys[K_ESCAPE]): self._running = False self.on_loop() self.on_render() self.on_cleanup() if __name__ == "__main__" : theApp = App() theApp.on_execute() |
You can now move the block around the screen with the arrow keys.
Creating the maze
We define a matrix of NxM to represent the positions of the maze blocks. In this matrix the element 1 represents the presence of a block and element 0 represents the absence.
class Maze: def __init__(self): self.M = 10 self.N = 8 self.maze = [ 1,1,1,1,1,1,1,1,1,1, 1,0,0,0,0,0,0,0,0,1, 1,0,0,0,0,0,0,0,0,1, 1,0,1,1,1,1,1,1,0,1, 1,0,1,0,0,0,0,0,0,1, 1,0,1,0,1,1,1,1,0,1, 1,0,0,0,0,0,0,0,0,1, 1,1,1,1,1,1,1,1,1,1,] |
We have this complete code to draw the maze:
from pygame.locals import * import pygame class Player: x = 44 y = 44 speed = 1 def moveRight(self): self.x = self.x + self.speed def moveLeft(self): self.x = self.x - self.speed def moveUp(self): self.y = self.y - self.speed def moveDown(self): self.y = self.y + self.speed class Maze: def __init__(self): self.M = 10 self.N = 8 self.maze = [ 1,1,1,1,1,1,1,1,1,1, 1,0,0,0,0,0,0,0,0,1, 1,0,0,0,0,0,0,0,0,1, 1,0,1,1,1,1,1,1,0,1, 1,0,1,0,0,0,0,0,0,1, 1,0,1,0,1,1,1,1,0,1, 1,0,0,0,0,0,0,0,0,1, 1,1,1,1,1,1,1,1,1,1,] def draw(self,display_surf,image_surf): bx = 0 by = 0 for i in range(0,self.M*self.N): if self.maze[ bx + (by*self.M) ] == 1: display_surf.blit(image_surf,( bx * 44 , by * 44)) bx = bx + 1 if bx > self.M-1: bx = 0 by = by + 1 class App: windowWidth = 800 windowHeight = 600 player = 0 def __init__(self): self._running = True self._display_surf = None self._image_surf = None self._block_surf = None self.player = Player() self.maze = Maze() def on_init(self): pygame.init() self._display_surf = pygame.display.set_mode((self.windowWidth,self.windowHeight), pygame.HWSURFACE) pygame.display.set_caption('Pygame pythonspot.com example') self._running = True self._image_surf = pygame.image.load("player.png").convert() self._block_surf = pygame.image.load("block.png").convert() def on_event(self, event): if event.type == QUIT: self._running = False def on_loop(self): pass def on_render(self): self._display_surf.fill((0,0,0)) self._display_surf.blit(self._image_surf,(self.player.x,self.player.y)) self.maze.draw(self._display_surf, self._block_surf) pygame.display.flip() def on_cleanup(self): pygame.quit() def on_execute(self): if self.on_init() == False: self._running = False while( self._running ): pygame.event.pump() keys = pygame.key.get_pressed() if (keys[K_RIGHT]): self.player.moveRight() if (keys[K_LEFT]): self.player.moveLeft() if (keys[K_UP]): self.player.moveUp() if (keys[K_DOWN]): self.player.moveDown() if (keys[K_ESCAPE]): self._running = False self.on_loop() self.on_render() self.on_cleanup() if __name__ == "__main__" : theApp = App() theApp.on_execute() |
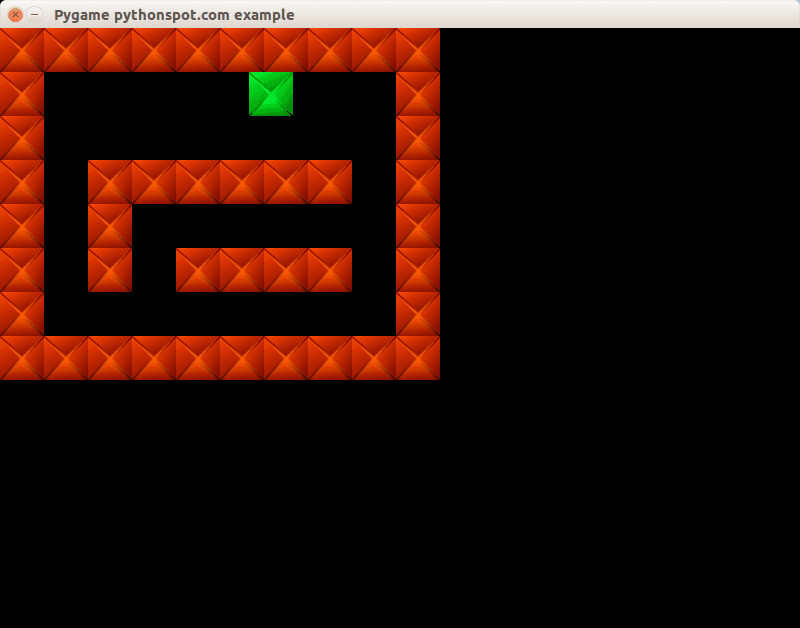
Concluding
You learned how to create a 2d maze in Python. Now you may want to add collision detection which we showed in our previous tutorial. Because we already explained that concept we will not go over it again 🙂