
QT4 Widgets
We have various widgets that we can access with PyQT. Including:
- Textbox
- Combobox
- Calendar
Related course:
Practice Python with interactive exercises
Textbox widget Input fields are present in nearly every application. In PyQT4 an input field can be created using the QLineEdit() function.
#! /usr/bin/env python
# -*- coding: utf-8 -*-
#
import sys
from PyQt4.QtGui import *
# Create an PyQT4 application object.
a = QApplication(sys.argv)
# The QWidget widget is the base class of all user interface objects in PyQt4.
w = QMainWindow()
# Set window size.
w.resize(320, 100)
# Set window title
w.setWindowTitle("PyQT Python Widget!")
# Create textbox
textbox = QLineEdit(w)
textbox.move(20, 20)
textbox.resize(280,40)
# Show window
w.show()
sys.exit(a.exec_())
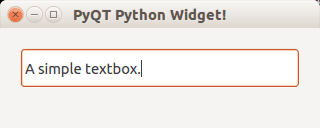 qt textbox
Combobox A combobox can be used to select an item from a list.
#! /usr/bin/env python
# -*- coding: utf-8 -*-
#
import sys
from PyQt4.QtGui import *
# Create an PyQT4 application object.
a = QApplication(sys.argv)
# The QWidget widget is the base class of all user interface objects in PyQt4.
w = QMainWindow()
# Set window size.
w.resize(320, 100)
# Set window title
w.setWindowTitle("PyQT Python Widget!")
# Create combobox
combo = QComboBox(w)
combo.addItem("Python")
combo.addItem("Perl")
combo.addItem("Java")
combo.addItem("C++")
combo.move(20,20)
# Show window
w.show()
sys.exit(a.exec_())
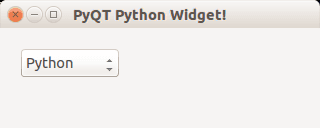 qt combobox
Calendar widget The PyQT4 library has a calendar widget, you can create it using the QCalendarWidget() call.
#! /usr/bin/env python
# -*- coding: utf-8 -*-
#
import sys
from PyQt4.QtGui import *
# Create an PyQT4 application object.
a = QApplication(sys.argv)
# The QWidget widget is the base class of all user interface objects in PyQt4.
w = QMainWindow()
# Set window size.
w.resize(320, 240)
# Set window title
w.setWindowTitle("PyQT Python Widget!")
# Create calendar
cal = QCalendarWidget(w)
cal.setGridVisible(True)
cal.move(0, 0)
cal.resize(320,240)
# Show window
w.show()
sys.exit(a.exec_())
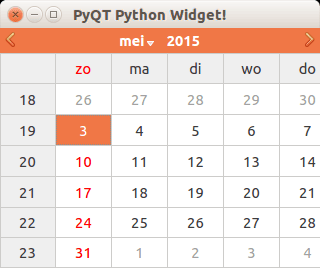 calendar qt