Category: gui
Python hosting: Host, run, and code Python in the cloud!
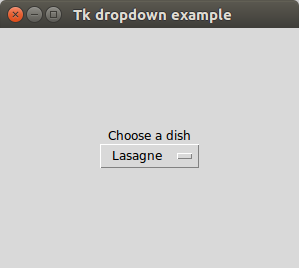
Tk dropdown example
Tkinter supports dropdown menus. This is similar to your standard combobox on your operating system.
The widget is called OptionMenu and the parameters you need are: frame, tk variable and a dictionary with choices.
Related course:
Tkinter dropdown example
The example below creates a Tkinter window with a combobox.
from Tkinter import * import Tkinter as ttk from ttk import * root = Tk() root.title("Tk dropdown example") # Add a grid mainframe = Frame(root) mainframe.grid(column=0,row=0, sticky=(N,W,E,S) ) mainframe.columnconfigure(0, weight = 1) mainframe.rowconfigure(0, weight = 1) mainframe.pack(pady = 100, padx = 100) # Create a Tkinter variable tkvar = StringVar(root) # Dictionary with options choices = { 'Pizza','Lasagne','Fries','Fish','Potatoe'} tkvar.set('Pizza') # set the default option popupMenu = OptionMenu(mainframe, tkvar, *choices) Label(mainframe, text="Choose a dish").grid(row = 1, column = 1) popupMenu.grid(row = 2, column =1) # on change dropdown value def change_dropdown(*args): print( tkvar.get() ) # link function to change dropdown tkvar.trace('w', change_dropdown) root.mainloop() |
It starts by creating a Tk object and pass it to a tkinter frame created with Frame()
root = Tk() root.title("Tk dropdown example") mainframe = Frame(root) |
A grid is added to the frame which will hold the combo-box.
mainframe.grid(column=0,row=0, sticky=(N,W,E,S) ) mainframe.columnconfigure(0, weight = 1) mainframe.rowconfigure(0, weight = 1) mainframe.pack(pady = 100, padx = 100) |
The popup menu contains a list of options which is defined in the variable choices.
A Tkinter variable is created with the line:
tkvar = StringVar(root) |
The default value of the variable is set with the .set() method.
We create the Tkinter combobox with:
popupMenu = OptionMenu(mainframe, tkvar, *choices) |
And link the callback method change_dropdown to this combobox.
Menu with PyQt4
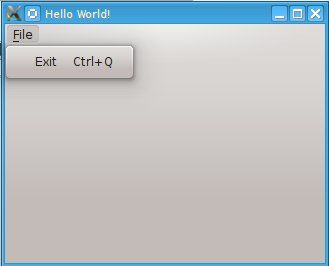
PyQt4 menus appear in the top of the window bar. A menu gives the user control over the application and is often location in the top of the window.
The QMainWindow class creates the main application window. This class has a method named menuBar() which adds the title bar.
Menus can be added to the title bar using addMenu(). Inside each menu you can add a command using the addAction method.
Related course:
PyQt4 menubar
This code will add a menu to your qt4 app:
#! /usr/bin/env python # -*- coding: utf-8 -*- # import sys from PyQt4.QtGui import * # Create an PyQT4 application object. a = QApplication(sys.argv) # The QWidget widget is the base class of all user interface objects in PyQt4. w = QMainWindow() # Set window size. w.resize(320, 240) # Set window title w.setWindowTitle("Hello World!") # Create main menu mainMenu = w.menuBar() mainMenu.setNativeMenuBar(False) fileMenu = mainMenu.addMenu('&File') # Add exit button exitButton = QAction(QIcon('exit24.png'), 'Exit', w) exitButton.setShortcut('Ctrl+Q') exitButton.setStatusTip('Exit application') exitButton.triggered.connect(w.close) fileMenu.addAction(exitButton) # Show window w.show() sys.exit(a.exec_()) |
QT4 Widgets
We have various widgets that we can access with PyQT. Including:
- Textbox
- Combobox
- Calendar
For more widgets we suggest using the GUI creation tool covered in the next tutorial.
Related course:
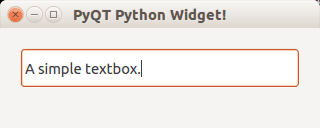
Textbox widget
Input fields are present in nearly every application. In PyQT4 an input field can be created using the QLineEdit() function.
#! /usr/bin/env python # -*- coding: utf-8 -*- # import sys from PyQt4.QtGui import * # Create an PyQT4 application object. a = QApplication(sys.argv) # The QWidget widget is the base class of all user interface objects in PyQt4. w = QMainWindow() # Set window size. w.resize(320, 100) # Set window title w.setWindowTitle("PyQT Python Widget!") # Create textbox textbox = QLineEdit(w) textbox.move(20, 20) textbox.resize(280,40) # Show window w.show() sys.exit(a.exec_()) |
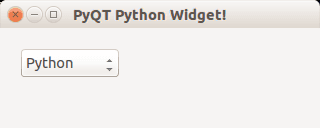
Combobox
A combobox can be used to select an item from a list.
#! /usr/bin/env python # -*- coding: utf-8 -*- # import sys from PyQt4.QtGui import * # Create an PyQT4 application object. a = QApplication(sys.argv) # The QWidget widget is the base class of all user interface objects in PyQt4. w = QMainWindow() # Set window size. w.resize(320, 100) # Set window title w.setWindowTitle("PyQT Python Widget!") # Create combobox combo = QComboBox(w) combo.addItem("Python") combo.addItem("Perl") combo.addItem("Java") combo.addItem("C++") combo.move(20,20) # Show window w.show() sys.exit(a.exec_()) |
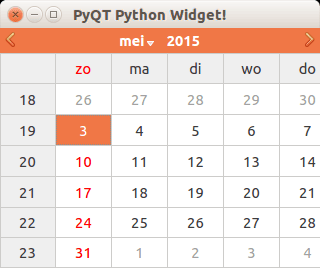
Calendar widget
The PyQT4 library has a calendar widget, you can create it using the QCalendarWidget() call.
#! /usr/bin/env python # -*- coding: utf-8 -*- # import sys from PyQt4.QtGui import * # Create an PyQT4 application object. a = QApplication(sys.argv) # The QWidget widget is the base class of all user interface objects in PyQt4. w = QMainWindow() # Set window size. w.resize(320, 240) # Set window title w.setWindowTitle("PyQT Python Widget!") # Create calendar cal = QCalendarWidget(w) cal.setGridVisible(True) cal.move(0, 0) cal.resize(320,240) # Show window w.show() sys.exit(a.exec_()) |
Result:
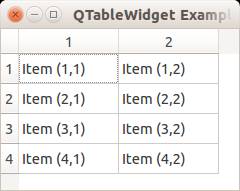
QT4 Table
We can show a table using the QTableWidget, part of the PyQt module. We set the title, row count, column count and add the data.
Related course:
Qt4 Table example
An example below:
from PyQt4.QtGui import * from PyQt4.QtCore import * import sys def main(): app = QApplication(sys.argv) table = QTableWidget() tableItem = QTableWidgetItem() # initiate table table.setWindowTitle("QTableWidget Example @pythonspot.com") table.resize(400, 250) table.setRowCount(4) table.setColumnCount(2) # set data table.setItem(0,0, QTableWidgetItem("Item (1,1)")) table.setItem(0,1, QTableWidgetItem("Item (1,2)")) table.setItem(1,0, QTableWidgetItem("Item (2,1)")) table.setItem(1,1, QTableWidgetItem("Item (2,2)")) table.setItem(2,0, QTableWidgetItem("Item (3,1)")) table.setItem(2,1, QTableWidgetItem("Item (3,2)")) table.setItem(3,0, QTableWidgetItem("Item (4,1)")) table.setItem(3,1, QTableWidgetItem("Item (4,2)")) # show table table.show() return app.exec_() if __name__ == '__main__': main() |
Result:
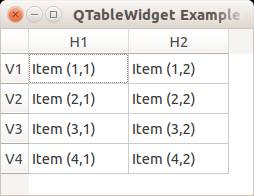
QTableWidget labels
You can set the header using the setHorizontalHeaderLabels() function. The same applies for vertical labels. A demonstration below:
from PyQt4.QtGui import * from PyQt4.QtCore import * import sys def main(): app = QApplication(sys.argv) table = QTableWidget() tableItem = QTableWidgetItem() # initiate table table.setWindowTitle("QTableWidget Example @pythonspot.com") table.resize(400, 250) table.setRowCount(4) table.setColumnCount(2) # set label table.setHorizontalHeaderLabels(QString("H1;H2;").split(";")) table.setVerticalHeaderLabels(QString("V1;V2;V3;V4").split(";")) # set data table.setItem(0,0, QTableWidgetItem("Item (1,1)")) table.setItem(0,1, QTableWidgetItem("Item (1,2)")) table.setItem(1,0, QTableWidgetItem("Item (2,1)")) table.setItem(1,1, QTableWidgetItem("Item (2,2)")) table.setItem(2,0, QTableWidgetItem("Item (3,1)")) table.setItem(2,1, QTableWidgetItem("Item (3,2)")) table.setItem(3,0, QTableWidgetItem("Item (4,1)")) table.setItem(3,1, QTableWidgetItem("Item (4,2)")) # show table table.show() return app.exec_() if __name__ == '__main__': main() |
Result:
QTableWidget click events
We can detect cell clicks using this procedure, first add a function:
# on click function table.cellClicked.connect(cellClick) |
Then define the function:
def cellClick(row,col): print "Click on " + str(row) + " " + str(col) |
The Python programming language starts counting with 0, so when you press on (1,1) you will see (0,0). Full code to detect table clicks:
from PyQt4.QtGui import * from PyQt4.QtCore import * import sys def cellClick(row,col): print "Click on " + str(row) + " " + str(col) def main(): app = QApplication(sys.argv) table = QTableWidget() tableItem = QTableWidgetItem() # initiate table table.setWindowTitle("QTableWidget Example @pythonspot.com") table.resize(400, 250) table.setRowCount(4) table.setColumnCount(2) # set label table.setHorizontalHeaderLabels(QString("H1;H2;").split(";")) table.setVerticalHeaderLabels(QString("V1;V2;V3;V4").split(";")) # set data table.setItem(0,0, QTableWidgetItem("Item (1,1)")) table.setItem(0,1, QTableWidgetItem("Item (1,2)")) table.setItem(1,0, QTableWidgetItem("Item (2,1)")) table.setItem(1,1, QTableWidgetItem("Item (2,2)")) table.setItem(2,0, QTableWidgetItem("Item (3,1)")) table.setItem(2,1, QTableWidgetItem("Item (3,2)")) table.setItem(3,0, QTableWidgetItem("Item (4,1)")) table.setItem(3,1, QTableWidgetItem("Item (4,2)")) # on click function table.cellClicked.connect(cellClick) # show table table.show() return app.exec_() if __name__ == '__main__': main() |
If you want to show the cell/row numbers in a non-programmer way use this instead:
def cellClick(row,col): print "Click on " + str(row+1) + " " + str(col+1) |
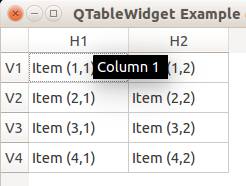
Tooltip text
We can set tooltip (mouse over) text using the method. If you set tooltips on non-existing columns you will get an error.
from PyQt4.QtGui import * from PyQt4.QtCore import * import sys def main(): app = QApplication(sys.argv) table = QTableWidget() tableItem = QTableWidgetItem() # initiate table table.setWindowTitle("QTableWidget Example @pythonspot.com") table.resize(400, 250) table.setRowCount(4) table.setColumnCount(2) # set label table.setHorizontalHeaderLabels(QString("H1;H2;").split(";")) table.setVerticalHeaderLabels(QString("V1;V2;V3;V4").split(";")) # set data table.setItem(0,0, QTableWidgetItem("Item (1,1)")) table.setItem(0,1, QTableWidgetItem("Item (1,2)")) table.setItem(1,0, QTableWidgetItem("Item (2,1)")) table.setItem(1,1, QTableWidgetItem("Item (2,2)")) table.setItem(2,0, QTableWidgetItem("Item (3,1)")) table.setItem(2,1, QTableWidgetItem("Item (3,2)")) table.setItem(3,0, QTableWidgetItem("Item (4,1)")) table.setItem(3,1, QTableWidgetItem("Item (4,2)")) # tooltip text table.horizontalHeaderItem(0).setToolTip("Column 1 ") table.horizontalHeaderItem(1).setToolTip("Column 2 ") # show table table.show() return app.exec_() if __name__ == '__main__': main() |
Result:
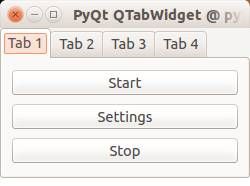
QT4 Tabs
Tabs are very useful in graphical applications. They appear in webbrowsers, text editors and any other apps. To create a tabbed window, you need to call the QTabWidget() function. Every tab is a QWidget() which you have seen before. You can connect the QWidgets with the QTabWidget with the function:
tabs.addTab(tab1,"Tab 1") |
where the first parameter is the tab object and the second the name that appears on the screen. We added some buttons to the first tab (QWidget).
Related course:
Example code:
from PyQt4 import QtGui from PyQt4 import QtCore import sys def main(): app = QtGui.QApplication(sys.argv) tabs = QtGui.QTabWidget() # Create tabs tab1 = QtGui.QWidget() tab2 = QtGui.QWidget() tab3 = QtGui.QWidget() tab4 = QtGui.QWidget() # Resize width and height tabs.resize(250, 150) # Set layout of first tab vBoxlayout = QtGui.QVBoxLayout() pushButton1 = QtGui.QPushButton("Start") pushButton2 = QtGui.QPushButton("Settings") pushButton3 = QtGui.QPushButton("Stop") vBoxlayout.addWidget(pushButton1) vBoxlayout.addWidget(pushButton2) vBoxlayout.addWidget(pushButton3) tab1.setLayout(vBoxlayout) # Add tabs tabs.addTab(tab1,"Tab 1") tabs.addTab(tab2,"Tab 2") tabs.addTab(tab3,"Tab 3") tabs.addTab(tab4,"Tab 4") # Set title and show tabs.setWindowTitle('PyQt QTabWidget @ pythonspot.com') tabs.show() sys.exit(app.exec_()) if __name__ == '__main__': main() |
Result:
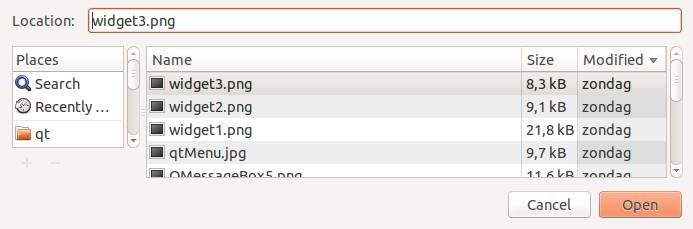
QT4 File Dialog
In this short tutorial you will learn how to create a file dialog and load its file contents. The file dialog is needed in many applications that use file access.
Related course:
File Dialog Example
To get a filename (not file data) in PyQT you can use the line:
filename = QFileDialog.getOpenFileName(w, 'Open File', '/') |
If you are on Microsoft Windows use
filename = QFileDialog.getOpenFileName(w, 'Open File', 'C:\') |
An example below (includes loading file data):
#! /usr/bin/env python # -*- coding: utf-8 -*- # import sys from PyQt4.QtGui import * # Create an PyQT4 application object. a = QApplication(sys.argv) # The QWidget widget is the base class of all user interface objects in PyQt4. w = QWidget() # Set window size. w.resize(320, 240) # Set window title w.setWindowTitle("Hello World!") # Get filename using QFileDialog filename = QFileDialog.getOpenFileName(w, 'Open File', '/') print filename # print file contents with open(filename, 'r') as f: print(f.read()) # Show window w.show() sys.exit(a.exec_()) |
Result (output may vary depending on your operating system):