python logo

pyqt treeview


Python hosting: Host, run, and code Python in the cloud!

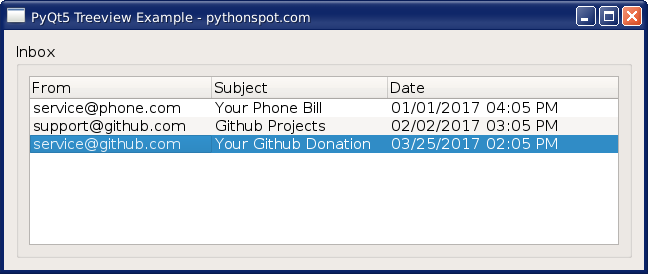
PyQt5 with Qt5 bindings offers an extensive range of features, one of which is the tree view widget, also known as the QTreeView class. This tutorial delves into the utilization and implementation of this widget in Python applications.

PyQt5 TreeView demonstration

For those aiming to enhance their GUI applications, understanding the tree view widget can be beneficial. It’s a versatile component used in many modern applications for hierarchical data representation.

Quick recommendation: If you’re serious about mastering GUI applications, consider the course: Create GUI Apps with PyQt5.

Implementing a Treeview in PyQt5

To comprehend the practicality of the QTreeView widget, let’s dissect a working example. This PyQt5 code snippet will generate a treeview, populate it with data, and integrate it into a GUI layout. Notably, it uses a QVBoxLayout for the overall layout design.

1
2
3
4
5
6
7
8
9
10
11
12
13
14
15
16
17
18
19
20
21
22
23
24
25
26
27
28
29
30
31
32
33
34
35
36
37
38
39
40
41
42
43
44
45
46
47
48
49
50
51
52
53
54
55
56
57
58
59
60
61
62
#!/usr/bin/env python3

import sys
from PyQt5.QtGui import QIcon
from PyQt5.QtCore import (QDate, QDateTime, QRegExp, QSortFilterProxyModel, Qt, QTime)
from PyQt5.QtGui import QStandardItemModel
from PyQt5.QtWidgets import (QApplication, QCheckBox, QComboBox, QGridLayout, QGroupBox, QHBoxLayout, QLabel, QLineEdit, QTreeView, QVBoxLayout, QWidget)

class App(QWidget):
FROM, SUBJECT, DATE = range(3)

def __init__(self):
super().__init__()
self.title = 'PyQt5 Treeview Tutorial - pythonspot.com'
self.left = 10
self.top = 10
self.width = 640
self.height = 240
self.initUI()

def initUI(self):
self.setWindowTitle(self.title)
self.setGeometry(self.left, self.top, self.width, self.height)

self.dataGroupBox = QGroupBox("Inbox")
self.dataView = QTreeView()
self.dataView.setRootIsDecorated(False)
self.dataView.setAlternatingRowColors(True)

dataLayout = QHBoxLayout()
dataLayout.addWidget(self.dataView)
self.dataGroupBox.setLayout(dataLayout)

model = self.createMailModel(self)
self.dataView.setModel(model)
self.addMail(model, '[email protected]', 'Your Github Donation','03/25/2017 02:05 PM')
self.addMail(model, '[email protected]', 'Github Projects','02/02/2017 03:05 PM')
self.addMail(model, '[email protected]', 'Your Phone Bill','01/01/2017 04:05 PM')

mainLayout = QVBoxLayout()
mainLayout.addWidget(self.dataGroupBox)
self.setLayout(mainLayout)

self.show()

def createMailModel(self, parent):
model = QStandardItemModel(0, 3, parent)
model.setHeaderData(self.FROM, Qt.Horizontal, "From")
model.setHeaderData(self.SUBJECT, Qt.Horizontal, "Subject")
model.setHeaderData(self.DATE, Qt.Horizontal, "Date")
return model

def addMail(self, model, mailFrom, subject, date):
model.insertRow(0)
model.setData(model.index(0, self.FROM), mailFrom)
model.setData(model.index(0, self.SUBJECT), subject)
model.setData(model.index(0, self.DATE), date)

if __name__ == '__main__':
app = QApplication(sys.argv)
ex = App()
sys.exit(app.exec_())

Decoding the Treeview Code

Let’s elucidate some crucial portions of the provided code:

  1. Initialization: The tree view object is instantiated using the line:

    1
    self.dataView = QTreeView()
  2. Data Model Assignment: The model for the tree view is designated using:

    1
    self.dataView.setModel(model)
  3. Model Structure: The model’s structure is detailed using:

    1
    2
    3
    4
    model = QStandardItemModel(0, 3, parent)
    model.setHeaderData(self.FROM, Qt.Horizontal, "From")
    model.setHeaderData(self.SUBJECT, Qt.Horizontal, "Subject")
    model.setHeaderData(self.DATE, Qt.Horizontal, "Date")
  4. Data Ingestion: Data is appended to the tree view with:

    1
    2
    3
    4
    model.insertRow(0)
    model.setData(model.index(0, self.FROM), mailFrom)
    model.setData(model.index(0, self.SUBJECT), subject)
    model.setData(model.index(0, self.DATE), date)

For those eager to dive deeper into PyQt5 functionalities, Download PyQT5 Examples. It provides a myriad of practical samples to enhance your PyQt5 coding capabilities.

Feeling ready to tackle more PyQt5 challenges? Move on to the next tutorial or revisit the previous lesson.


Leave a Reply: