Category: pro
Python hosting: Host, run, and code Python in the cloud!
Face detection in Google Hangouts video
In this tutorial you will learn how to apply face detection with Python. As input video we will use a Google Hangouts video. There are tons of Google Hangouts videos around the web and in these videos the face is usually large enough for the software to detect the faces.
Detection of faces is achieved using the OpenCV (Open Computer Vision) library. The most common face detection method is to extract cascades. This technique is known to work well with face detection. You need to have the cascade files (included in OpenCV) in the same directory as your program.
Related course
Master Computer Vision with OpenCV
Video with Python OpenCV
To analyse the input video we extract each frame. Each frame is shown for a brief period of time. Start with this basic program:
#! /usr/bin/python import cv2 vc = cv2.VideoCapture('video.mp4') c=1 fps = 24 if vc.isOpened(): rval , frame = vc.read() else: rval = False while rval: rval, frame = vc.read() cv2.imshow("Result",frame) cv2.waitKey(1000 / fps); vc.release() |
Upon execution you will see the video played without sound. (OpenCV does not support sound). Inside the while loop we have every video frame inside the variable frame.
Face detection with OpenCV
We will display a rectangle on top of the face. To avoid flickering of the rectangle, we will show it at it latest known position if the face is not detected.
#! /usr/bin/python import cv2 face_cascade = cv2.CascadeClassifier('lbpcascade_frontalface.xml') vc = cv2.VideoCapture('video.mp4') if vc.isOpened(): rval , frame = vc.read() else: rval = False roi = [0,0,0,0] while rval: rval, frame = vc.read() # resize frame for speed. frame = cv2.resize(frame, (300,200)) # face detection. faces = face_cascade.detectMultiScale(frame, 1.8, 2) nfaces = 0 for (x,y,w,h) in faces: cv2.rectangle(frame,(x,y),(x+w,y+h),(0,0,255),2) nfaces = nfaces + 1 roi = [x,y,w,h] # undetected face, show old on position. if nfaces == 0: cv2.rectangle(frame,(roi[0],roi[1]),(roi[0]+roi[2],roi[1]+roi[3]),(0,0,255),2) # show result cv2.imshow("Result",frame) cv2.waitKey(1); vc.release() |
In this program we simply assumed there is one face in the video screen. We reduced the size of the screen to speed up the processing time. This is fine in most cases because detection will work fine in lower resolutions. If you want to execute the face detection in “real time”, keeping the computational cycle short is mandatory. An alternative to this implementation is to process first and display later.
A limitation of this technique is that it does not always detect faces and faces that are very small or occluded may not be detected. It may show false positives such as a bag detected as face. This technique works quite well on certain type of input videos.
Car tracking with cascades
In this tutorial we will look at vehicle tracking using haar features. We have a haar cascade file trained on cars.
The program will detect regions of interest, classify them as cars and show rectangles around them.
Related courses:
Detecting with cascades
Lets start with the basic cascade detection program:
#! /usr/bin/python import cv2 face_cascade = cv2.CascadeClassifier('cars.xml') vc = cv2.VideoCapture('road.avi') if vc.isOpened(): rval , frame = vc.read() else: rval = False while rval: rval, frame = vc.read() # car detection. cars = face_cascade.detectMultiScale(frame, 1.1, 2) ncars = 0 for (x,y,w,h) in cars: cv2.rectangle(frame,(x,y),(x+w,y+h),(0,0,255),2) ncars = ncars + 1 # show result cv2.imshow("Result",frame) cv2.waitKey(1); vc.release() |
This will detect cars in the screen but also noise and the screen will be jittering sometimes. To avoid all of these, we have to improve our car tracking algorithm. We decided to come up with a simple solution.
Car tracking algorithm
For every frame:
- Detect potential regions of interest
- Filter detected regions based on vertical,horizontal similarity
- If its a new region, add to the collection
- Clear collection every 30 frames
Removing false positives
The mean square error function is used to remove false positives. We compare vertical and horizontal sides of the images. If the difference is to large or to small it cannot be a car.
ROI detection
A car may not be detected in every frame. If a new car is detected, its added to the collection.
We keep this collection for 30 frames, then clear it.
#! /usr/bin/python import cv2 import numpy as np def diffUpDown(img): # compare top and bottom size of the image # 1. cut image in two # 2. flip the top side # 3. resize to same size # 4. compare difference height, width, depth = img.shape half = height/2 top = img[0:half, 0:width] bottom = img[half:half+half, 0:width] top = cv2.flip(top,1) bottom = cv2.resize(bottom, (32, 64)) top = cv2.resize(top, (32, 64)) return ( mse(top,bottom) ) def diffLeftRight(img): # compare left and right size of the image # 1. cut image in two # 2. flip the right side # 3. resize to same size # 4. compare difference height, width, depth = img.shape half = width/2 left = img[0:height, 0:half] right = img[0:height, half:half + half-1] right = cv2.flip(right,1) left = cv2.resize(left, (32, 64)) right = cv2.resize(right, (32, 64)) return ( mse(left,right) ) def mse(imageA, imageB): err = np.sum((imageA.astype("float") - imageB.astype("float")) ** 2) err /= float(imageA.shape[0] * imageA.shape[1]) return err def isNewRoi(rx,ry,rw,rh,rectangles): for r in rectangles: if abs(r[0] - rx) < 40 and abs(r[1] - ry) < 40: return False return True def detectRegionsOfInterest(frame, cascade): scaleDown = 2 frameHeight, frameWidth, fdepth = frame.shape # Resize frame = cv2.resize(frame, (frameWidth/scaleDown, frameHeight/scaleDown)) frameHeight, frameWidth, fdepth = frame.shape # haar detection. cars = cascade.detectMultiScale(frame, 1.2, 1) newRegions = [] minY = int(frameHeight*0.3) # iterate regions of interest for (x,y,w,h) in cars: roi = [x,y,w,h] roiImage = frame[y:y+h, x:x+w] carWidth = roiImage.shape[0] if y > minY: diffX = diffLeftRight(roiImage) diffY = round(diffUpDown(roiImage)) if diffX > 1600 and diffX < 3000 and diffY > 12000: rx,ry,rw,rh = roi newRegions.append( [rx*scaleDown,ry*scaleDown,rw*scaleDown,rh*scaleDown] ) return newRegions def detectCars(filename): rectangles = [] cascade = cv2.CascadeClassifier('cars.xml') vc = cv2.VideoCapture(filename) if vc.isOpened(): rval , frame = vc.read() else: rval = False roi = [0,0,0,0] frameCount = 0 while rval: rval, frame = vc.read() frameHeight, frameWidth, fdepth = frame.shape newRegions = detectRegionsOfInterest(frame, cascade) for region in newRegions: if isNewRoi(region[0],region[1],region[2],region[3],rectangles): rectangles.append(region) for r in rectangles: cv2.rectangle(frame,(r[0],r[1]),(r[0]+r[2],r[1]+r[3]),(0,0,255),3) frameCount = frameCount + 1 if frameCount > 30: frameCount = 0 rectangles = [] # show result cv2.imshow("Result",frame) cv2.waitKey(1); vc.release() detectCars('road.avi') |
Final notes
The cascades are not rotation invariant, scale and translation invariant. In addition, Detecting vehicles with haar cascades may work reasonably well, but there is gain with other algorithms (salient points).
You may like:
Create and read csv
Spreadsheets often export CSV (comma seperated values) files, because they are easy to read and write. A csv file is simply consists of values, commas and newlines. While the file is called ‘comma seperate value’ file, you can use another seperator such as the pipe character.
Related course
Data Analysis with Python Pandas
Create a spreadsheet file (CSV) in Python
Let us create a file in CSV format with Python. We will use the comma character as seperator or delimter.
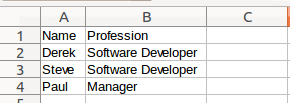
import csv with open('persons.csv', 'wb') as csvfile: filewriter = csv.writer(csvfile, delimiter=',', quotechar='|', quoting=csv.QUOTE_MINIMAL) filewriter.writerow(['Name', 'Profession']) filewriter.writerow(['Derek', 'Software Developer']) filewriter.writerow(['Steve', 'Software Developer']) filewriter.writerow(['Paul', 'Manager']) |
Running this code will give us this fil persons.csv with this content:
Name,Profession Derek,Software Developer Steve,Software Developer Paul,Manager |
You can import the persons.csv file in your favorite office program.
Read a spreadsheet file (csv)
If you created a csv file, we can read files row by row with the code below:
import csv # open file with open('persons.csv', 'rb') as f: reader = csv.reader(f) # read file row by row for row in reader: print row |
This will simply show every row as a list:
['Name', 'Profession'] ['Derek', 'Software Developer'] ['Steve', 'Software Developer'] ['Paul', 'Manager'] |
Perhaps you want to store that into Python lists. We get the data from the csv file and then store it into Python lists. We skip the header with an if statement because it does not belong in the lists. Full code:
import csv # create list holders for our data. names = [] jobs = [] # open file with open('persons.csv', 'rb') as f: reader = csv.reader(f) # read file row by row rowNr = 0 for row in reader: # Skip the header row. if rowNr >= 1: names.append(row[0]) jobs.append(row[1]) # Increase the row number rowNr = rowNr + 1 # Print data print names print jobs |
Result:
['Derek', 'Steve', 'Paul'] ['Software Developer', 'Software Developer', 'Manager'] |
Most spreadsheet or office programs can export csv files, so we recommend you to create any type of csv file and play around with it 🙂
Regular Expressions
Regular expressions are essentially a highly specialized programming language embedded inside Python that empowers you to specify the rules for the set of possible strings that you want to match.
In Python you need the re module for regular expressions usage. The grammar overview is on the bottom of this page.
Related course:
Python Programming Bootcamp: Go from zero to hero
The Match function
The match function is defined as:
re.match(pattern, string) |
The parameters are:
| Parameters | Description |
|---|---|
| pattern | a regular expression |
| string | the input string |
If you want to match a string to a numberic sequence of exactly five, you can use this code:
#!/usr/bin/python import re input = raw_input("Enter an input string:") m = re.match('\d{5}\Z',input) if m: print("True") else: print("False") |
Example outputs:
| String | Match |
|---|---|
| 12345 | True |
| 12358 | True |
| 55555 | True |
| 123 | False |
| 123K5 | False |
| 5555555 | False |
Email validation regex
We can use the same function to validate email address. The grammar rules are seen in re.compile and in the grammar table.
#!/usr/bin/python import re input = raw_input("Enter an input string:") m = re.match('[^@][email protected][^@]+\.[^@]+',input) if m: print("True") else: print("False") |
The Search Function
The search function is defined as:
re.search(pattern, string) |
The parameters are:
| Parameter | Description |
|---|---|
| pattern | a regular expression, defines the string to be searched |
| string | the search space |
To search if an e-mail address is in a string:
#!/usr/bin/python import re input = "Contact me by [email protected] or at the office." m = re.search('[^@][email protected][^@]+\.[^@]+',input) if m: print("String found.") else: print("Nothing found.") |
Regular Expression Examples
A few examples of regular expressions:
| Example | Regex |
|---|---|
| IP address | (([2][5][0-5]\.)|([2][0-4][0-9]\.)|([0-1]?[0-9]?[0-9]\.)){3}(([2][5][0-5])|([2][0-4][0-9])|([0-1]?[0-9]?[0-9])) |
| [^@][email protected][^@]+\.[^@]+ | |
| Date MM/DD/YY | (\d+/\d+/\d+) |
| Integer (positive) | (?<![-.])\b[0-9]+\b(?!\.[0-9]) |
| Integer | [+-]?(?<!\.)\b[0-9]+\b(?!\.[0-9]) |
| Float | (?<=>)\d+.\d+|\d+ |
| Hexadecimal | \s–([0-9a-fA-F]+)(?:–)?\s |
Regular Expression Grammar
Overview of the regex grammar:
| Regex | Description |
|---|---|
| \d | Matches any decimal digit; this is equivalent to the class [0-9] |
| \D | Matches any non-digit character; this is equivalent to the class [^0-9]. |
| \s | Matches any whitespace character; this is equivalent to the class [ \t\n\r\f\v]. |
| \S | Matches any non-whitespace character; this is equivalent to the class [^ \t\n\r\f\v]. |
| \w | Matches any alphanumeric character; this is equivalent to the class [a-zA-Z0-9_]. |
| \W | Matches any non-alphanumeric character; this is equivalent to the class [^a-zA-Z0-9_]. |
| \Z | Matches only at end of string |
| [..] | Match single character in brackets |
| [^..] | Match any single character not in brackets |
| . | Match any character except newline |
| $ | Match the end of the string |
| * | Match 0 or more repetitions |
| + | 1 or more repetitions |
| {m} | Exactly m copies of the previous RE should be matched. |
| | | Match A or B. A|B |
| ? | 0 or 1 repetitions of the preceding RE |
| [a-z] | Any lowercase character |
| [A-Z] | Any uppercase character |
| [a-zA-Z] | Any character |
| [0-9] | Any digit |
Fun tricks with Python
Starting a simple HTTP web server
A simple HTTP Server can be started in seconds.
python -m SimpleHTTPServer |
For Python3:
python -m http.server |
Once started you can open http://127.0.0.1:8000/. The browser will show you the contents of the directory.
A funny text
Try the statement below to display a poem by Tim Peters.
import this |
XKCD web comic
You can open a comic on XKCD using:
import antigravity |
Using Zip to combine arrays
You can zip the two arrays with:
b = [[1, 2, 3, 4], [6, 5, 4, 3]] zip(*b) [(1, 6), (2, 5), (3, 4), (4, 3)] |
Reverse a list
To reverse a list, you could implement a function. But why go through the trouble if it’s already implemented?
b = [1,2,3,4,5] b.reverse() print b [5, 4, 3, 2, 1] |
Reverse a string
Instead of creating a method to reverse a string you can use:
s = "Hello world" s = s[::-1] print s dlrow olleH |
Swapping variables
You do not need to define a temporary variable to swap to variables in Python:
a = 1 b = 3 b,a = a,b print a print b 1 |
If you know of any tips or tricks, leave a comment. 🙂
Flask, JSON and the Google Charts API
This tutorial will teach you how to build a Flask app that combined with JSON and the Google Charts API. If you have no experience with Flask before I recommend reading my previous tutorials, they are great fun!
Related course
Python Flask: Make Web Apps with Python
$ pip install Flask |
Create a file called hello.py
from flask import Flask app = Flask(__name__) @app.route("/") def hello(): return "Hello World!" if __name__ == "__main__": app.run() |
Finally run the web app using this command:
$ python hello.py * Running on http://localhost:5000/ |
Open http://localhost:5000/ in your webbrowser, and “Hello World!” should appear.
Get JSON data
To display awesome charts we first need some data. There are two common ways to get data in web apps: data from servers using an API (usually JSON) and data from databases. I use the Fixer.io JSON API to get some financial data, but any JSON API should do. If you are unfamiliar with JSON, see this article.
We wrote this script to get the exchange rates:
import json import urllib2 def getExchangeRates(): rates = [] response = urllib2.urlopen('http://api.fixer.io/latest') data = response.read() rdata = json.loads(data, parse_float=float) rates.append( rdata['rates']['USD'] ) rates.append( rdata['rates']['GBP'] ) rates.append( rdata['rates']['JPY'] ) rates.append( rdata['rates']['AUD'] ) return rates rates = getExchangeRates() print rates |
Google Charts API with Flask
With the Google Charts API you can display live data on your site. There are a lot of great charts there that are easy to add to your Flask app. We simply give the data that we got from the server through JSON and parsed, to the Google Charts API.
Create a flask app with the directory /templates/ for your templates. This is the main Flask code:
from flask import Flask, flash, redirect, render_template, request, session, abort import os import json import urllib2 tmpl_dir = os.path.join(os.path.dirname(os.path.abspath(__file__)), 'templates') app = Flask(__name__, template_folder=tmpl_dir) def getExchangeRates(): rates = [] response = urllib2.urlopen('http://api.fixer.io/latest') data = response.read() rdata = json.loads(data, parse_float=float) rates.append( rdata['rates']['USD'] ) rates.append( rdata['rates']['GBP'] ) rates.append( rdata['rates']['HKD'] ) rates.append( rdata['rates']['AUD'] ) return rates @app.route("/") def index(): rates = getExchangeRates() return render_template('test.html',**locals()) @app.route("/hello") def hello(): return "Hello World!" if __name__ == "__main__": app.run() |
And we have this template:
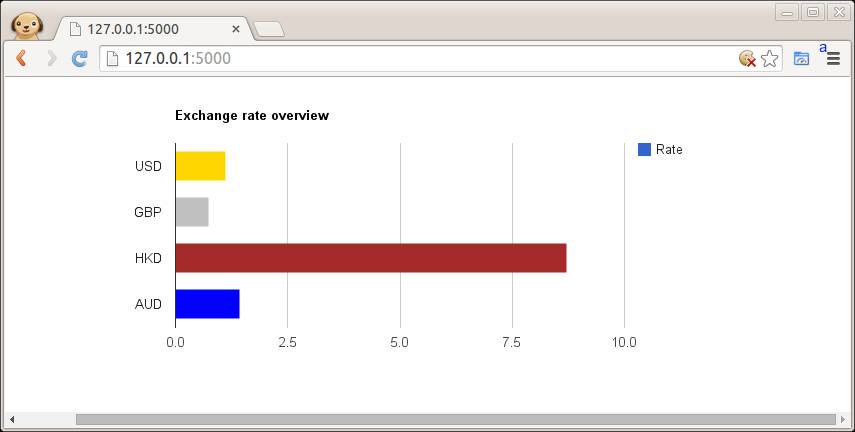
{% block body %} <script type="text/javascript" src="https://www.google.com/jsapi"></script> <div id="chart_div" style="width: 900px; height: 300px;"> <div> <script type="text/javascript">//<![CDATA[ google.load('visualization', '1', {packages: ['corechart', 'bar']});<br /> google.setOnLoadCallback(drawBasic);</p> <p>function drawBasic() {</p> <p> var data = google.visualization.arrayToDataTable([<br /> ['Currency', 'Rate', { role: 'style' }],<br /> ['USD', {{rates[0]}}, 'gold'],<br /> ['GBP', {{rates[1]}}, 'silver'],<br /> ['HKD', {{rates[2]}}, 'brown'],<br /> ['AUD', {{rates[3]}}, 'blue']<br /> ]);</p> <p> var options = {<br /> title: 'Exchange rate overview',<br /> chartArea: {width: '50%'},<br /> hAxis: {<br /> title: '',<br /> minValue: 0<br /> },<br /> vAxis: {<br /> title: ''<br /> }<br /> };</p> <p> var chart = new google.visualization.BarChart(document.getElementById('chart_div'));</p> <p> chart.draw(data, options);<br /> }<br /> //]]> </p> <p></script> {% endblock %} |
Result: