Category: pro
Python hosting: Host, run, and code Python in the cloud!
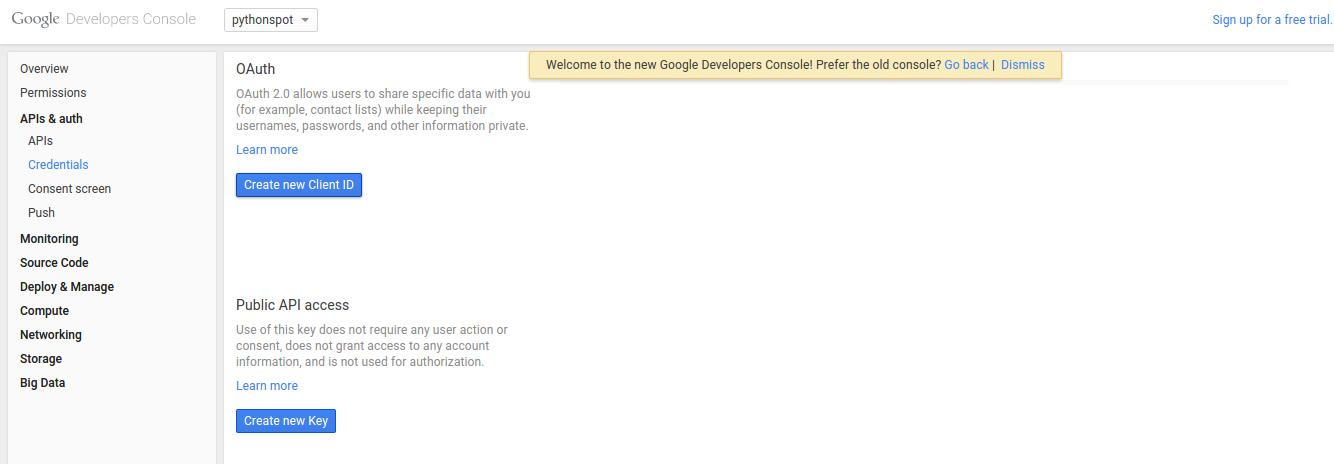
Login to your Flask app with Google
In this article you will learn how to use Google for login authentication in a Flask app. Instead of using a custom user login system, you could use Google to authenticate with your website. Your visitors may already have an account on Google, so why not use it to login?
To do so, we use a protocol called OAuth. From wikipedia:
OAuth is a protocol that utilizes tokens in order to access resources on behalf of a resource owner. Think giving a user the ability to give out a valet key to certain portions of your site. Many sites, such as Google, Facebook, and Twitter use OAuth for authenticating third party clients in order to access certain user resources.
Don’t worry if that sounds vague, we’ll take you through the steps.
Related course
Python Flask: Make Web Apps with Python
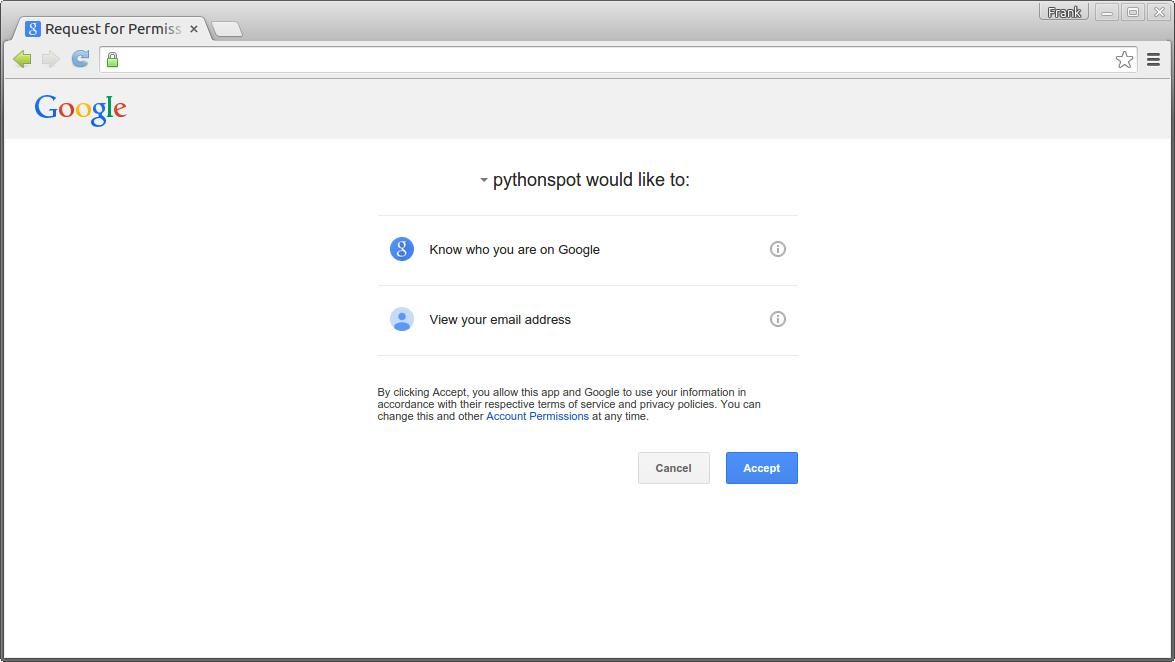
You will see this screen popup:
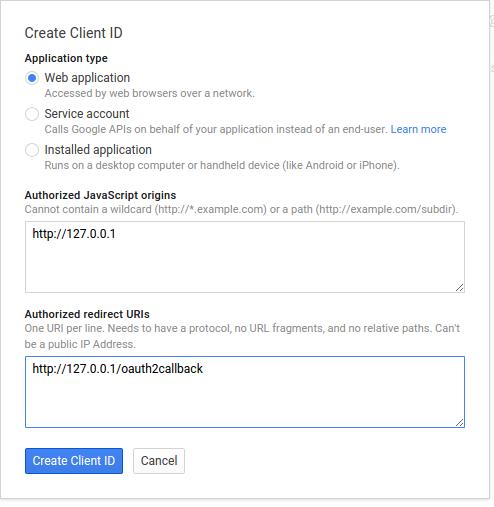
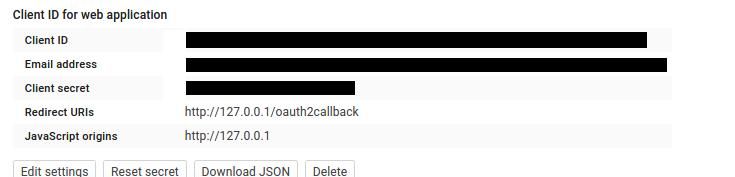
Type your information and press “Create Client ID”. You then have a Client ID and Client secret which you will need.
Login authentication with Google
We use a module called flask_oauth to authenticate with Google. It is maintained by Armin Ronacher, the creator of Flask, so you can be sure the module does not die. The module uses OAuth, a protocol that gives tokens in order to access resources. Other modules may not have as good support.
Copy the code below and set the client id and client secret that you got from Google above. Just replace the lines:
GOOGLE_CLIENT_ID = 'PUT CLIENT ID' GOOGLE_CLIENT_SECRET = 'PUT CLIENT SECRET' |
Save the program as app.py
from flask import Flask, redirect, url_for, session from flask_oauth import OAuth # You must configure these 3 values from Google APIs console # https://code.google.com/apis/console GOOGLE_CLIENT_ID = 'PUT CLIENT ID' GOOGLE_CLIENT_SECRET = 'PUT CLIENT SECRET' REDIRECT_URI = '/oauth2callback' # one of the Redirect URIs from Google APIs console SECRET_KEY = 'development key' DEBUG = True app = Flask(__name__) app.debug = DEBUG app.secret_key = SECRET_KEY oauth = OAuth() google = oauth.remote_app('google', base_url='https://www.google.com/accounts/', authorize_url='https://accounts.google.com/o/oauth2/auth', request_token_url=None, request_token_params={'scope': 'https://www.googleapis.com/auth/userinfo.email', 'response_type': 'code'}, access_token_url='https://accounts.google.com/o/oauth2/token', access_token_method='POST', access_token_params={'grant_type': 'authorization_code'}, consumer_key=GOOGLE_CLIENT_ID, consumer_secret=GOOGLE_CLIENT_SECRET) @app.route('/') def index(): access_token = session.get('access_token') if access_token is None: return redirect(url_for('login')) access_token = access_token[0] from urllib2 import Request, urlopen, URLError headers = {'Authorization': 'OAuth '+access_token} req = Request('https://www.googleapis.com/oauth2/v1/userinfo', None, headers) try: res = urlopen(req) except URLError, e: if e.code == 401: # Unauthorized - bad token session.pop('access_token', None) return redirect(url_for('login')) return res.read() return res.read() @app.route('/login') def login(): callback=url_for('authorized', _external=True) return google.authorize(callback=callback) @app.route(REDIRECT_URI) @google.authorized_handler def authorized(resp): access_token = resp['access_token'] session['access_token'] = access_token, '' return redirect(url_for('index')) @google.tokengetter def get_access_token(): return session.get('access_token') def main(): app.run() if __name__ == '__main__': main() |
Execute using:
python app.py * Running on http://127.0.0.1:5000/ * Restarting with reloader |
You can then open the link to see the login screen. The app will simply return your account information encoded in JSON format once you accept.
Finally, you can validate if the access token is set on new routes.
Download Flask Examples
Simple text game with Python
In this article we will demonstrate how to create a simple guessing game.
The goal of the game is to guess the right number.
Example
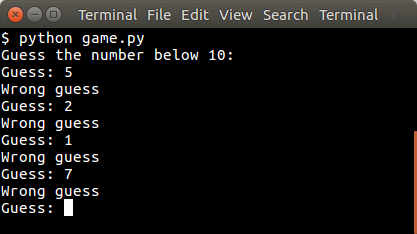
An example run below:
You may like
Random number
The user will be asked to guess the random number. We first pick the random number:
from random import randint x = randint(1,9) |
The randint() function will pick a pseudo random number between 1 and 10. Then we have to continue until the correct number is found:
guess = -1 print("Guess the number below 10:") while guess != x: guess = int(raw_input("Guess: ")) if guess != x: print("Wrong guess") else: print("Guessed correctly") |
Python Guessing Game
The code below starts the game:
from random import randint x = randint(1,9) guess = -1 print "Guess the number below 10:" while guess != x: guess = int(raw_input("Guess: ")) if guess != x: print("Wrong guess") else: print("Guessed correctly") |
An example run:
Guess the number below 10: Guess: 3 Wrong guess Guess: 6 Wrong guess .. |
Python network sockets programming tutorial
In this tutorial you will learn about in network programming. You will learn about the client-server model that is in use for the World Wide Web, E-mail and many other applications.
Related course:
If you prefer a course or certification:
socket server code
This code will start a simple web server using sockets. It waits for a connection and if a connection is received it will output the bytes received.
#!/usr/bin/env python import socket TCP_IP = '127.0.0.1' TCP_PORT = 62 BUFFER_SIZE = 20 # Normally 1024, but we want fast response s = socket.socket(socket.AF_INET, socket.SOCK_STREAM) s.bind((TCP_IP, TCP_PORT)) s.listen(1) conn, addr = s.accept() print 'Connection address:', addr while 1: data = conn.recv(BUFFER_SIZE) if not data: break print "received data:", data conn.send(data) # echo conn.close() |
Execute with:
$ python server.py |
This opens the web server at port 62. In a second screen, open a client with Telnet. If you use the same machine for the client and server use:
$ telnet 127.0.0.1 62. |
If you use another machine as client, type the according IP address of that machine. You can find it with ifconfig.
Everything you write from the client will arrive at the server. The server sends the received messages back. An example output below (Click to enlarge):
socket network client:
The client script below sends a message to the server. The server must be running!
#!/usr/bin/env python import socket TCP_IP = '127.0.0.1' TCP_PORT = 5005 BUFFER_SIZE = 1024 MESSAGE = "Hello, World!" s = socket.socket(socket.AF_INET, socket.SOCK_STREAM) s.connect((TCP_IP, TCP_PORT)) s.send(MESSAGE) data = s.recv(BUFFER_SIZE) s.close() print "received data:", data |
This client simply mimics the behavior we did in Telnet.
Limitations of the server code
The server code above can only interact with one client. If you try to connect with a second terminal it simply won’t reply to the new client. To let the server interact with multiple clients you need to use multi-threading. We rebuild the server script to accept multiple client connections:
#!/usr/bin/env python import socket from threading import Thread from SocketServer import ThreadingMixIn class ClientThread(Thread): def __init__(self,ip,port): Thread.__init__(self) self.ip = ip self.port = port print "[+] New thread started for "+ip+":"+str(port) def run(self): while True: data = conn.recv(2048) if not data: break print "received data:", data conn.send(data) # echo TCP_IP = '0.0.0.0' TCP_PORT = 62 BUFFER_SIZE = 20 # Normally 1024, but we want fast response tcpsock = socket.socket(socket.AF_INET, socket.SOCK_STREAM) tcpsock.setsockopt(socket.SOL_SOCKET, socket.SO_REUSEADDR, 1) tcpsock.bind((TCP_IP, TCP_PORT)) threads = [] while True: tcpsock.listen(4) print "Waiting for incoming connections..." (conn, (ip,port)) = tcpsock.accept() newthread = ClientThread(ip,port) newthread.start() threads.append(newthread) for t in threads: t.join() |
Application protocol
So far we have simply sent messages back and forth. Every message can have a specific meaning in an application. This is known as the protocol. The meaning of these messages must be the same on both the sender and receiver side. The Transport Layer below makes sure that messages are received (TCP). The Internet Layer is the IPv4 protocol. All we have to define is the Application Layer.
Below we modified the server to accept simple commands (We use the non-threading server for simplicity). We changed the port to 64. Server code with a protocol:
#!/usr/bin/env python import socket TCP_IP = '127.0.0.1' TCP_PORT = 64 BUFFER_SIZE = 20 # Normally 1024, but we want fast response s = socket.socket(socket.AF_INET, socket.SOCK_STREAM) s.bind((TCP_IP, TCP_PORT)) s.listen(1) conn, addr = s.accept() print 'Connection address:', addr while 1: data = conn.recv(BUFFER_SIZE) if not data: break print "received data:", data #conn.send(data) # echo if "/version" in data: conn.send("Demo versionn") if "/echo" in data: data = data.replace("/echo","") conn.send(data + "n") conn.close() |
Run the server with:
sudo python server.py |
A client can then connect with telnet (make sure you pick the right IP):
$ telnet 127.0.0.1 64 Trying 127.0.0.1... Connected to 127.0.0.1. Escape character is '^]'. message /version Demo version /echo Repeat this Repeat this |
JSON encoding and decoding with Python
Introduction
JSON (JavaScript Object Notation) is frequently used between a server and a web application. An example of JSON data:
{ "persons": [ { "city": "Seattle", "name": "Brian" }, { "city": "Amsterdam", "name": "David" } ] } |
The json module enables you to convert between JSON and Python Objects.
JSON conversion examples
Convert JSON to Python Object (Dict)
To convert JSON to a Python dict use this:
import json json_data = '{"name": "Brian", "city": "Seattle"}' python_obj = json.loads(json_data) print python_obj["name"] print python_obj["city"] |
Convert JSON to Python Object (List)
JSON data can be directly mapped to a Python list.
import json array = '{"drinks": ["coffee", "tea", "water"]}' data = json.loads(array) for element in data['drinks']: print element |
Convert JSON to Python Object (float)
Floating points can be mapped using the decimal library.
import json from decimal import Decimal jsondata = '{"number": 1.573937639}' x = json.loads(jsondata, parse_float=Decimal) print x['number'] |
Convert JSON to Python Object (Example)
JSON data often holds multiple objects, an example of how to use that below:
import json json_input = '{"persons": [{"name": "Brian", "city": "Seattle"}, {"name": "David", "city": "Amsterdam"} ] }' try: decoded = json.loads(json_input) # Access data for x in decoded['persons']: print x['name'] except (ValueError, KeyError, TypeError): print "JSON format error" |
Convert Python Object (Dict) to JSON
If you want to convert a Python Object to JSON use the json.dumps() method.
import json from decimal import Decimal d = {} d["Name"] = "Luke" d["Country"] = "Canada" print json.dumps(d, ensure_ascii=False) # result {"Country": "Canada", "Name": "Luke"} |
Converting JSON data to Python objects
JSON data can be converted (deserialized) to Pyhon objects using the json.loads() function. A table of the mapping:
| JSON | Python |
|---|---|
| object | dict |
| array | list |
| string | str |
| number (int) | int |
| number (real) | float |
| true | True |
| false | False |
| null | None |
Pretty printing
If you want to display JSON data you can use the json.dumps() function.
import json json_data = '{"name": "Brian", "city": "Seattle"}' python_obj = json.loads(json_data) print json.dumps(python_obj, sort_keys=True, indent=4) |
Menu with PyQt4
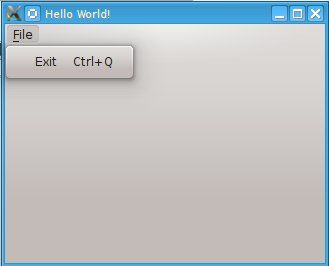
PyQt4 menus appear in the top of the window bar. A menu gives the user control over the application and is often location in the top of the window.
The QMainWindow class creates the main application window. This class has a method named menuBar() which adds the title bar.
Menus can be added to the title bar using addMenu(). Inside each menu you can add a command using the addAction method.
Related course:
PyQt4 menubar
This code will add a menu to your qt4 app:
#! /usr/bin/env python # -*- coding: utf-8 -*- # import sys from PyQt4.QtGui import * # Create an PyQT4 application object. a = QApplication(sys.argv) # The QWidget widget is the base class of all user interface objects in PyQt4. w = QMainWindow() # Set window size. w.resize(320, 240) # Set window title w.setWindowTitle("Hello World!") # Create main menu mainMenu = w.menuBar() mainMenu.setNativeMenuBar(False) fileMenu = mainMenu.addMenu('&File') # Add exit button exitButton = QAction(QIcon('exit24.png'), 'Exit', w) exitButton.setShortcut('Ctrl+Q') exitButton.setStatusTip('Exit application') exitButton.triggered.connect(w.close) fileMenu.addAction(exitButton) # Show window w.show() sys.exit(a.exec_()) |
QT4 Widgets
We have various widgets that we can access with PyQT. Including:
- Textbox
- Combobox
- Calendar
For more widgets we suggest using the GUI creation tool covered in the next tutorial.
Related course:
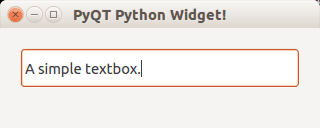
Textbox widget
Input fields are present in nearly every application. In PyQT4 an input field can be created using the QLineEdit() function.
#! /usr/bin/env python # -*- coding: utf-8 -*- # import sys from PyQt4.QtGui import * # Create an PyQT4 application object. a = QApplication(sys.argv) # The QWidget widget is the base class of all user interface objects in PyQt4. w = QMainWindow() # Set window size. w.resize(320, 100) # Set window title w.setWindowTitle("PyQT Python Widget!") # Create textbox textbox = QLineEdit(w) textbox.move(20, 20) textbox.resize(280,40) # Show window w.show() sys.exit(a.exec_()) |
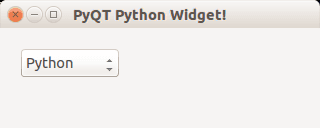
Combobox
A combobox can be used to select an item from a list.
#! /usr/bin/env python # -*- coding: utf-8 -*- # import sys from PyQt4.QtGui import * # Create an PyQT4 application object. a = QApplication(sys.argv) # The QWidget widget is the base class of all user interface objects in PyQt4. w = QMainWindow() # Set window size. w.resize(320, 100) # Set window title w.setWindowTitle("PyQT Python Widget!") # Create combobox combo = QComboBox(w) combo.addItem("Python") combo.addItem("Perl") combo.addItem("Java") combo.addItem("C++") combo.move(20,20) # Show window w.show() sys.exit(a.exec_()) |
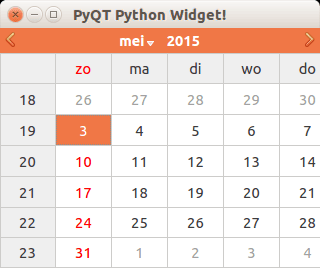
Calendar widget
The PyQT4 library has a calendar widget, you can create it using the QCalendarWidget() call.
#! /usr/bin/env python # -*- coding: utf-8 -*- # import sys from PyQt4.QtGui import * # Create an PyQT4 application object. a = QApplication(sys.argv) # The QWidget widget is the base class of all user interface objects in PyQt4. w = QMainWindow() # Set window size. w.resize(320, 240) # Set window title w.setWindowTitle("PyQT Python Widget!") # Create calendar cal = QCalendarWidget(w) cal.setGridVisible(True) cal.move(0, 0) cal.resize(320,240) # Show window w.show() sys.exit(a.exec_()) |
Result: