
Category: pro
Python hosting: Host, run, and code Python in the cloud!
Flask boilerplate with Bootstrap, SQLAlchemy
In this article you will learn about cookiecutter, a command-line utility that creates projects from project templates. With cookiecutter you can create a new python Flask project. This is similar to a standard Flask project except that using this method you start with several complete templates and a list of features.
Related course:
Python Flask: Make Web Apps with Python
- Bootstrap 3 and Font Awesome 4 with starter templates
- Flask-SQLAlchemy with basic User model
- Easy database migrations with Flask-Migrate
- Flask-WTForms with login and registration forms
- Flask-Login for authentication
- Flask-Bcrypt for password hashing
- Procfile for deploying to a PaaS (e.g. Heroku)
- pytest and Factory-Boy for testing (example tests included)
- A simple
manage.pyscript. - CSS and JS minification using Flask-Assets
- Optional bower support for frontend package management
- Caching using Flask-Cache
- Useful debug toolbar
- Utilizes best practices: Blueprints and Application Factory patterns
Install the Flask dependencies:
sudo pip install flask_script sudo pip install flask_migrate sudo pip install flask_assets sudo pip install flask_bcrypt sudo pip install flask_cache sudo pip install flask_debugtoolbar |
Install and clone cookieclutter
sudo pip install cookiecutter sudo pip install mock==1.0.1 cookiecutter https://github.com/sloria/cookiecutter-flask.git |
You will be asked some information about your project, enter as you wish:
remote: Counting objects: 1545, done. remote: Total 1545 (delta 0), reused 0 (delta 0), pack-reused 1545 Receiving objects: 100% (1545/1545), 1.57 MiB | 720.00 KiB/s, done. Resolving deltas: 100% (857/857), done. Checking connectivity... done. full_name (default is "Steven Loria")? Steven Loria email (default is "[email protected]")? slorial@gmail.com github_username (default is "sloria")? sloria project_name (default is "My Flask App")? example app_name (default is "myflaskapp")? example project_short_description (default is "A flasky app.")? a flasky app |
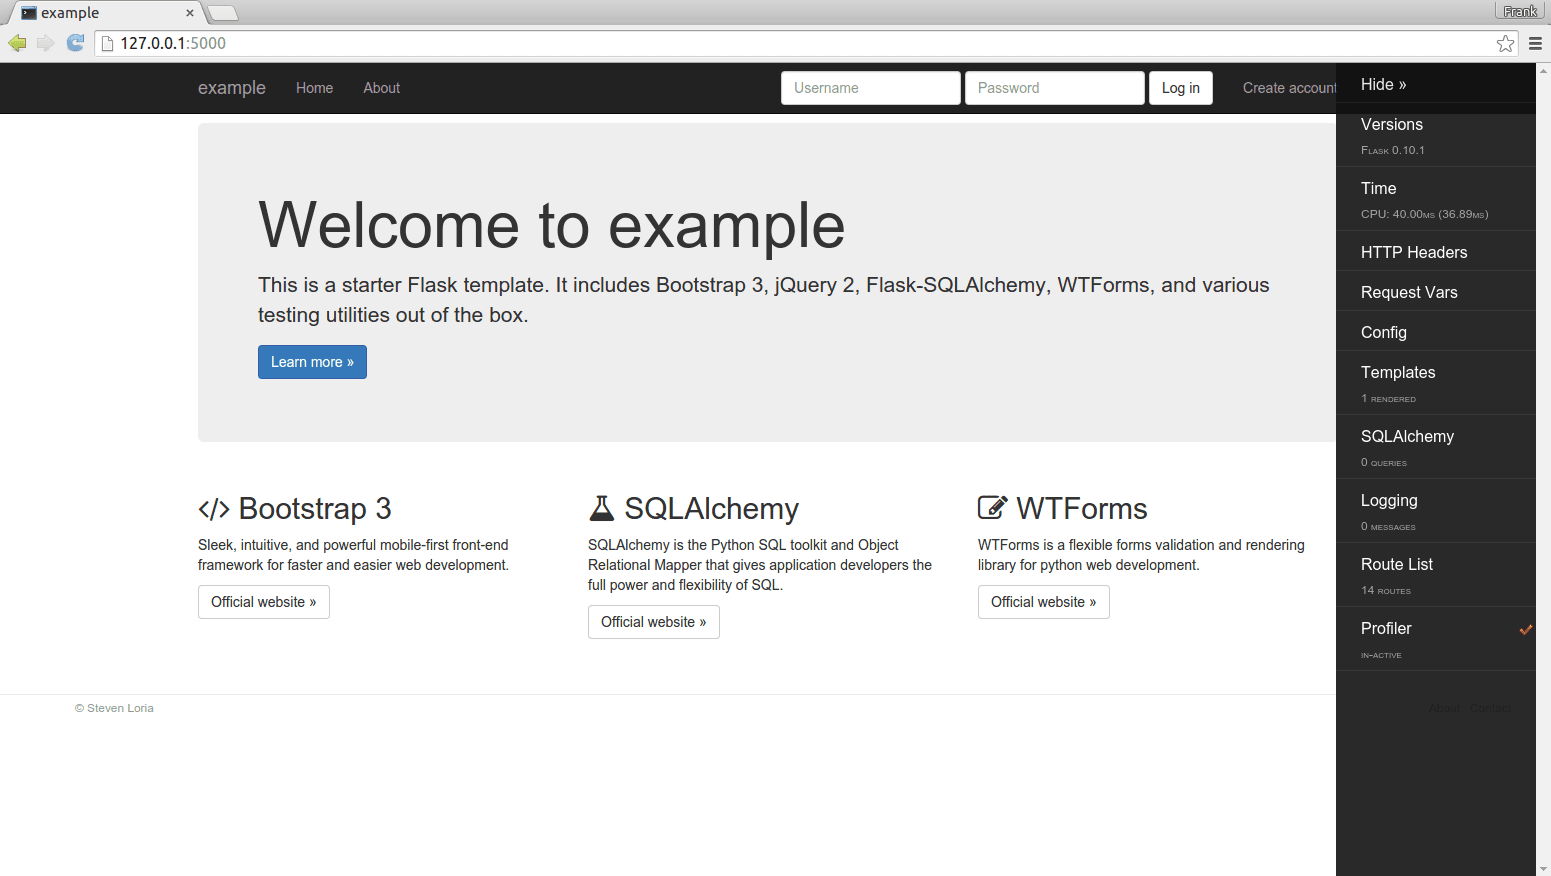
Then enter your project directory (example) and start the server
cd example python manage.py runserver |
You can then open http://127.0.0.1:5000
Read Email, pop3
[toc]In this tutorial you will learn how to receive email using the poplib module. The mail server needs to support pop3, but most mail servers do this. The Post Office Protocol (POP3) is for receiving mail only, for sending you will need the SMTP protocol.
Related course:
Python Programming Bootcamp: Go from zero to hero
Meta Data
Every email will contain many variables, but these are the most important ones:
| Feature | Description |
|---|---|
| message-id | unique identifier |
| from | where did the email come from? |
| to | where was the email sent to? |
| date | date |
| subject | Email subject. |
Reading Email Example
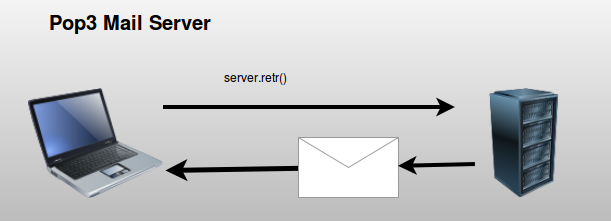
You can request messages directly from a mail server using the Post Office Protocol (protocol). You do not have to worry about the internal protocol because you can use the poplib module.
Connect and authenticate with the server using:
# connect to server server = poplib.POP3(SERVER) # login server.user(USER) server.pass_(PASSWORD) |
The program below gets 10 emails from the server including mail header
import poplib import string, random import StringIO, rfc822 def readMail(): SERVER = "YOUR MAIL SERVER" USER = "YOUR USERNAME [email protected]" PASSWORD = "YOUR PASSWORD" # connect to server server = poplib.POP3(SERVER) # login server.user(USER) server.pass_(PASSWORD) # list items on server resp, items, octets = server.list() for i in range(0,10): id, size = string.split(items[i]) resp, text, octets = server.retr(id) text = string.join(text, "\n") file = StringIO.StringIO(text) message = rfc822.Message(file) for k, v in message.items(): print k, "=", v readMail() |
PyQt4 GUI tutorial
In this tutorial we will teach you how to create a graphical application with PyQT4. This will work on any platform that supports PyQT4 including Windows, Linux, UNIX, Android, OS X and iOS.
Related course:
PyQt4 installation
PyQt does not include Qt itself – you may have to obtain it separately.
The homepage for PyQt is http://www.riverbankcomputing.com/software/pyqt/.
You will need to install some packages:
sudo pip install pyqt sudo apt-get install qt4-designer sudo apt-get install pyqt4-dev-tools sudo apt-get install python-kde4 |
If python-kde4 cannot be found update your repository to find it. If you are on Ubuntu use this link.
Building a PyQT4 GUI
Now we can use the QT Designer application. It saves us from writing tons of layout code that you may be used to when writing HTML. Start qt4-designer from your applications menu. The QT Designer application will appear.

Press Dialog without Buttons and press Create. You can now drag any component from the widget box to the form. Simple drag and drop. We added a button, label and a pixmap. (I took a random image from the web for the pixmap)
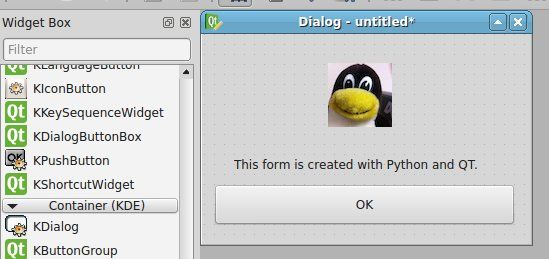
Our window looks like the image above. Press Form > Viewcode. We will get a popup box with the form code in… C++! That is great, but we want the Python code. Press File > Save as > form.ui.
The file test.ui contains your form described in XML format. (You can view it in a text editor) Open a console and type:
pyuic4 form.ui > form.py |
Running the file does nothing. Create a new file called gui.py
Paste the code below:
import sys from PyQt4 import QtCore, QtGui from form import Ui_Dialog class MyDialog(QtGui.QDialog): def __init__(self, parent=None): QtGui.QWidget.__init__(self, parent) self.ui = Ui_Dialog() self.ui.setupUi(self) if __name__ == "__main__": app = QtGui.QApplication(sys.argv) myapp = MyDialog() myapp.show() sys.exit(app.exec_()) |
Run with:
python gui.py |
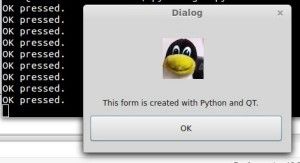
This will open our graphical interface. Pressing on the OK button will simply close the application.
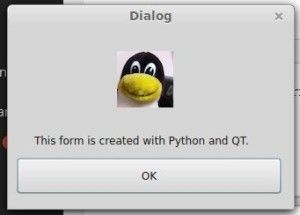
We want to add some action when the OK button is pressed. We add these three lines to the code:
self.ui.pushButton.clicked.connect(self.OK) def OK(self): print 'OK pressed.' |
Download PyQT4 Examples (Bulk Collection)
You may like: Create a webbrowser with PyQT4 or PyQt4 Overview
QML and PyQT: Creating a GUI (tutorial)
If you have not done our first PyQT tutorial yet, you should do it, it’s fun! In this tutorial we will use PyQT4 and a user interface markup language, a language that describes the graphical user interfaces and controls .
Related course:
QML and PyQT
An excerpt of user interface markup graphical user interfaces and language code could look like:
Rectangle { id: simplebutton color: "grey" width: 150; height: 75 |
Essentially the language tells what the interface should look like. The language we will be using is called QML.
QTCreator
Start a programmed called QTCreator. The tutorial will be quite graphical to help you through the whole process. Simply type qtcreator in the terminal or start it from the menu list. This screen should pop up:
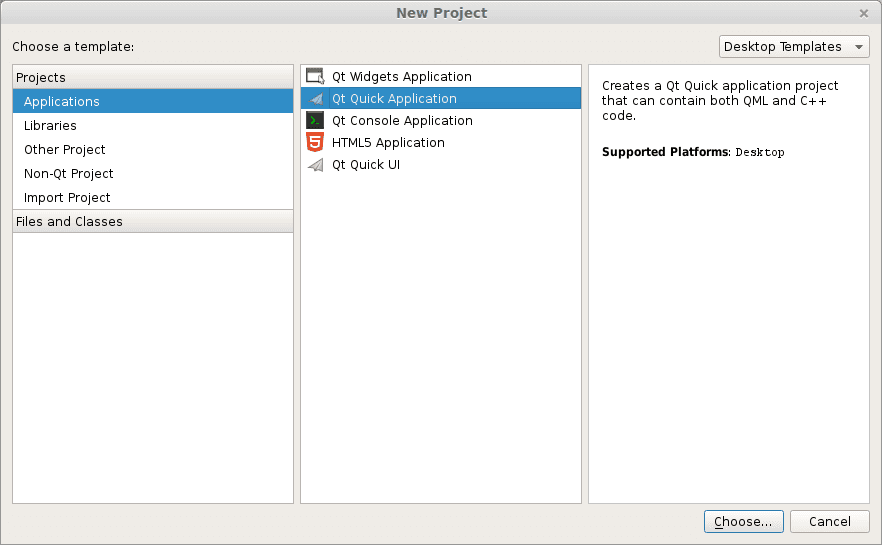
Creating a GUI
Press the big New Project button. Select QT Quick Application from the menu below. Finally press Choose on the bottom right.
A new popup will appear:
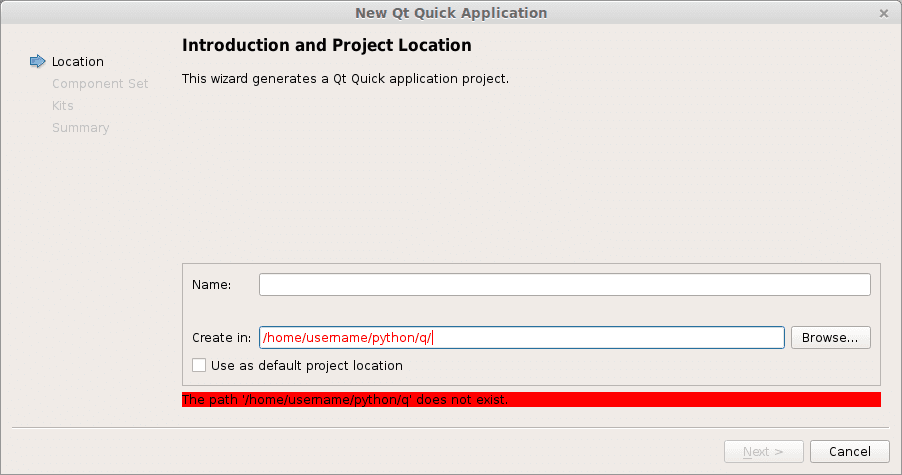
Type a name and a valid path to save your project. Then press Next. Select QT Quick 2.0 from the menu list. Press Next. Press Finish. Immediately a user interface defined in the QML language will appear.
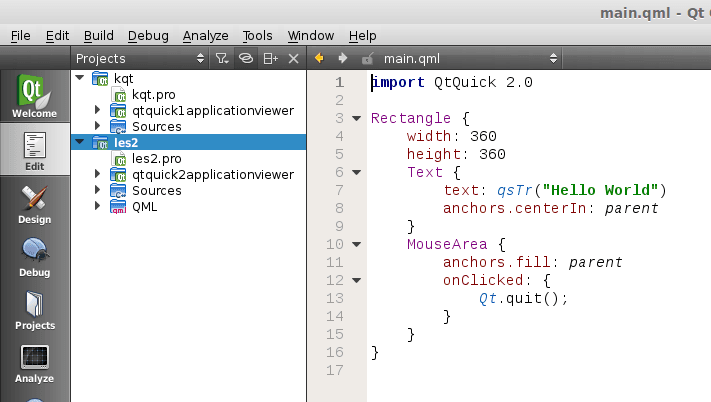
Like all great programmers we are going to solve things the most lazy way possible. Instead of typing all the QML code by hand we are going to press the Design button that is on the left of the screen. A drag and drop screen should appear now.
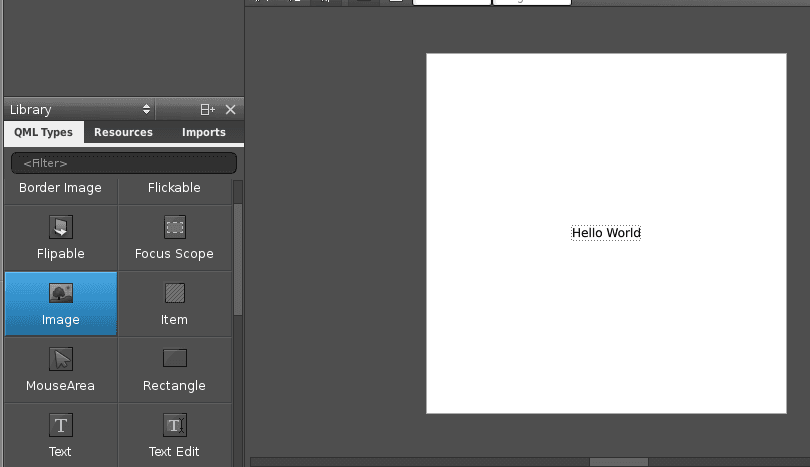
We drag an image onto the area and select the source on the right. Save the project. Open a terminal and locate the qml file you just created. Alternatively you could simply copy the code in the edit box and save it to a .qml file. Enter the command:
qmlviewer main.qml |
This will display the windows as defined in the qml file without any functionality. It is simply a viewer for the interface. We then create some code to load this QML definition:
import sys from PyQt4.QtCore import QDateTime, QObject, QUrl, pyqtSignal from PyQt4.QtGui import QApplication from PyQt4.QtDeclarative import QDeclarativeView app = QApplication(sys.argv) # Create the QML user interface. view = QDeclarativeView() view.setSource(QUrl('main.qml')) view.setResizeMode(QDeclarativeView.SizeRootObjectToView) view.setGeometry(100, 100, 400, 240) view.show() app.exec_() |
Finally we modify the first line main.qml to:
import Qt 4.7 |
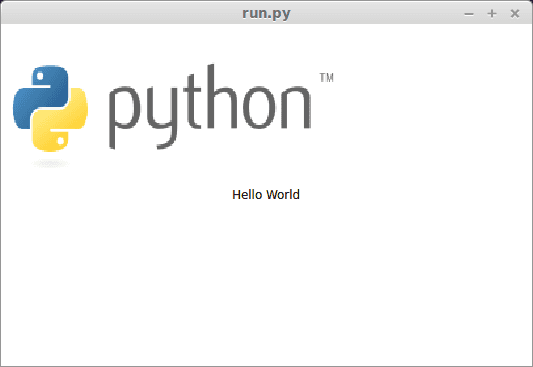
Simply because our QtQuick was missing. Running
python run.py |
Will now display our user interface as defined by QML:
All of the code is simply PyQT, so you could add code like in the previous tutorial. These are the two methods to create a graphical interface with PyQT. This method may be more loosely coupled to the code compared to the method of creating a GUI with QT in the previous tutorial. Despite that both are valid methods.
Download PyQT4 Examples (Bulk Collection)
You may like: Application GUI with PyQT4 or the PyQt4 Tutorials
wxPython GUI tutorial
The official wxPython site has several screenshots and downloads for these platforms. wxPython is based on wxWidgets.
Install wxPython
First download and install WxPython, the Python bindings for wxWidgets.
sudo apt-get install python-wxgtk2.8 python-wxtools wx2.8-doc wx2.8-examples wx2.8-headers wx2.8-i18n |
Then install a GUI creator called wxglade:
sudo apt-get install wxglade |
Using a GUI builder such as wxGlade will save you a lot of time, regardless of the GUI library you use. You can easily make complex graphical interfaces because you can simply drag and drop.
Creating our first GUI with Python and wxWidgets:
Start wxglade. You will see its user interface:
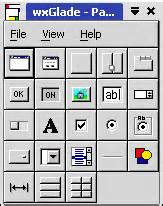
Press on tiny window on the top left, below the file icon.

Press OK. An empty window will now appear. Press on the tiny [OK] button in the wxGlade panel and press on the frame. The button will now appear. Press on Application in the tree window.
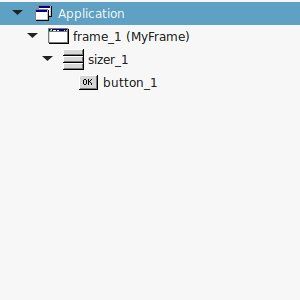
Set the output file in the wxproperties window.
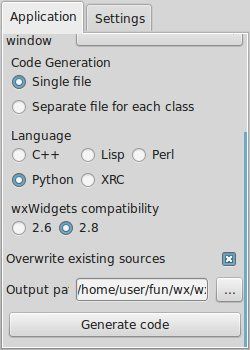
If you look at the window note you can select multiple programming languages and two versions of wxWidgets. Select Python and wxWidgets 2.8. Finally press Generate code. (Do NOT name the file wx.py because the import needs wx, save it as window.py or something else).
Running wxglade code:
Run:
python window.py |
And a window with a button will appear. Pressing the button will not do anything. To start a function when pressing the button, we need to define a so called Callback. This can be as simple as:
def OnButton(self, Event, button_label): print "In OnButton:", button_label |
Finally we bind the button to the callback function using:
self.button_1.Bind(wx.EVT_BUTTON, self.OnButton ) |
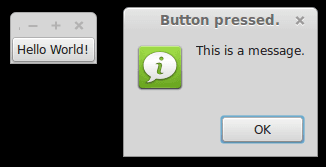
Pressing the button will now write a message to the command line. Instead of the boring command line message, we want to show a message box. This can be done using this command:
wx.MessageBox( "This is a message.", "Button pressed."); |
wxPython example code
The full code below:
#!/usr/bin/env python # -*- coding: UTF-8 -*- # # generated by wxGlade 0.6.8 on Fri Jan 23 22:59:56 2015 # import wx # begin wxGlade: dependencies import gettext # end wxGlade # begin wxGlade: extracode # end wxGlade class MyFrame(wx.Frame): def __init__(self, *args, **kwds): # begin wxGlade: MyFrame.__init__ kwds["style"] = wx.DEFAULT_FRAME_STYLE wx.Frame.__init__(self, *args, **kwds) self.button_1 = wx.Button(self, wx.ID_ANY, _("Hello World!")) self.button_1.Bind(wx.EVT_BUTTON, self.OnButton ) self.__set_properties() self.__do_layout() # end wxGlade def __set_properties(self): # begin wxGlade: MyFrame.__set_properties self.SetTitle(_("wxWidgets button example. pythonspot.com ")) # end wxGlade def __do_layout(self): # begin wxGlade: MyFrame.__do_layout sizer_1 = wx.BoxSizer(wx.VERTICAL) sizer_1.Add(self.button_1, 0, 0, 0) self.SetSizer(sizer_1) sizer_1.Fit(self) self.Layout() # end wxGlade def OnButton(event, button_label): wx.MessageBox( "This is a message.", "Button pressed."); # end of class MyFrame if __name__ == "__main__": gettext.install("app") # replace with the appropriate catalog name app = wx.PySimpleApp(0) wx.InitAllImageHandlers() frame_1 = MyFrame(None, wx.ID_ANY, "") app.SetTopWindow(frame_1) frame_1.Show() app.MainLoop() |
An Introduction to Building Quantum Computing Applications with Python
So we want to make a quantum application with Python, but since we do not own any quantum computer we need to have a simulator first. Simulation will not have the same performance as an actual quantum computer but we will be able to run applications. We have a choice from three simulators: PyQu , QuTip and Qitensor. We decided to pick QuTip as it has a very large code base and as it has the most recent changes. PyQu hasn’t been updated since 2010 and Qitensor since a year or so.
Related course:
Quantum Physics: What Everyone Needs to Know
Installing
We use a Unix machine in this tutorial, but you should be fine with any other operating system. Install using:
sudo add-apt-repository ppa:jrjohansson/qutip-releases
sudo apt-get update
sudo apt-get install python-qutip
We then start Python from the command line and type the commands listed below ( >>> ).
$ python Python 2.7.6 (default, Mar 22 2014, 22:59:38) [GCC 4.8.2] on linux2 Type "help", "copyright", "credits" or "license" for more information. >>> from qutip import * >>> about() QuTiP: Quantum Toolbox in Python Copyright (c) 2011 and later. Paul D. Nation & Robert J. Johansson QuTiP Version: 3.1.0 Numpy Version: 1.8.2 Scipy Version: 0.13.3 Cython Version: 0.20.1post0 Matplotlib Version: 1.3.1 Fortran mcsolver: True scikits.umfpack: False Python Version: 2.7.6 Platform Info: Linux (i686) Installation path: /usr/lib/python2.7/dist-packages/qutip |
This indicates that Qutip has been correctly installed.
The Quantum data structure
In quantum systems we need a data structure that is capable of encapsulating the properties of a quantum operator and ket/bra vectors, we use the Qobj data structure for that. In other words, to effectively simulate a quantum application we need to use the appropriate data structure. Consider the example below:
#!/usr/bin/env python from qutip import * from scipy import * r = rand(4, 4) print Qobj(r) |
And execute with:
python quantum.py |
This will output the quantum object:
Quantum object: dims = [[4], [4]], shape = [4, 4], type = oper, isherm = False Qobj data = [[ 0.25529374 0.75548592 0.85680266 0.1438253 [ 0.75070138 0.68628867 0.97435624 0.77396516] [ 0.69819458 0.81714756 0.2604015 0.69051901] [ 0.0898242 0.05292657 0.49134431 0.4433644 ]] |
If you want to specify user input yourself you could use:
#!/usr/bin/env python from qutip import * from scipy import * x = array([[1],[2],[3],[4],[5]]) q = Qobj(x) print q |
This quantum object will simply hold your user given data:
Quantum object: dims = [[5], [1]], shape = [5, 1], type = ket Qobj data = [[ 1.] [ 2.] [ 3.] [ 4.] [ 5.]] |
Quantum states and operators
A quantum system is not a simple two-level system, it has multiple states. QuTip includes some predefined states and quantum operators which are listed here.
Qubits and operators
We create a Qubit to hold data. Th Qubit is the quantum analogue of the classical bit. Unlike traditional bits, the qubit can be in a superposition of both states at the same time, a property which is fundamental to quantum computing. The code below will create a qubit:
#!/usr/bin/env python from qutip import * from scipy import * spin = basis(2, 0) print spin |
You can now apply quantum system operators on the qubit:
#!/usr/bin/env python from qutip import * from scipy import * spin = basis(2, 0) print sigmam() * spin print sigmap() * spin |
Combining qubits
To describe the states of two coupled qubits we need to take the tensor product of the state vectors for each of the system components. Let us try that:
#!/usr/bin/env python from qutip import * from scipy import * q1 = basis(2, 0) q2 = basis(2,0) print q1 print q2 print tensor(q1,q2) |
The output we will get is:
Quantum object: dims = [[2], [1]], shape = [2, 1], type = ket Qobj data = [[ 1.] [ 0.]] Quantum object: dims = [[2], [1]], shape = [2, 1], type = ket Qobj data = [[ 1.] [ 0.]] Quantum object: dims = [[2, 2], [1, 1]], shape = [4, 1], type = ket Qobj data = [[ 1.] [ 0.] [ 0.] [ 0.]] |
Whats next?
We have built some very simply quantum applications using this simple introduction. Perhaps you want to create an actually useful application, if so you could study more about quantum computing and complete the tutorial at http://qutip.org/docs/latest/index.html