Tag: GUI - Page 2
Python hosting: Host, run, and code Python in the cloud!
Tk widgets
Tkinter has several widgets including:
- Label
- EditText
- Images
- Buttons (Discussed before)
In this article we will show how to use some of these Tkinter widgets. Keep in mind there’s a slight difference between Tkinter for Python 2.x and 3.x
Related course
Label
To create a label we simply call the Label() class and pack it. The numbers padx and pady are the horizontal and vertical padding.
from Tkinter import * root = Tk() root.title('Python Tk Examples @ pythonspot.com') Label(root, text='Python').pack(pady=20,padx=50) root.mainloop() |
EditText (Entry widget)
To get user input you can use an Entry widget.
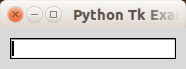
from Tkinter import * root = Tk() root.title('Python Tk Examples @ pythonspot.com') var = StringVar() textbox = Entry(root, textvariable=var) textbox.focus_set() textbox.pack(pady=10, padx=10) root.mainloop() |
Result:
Images
Tk has a widget to display an image, the PhotoImage. It is quite easy to load an image:
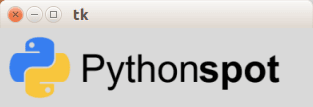
from Tkinter import * import os root = Tk() img = PhotoImage(file="logo2.png") panel = Label(root, image = img) panel.pack(side = "bottom", fill = "both", expand = "yes") root.mainloop() |
Result:
GUI editor
An overview of Tkinter GUI editors can be found here: http://wiki.tcl.tk/4056
Menu with PyQt4
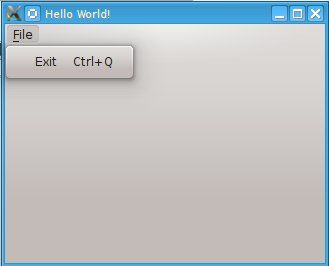
PyQt4 menus appear in the top of the window bar. A menu gives the user control over the application and is often location in the top of the window.
The QMainWindow class creates the main application window. This class has a method named menuBar() which adds the title bar.
Menus can be added to the title bar using addMenu(). Inside each menu you can add a command using the addAction method.
Related course:
PyQt4 menubar
This code will add a menu to your qt4 app:
#! /usr/bin/env python # -*- coding: utf-8 -*- # import sys from PyQt4.QtGui import * # Create an PyQT4 application object. a = QApplication(sys.argv) # The QWidget widget is the base class of all user interface objects in PyQt4. w = QMainWindow() # Set window size. w.resize(320, 240) # Set window title w.setWindowTitle("Hello World!") # Create main menu mainMenu = w.menuBar() mainMenu.setNativeMenuBar(False) fileMenu = mainMenu.addMenu('&File') # Add exit button exitButton = QAction(QIcon('exit24.png'), 'Exit', w) exitButton.setShortcut('Ctrl+Q') exitButton.setStatusTip('Exit application') exitButton.triggered.connect(w.close) fileMenu.addAction(exitButton) # Show window w.show() sys.exit(a.exec_()) |
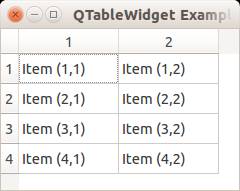
QT4 Table
We can show a table using the QTableWidget, part of the PyQt module. We set the title, row count, column count and add the data.
Related course:
Qt4 Table example
An example below:
from PyQt4.QtGui import * from PyQt4.QtCore import * import sys def main(): app = QApplication(sys.argv) table = QTableWidget() tableItem = QTableWidgetItem() # initiate table table.setWindowTitle("QTableWidget Example @pythonspot.com") table.resize(400, 250) table.setRowCount(4) table.setColumnCount(2) # set data table.setItem(0,0, QTableWidgetItem("Item (1,1)")) table.setItem(0,1, QTableWidgetItem("Item (1,2)")) table.setItem(1,0, QTableWidgetItem("Item (2,1)")) table.setItem(1,1, QTableWidgetItem("Item (2,2)")) table.setItem(2,0, QTableWidgetItem("Item (3,1)")) table.setItem(2,1, QTableWidgetItem("Item (3,2)")) table.setItem(3,0, QTableWidgetItem("Item (4,1)")) table.setItem(3,1, QTableWidgetItem("Item (4,2)")) # show table table.show() return app.exec_() if __name__ == '__main__': main() |
Result:
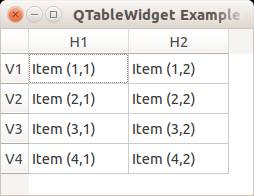
QTableWidget labels
You can set the header using the setHorizontalHeaderLabels() function. The same applies for vertical labels. A demonstration below:
from PyQt4.QtGui import * from PyQt4.QtCore import * import sys def main(): app = QApplication(sys.argv) table = QTableWidget() tableItem = QTableWidgetItem() # initiate table table.setWindowTitle("QTableWidget Example @pythonspot.com") table.resize(400, 250) table.setRowCount(4) table.setColumnCount(2) # set label table.setHorizontalHeaderLabels(QString("H1;H2;").split(";")) table.setVerticalHeaderLabels(QString("V1;V2;V3;V4").split(";")) # set data table.setItem(0,0, QTableWidgetItem("Item (1,1)")) table.setItem(0,1, QTableWidgetItem("Item (1,2)")) table.setItem(1,0, QTableWidgetItem("Item (2,1)")) table.setItem(1,1, QTableWidgetItem("Item (2,2)")) table.setItem(2,0, QTableWidgetItem("Item (3,1)")) table.setItem(2,1, QTableWidgetItem("Item (3,2)")) table.setItem(3,0, QTableWidgetItem("Item (4,1)")) table.setItem(3,1, QTableWidgetItem("Item (4,2)")) # show table table.show() return app.exec_() if __name__ == '__main__': main() |
Result:
QTableWidget click events
We can detect cell clicks using this procedure, first add a function:
# on click function table.cellClicked.connect(cellClick) |
Then define the function:
def cellClick(row,col): print "Click on " + str(row) + " " + str(col) |
The Python programming language starts counting with 0, so when you press on (1,1) you will see (0,0). Full code to detect table clicks:
from PyQt4.QtGui import * from PyQt4.QtCore import * import sys def cellClick(row,col): print "Click on " + str(row) + " " + str(col) def main(): app = QApplication(sys.argv) table = QTableWidget() tableItem = QTableWidgetItem() # initiate table table.setWindowTitle("QTableWidget Example @pythonspot.com") table.resize(400, 250) table.setRowCount(4) table.setColumnCount(2) # set label table.setHorizontalHeaderLabels(QString("H1;H2;").split(";")) table.setVerticalHeaderLabels(QString("V1;V2;V3;V4").split(";")) # set data table.setItem(0,0, QTableWidgetItem("Item (1,1)")) table.setItem(0,1, QTableWidgetItem("Item (1,2)")) table.setItem(1,0, QTableWidgetItem("Item (2,1)")) table.setItem(1,1, QTableWidgetItem("Item (2,2)")) table.setItem(2,0, QTableWidgetItem("Item (3,1)")) table.setItem(2,1, QTableWidgetItem("Item (3,2)")) table.setItem(3,0, QTableWidgetItem("Item (4,1)")) table.setItem(3,1, QTableWidgetItem("Item (4,2)")) # on click function table.cellClicked.connect(cellClick) # show table table.show() return app.exec_() if __name__ == '__main__': main() |
If you want to show the cell/row numbers in a non-programmer way use this instead:
def cellClick(row,col): print "Click on " + str(row+1) + " " + str(col+1) |
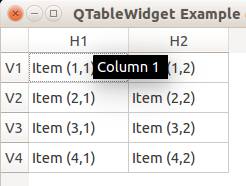
Tooltip text
We can set tooltip (mouse over) text using the method. If you set tooltips on non-existing columns you will get an error.
from PyQt4.QtGui import * from PyQt4.QtCore import * import sys def main(): app = QApplication(sys.argv) table = QTableWidget() tableItem = QTableWidgetItem() # initiate table table.setWindowTitle("QTableWidget Example @pythonspot.com") table.resize(400, 250) table.setRowCount(4) table.setColumnCount(2) # set label table.setHorizontalHeaderLabels(QString("H1;H2;").split(";")) table.setVerticalHeaderLabels(QString("V1;V2;V3;V4").split(";")) # set data table.setItem(0,0, QTableWidgetItem("Item (1,1)")) table.setItem(0,1, QTableWidgetItem("Item (1,2)")) table.setItem(1,0, QTableWidgetItem("Item (2,1)")) table.setItem(1,1, QTableWidgetItem("Item (2,2)")) table.setItem(2,0, QTableWidgetItem("Item (3,1)")) table.setItem(2,1, QTableWidgetItem("Item (3,2)")) table.setItem(3,0, QTableWidgetItem("Item (4,1)")) table.setItem(3,1, QTableWidgetItem("Item (4,2)")) # tooltip text table.horizontalHeaderItem(0).setToolTip("Column 1 ") table.horizontalHeaderItem(1).setToolTip("Column 2 ") # show table table.show() return app.exec_() if __name__ == '__main__': main() |
Result:
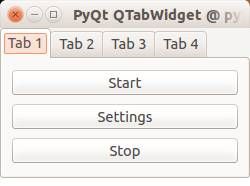
QT4 Tabs
Tabs are very useful in graphical applications. They appear in webbrowsers, text editors and any other apps. To create a tabbed window, you need to call the QTabWidget() function. Every tab is a QWidget() which you have seen before. You can connect the QWidgets with the QTabWidget with the function:
tabs.addTab(tab1,"Tab 1") |
where the first parameter is the tab object and the second the name that appears on the screen. We added some buttons to the first tab (QWidget).
Related course:
Example code:
from PyQt4 import QtGui from PyQt4 import QtCore import sys def main(): app = QtGui.QApplication(sys.argv) tabs = QtGui.QTabWidget() # Create tabs tab1 = QtGui.QWidget() tab2 = QtGui.QWidget() tab3 = QtGui.QWidget() tab4 = QtGui.QWidget() # Resize width and height tabs.resize(250, 150) # Set layout of first tab vBoxlayout = QtGui.QVBoxLayout() pushButton1 = QtGui.QPushButton("Start") pushButton2 = QtGui.QPushButton("Settings") pushButton3 = QtGui.QPushButton("Stop") vBoxlayout.addWidget(pushButton1) vBoxlayout.addWidget(pushButton2) vBoxlayout.addWidget(pushButton3) tab1.setLayout(vBoxlayout) # Add tabs tabs.addTab(tab1,"Tab 1") tabs.addTab(tab2,"Tab 2") tabs.addTab(tab3,"Tab 3") tabs.addTab(tab4,"Tab 4") # Set title and show tabs.setWindowTitle('PyQt QTabWidget @ pythonspot.com') tabs.show() sys.exit(app.exec_()) if __name__ == '__main__': main() |
Result:
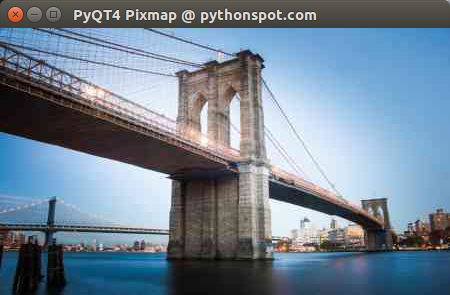
QT4 Pixmaps (Images)
In this article we will demonstrate how to load and display images in an PyQT window. We can display images in a PyQT window using the Pixmap widget.
Related course:
Introduction
The constructor of Pixmap takes the image path as parameter:
pixmap = QPixmap(os.getcwd() + 'https://pythonspot-9329.kxcdn.com/logo.png') |
This image needs to be in the same directory as your program. The QPixmap widget supports png and jpeg. Example code below.
PyQT load image in Pixmap
We create a standard QWidget as we have done before. Then we add the QPixmap widget inside which will load the image. The Pixmap is attached to a label which is drawn to the screen.
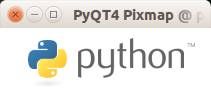
import os import sys from PyQt4.QtGui import * # Create window app = QApplication(sys.argv) w = QWidget() w.setWindowTitle("PyQT4 Pixmap @ pythonspot.com ") # Create widget label = QLabel(w) pixmap = QPixmap(os.getcwd() + 'https://pythonspot-9329.kxcdn.com/logo.png') label.setPixmap(pixmap) w.resize(pixmap.width(),pixmap.height()) # Draw window w.show() app.exec_() |
Download PyQT Code (Bulk Collection)
Result: