
Tag: python
open file python
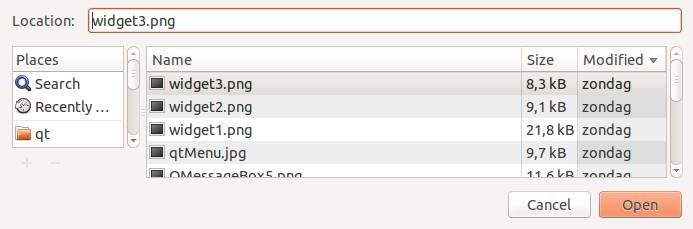
In this short tutorial you will learn how to create a file dialog and load its file contents. The file dialog is needed in many applications that use file access.
Related course:
File Dialog Example
To get a filename (not file data) in PyQT you can use the line:
filename = QFileDialog.getOpenFileName(w, 'Open File', '/') |
If you are on Microsoft Windows use
filename = QFileDialog.getOpenFileName(w, 'Open File', 'C:\') |
An example below (includes loading file data):
#! /usr/bin/env python |
Result (output may vary depending on your operating system):
Download PyQT Code (Bulk Collection)
progressbar python
python browser
snake ai
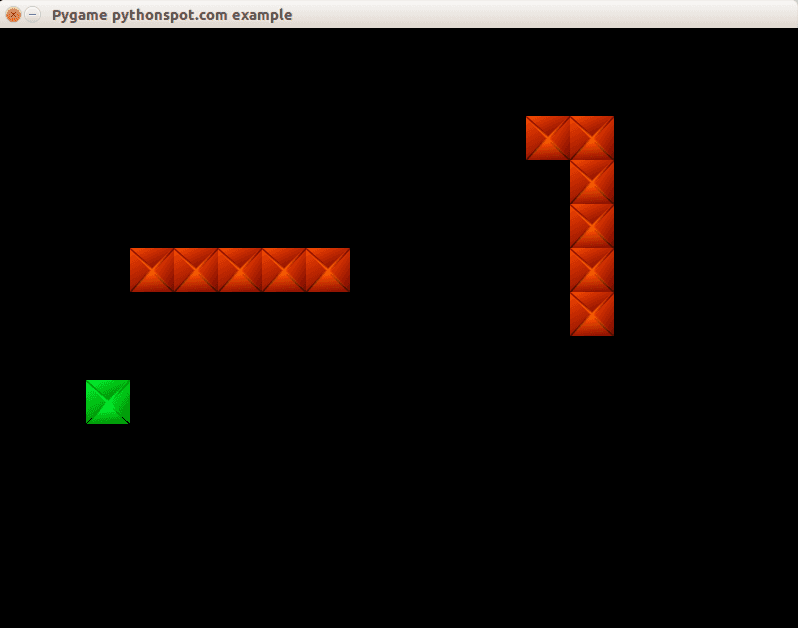
In this article we will show you how to create basic game AI (Artificial Intelligence). This article will describe an AI for the game snake.
In this game (snake) both the computer and you play a snake, and the computer snake tries to catch you. In short: the opponent AI tries to determine and go to the destination point based on your location on the board.
You may like
Adding the computer player:
We extend the code with a new class called Computer which will be our computer player. This contains routines to draw and move the computer snake.
class Computer: |
We then call the update and drawing method of the computer.
def on_loop(self): |
This will make the computer snake move and be drawn on the screen. It has the same properties as the human player.
You may like
Adding the intelligence to the computer player
Because this is a simple game, we do not need to create a complete thinking machine inside the game. We simply need some basic intelligence exhibited by our computer player. Intelligence in games is often quite limited because most of the time more complexity is not neccesary or there simply is not the time available to implement clever algorithms.
The algorithm we will add will simply go to the destination. It will neglect any obstacles (the human player).
def target(self,dx,dy): |
Complete code
We end up with this complete code:
from pygame.locals import * |
You may like
Conclusion
You learned how to create a basic computer player using an very simple AI algorithm.
Next: Learn basic sidescroller logic
python ftp client
python snake game
pygame
python chrome extension
face detection python
In this tutorial you will learn how to apply face detection with Python. As input video we will use a Google Hangouts video. There are tons of Google Hangouts videos around the web and in these videos the face is usually large enough for the software to detect the faces.
Detection of faces is achieved using the OpenCV (Open Computer Vision) library. The most common face detection method is to extract cascades. This technique is known to work well with face detection. You need to have the cascade files (included in OpenCV) in the same directory as your program.
Related course
Master Computer Vision with OpenCV and Python
Video with Python OpenCV
To analyse the input video we extract each frame. Each frame is shown for a brief period of time. Start with this basic program:
#! /usr/bin/python |
Upon execution you will see the video played without sound. (OpenCV does not support sound). Inside the while loop we have every video frame inside the variable frame.
Face detection with OpenCV
We will display a rectangle on top of the face. To avoid flickering of the rectangle, we will show it at it latest known position if the face is not detected.
#! /usr/bin/python |
In this program we simply assumed there is one face in the video screen. We reduced the size of the screen to speed up the processing time. This is fine in most cases because detection will work fine in lower resolutions. If you want to execute the face detection in “real time”, keeping the computational cycle short is mandatory. An alternative to this implementation is to process first and display later.
A limitation of this technique is that it does not always detect faces and faces that are very small or occluded may not be detected. It may show false positives such as a bag detected as face. This technique works quite well on certain type of input videos.
Download Computer Vision Examples and Course
Car tracking with cascades
In this tutorial we will look at vehicle tracking using haar features. We have a haar cascade file trained on cars.
The program will detect regions of interest, classify them as cars and show rectangles around them.
Related course:
Master Computer Vision with OpenCV
Detecting with cascades
Lets start with the basic cascade detection program:
#! /usr/bin/python |
This will detect cars in the screen but also noise and the screen will be jittering sometimes. To avoid all of these, we have to improve our car tracking algorithm. We decided to come up with a simple solution.
Related course:
Master Computer Vision with OpenCV
Car tracking algorithm
For every frame:
- Detect potential regions of interest
- Filter detected regions based on vertical,horizontal similarity
- If its a new region, add to the collection
- Clear collection every 30 frames
Removing false positives
The mean square error function is used to remove false positives. We compare vertical and horizontal sides of the images. If the difference is to large or to small it cannot be a car.
ROI detection
A car may not be detected in every frame. If a new car is detected, its added to the collection.
We keep this collection for 30 frames, then clear it.
#!/usr/bin/python |
Final notes
The cascades are not rotation invariant, scale and translation invariant. In addition, Detecting vehicles with haar cascades may work reasonably well, but there is gain with other algorithms (salient points).
You may like:
Download Computer Vision Examples + Course
create csv file python
python regex
Regular expressions are essentially a highly specialized programming language embedded inside Python that empowers you to specify the rules for the set of possible strings that you want to match.
In Python you need the re module for regular expressions usage. The grammar overview is on the bottom of this page.
Related course:
Python Programming Bootcamp: Go from zero to hero
The Match function
The match function is defined as:
re.match(pattern, string) |
The parameters are:
| Parameters | Description |
|---|---|
| pattern | a regular expression |
| string | the input string |
#!/usr/bin/python |
Example outputs:
| String | Match |
|---|---|
| 12345 | True |
| 12358 | True |
| 55555 | True |
| 123 | False |
| 123K5 | False |
| 5555555 | False |
#!/usr/bin/python |
The Search Function
The search function is defined as:
re.search(pattern, string) |
The parameters are:
| Parameter | Description |
|---|---|
| pattern | a regular expression, defines the string to be searched |
| string | the search space |
#!/usr/bin/python |
Regular Expression Examples
A few examples of regular expressions:
| Example | Regex |
|---|---|
| IP address | (([2][5][0-5]\.)|([2][0-4][0-9]\.)|([0-1]?[0-9]?[0-9]\.)){3}(([2][5][0-5])|([2][0-4][0-9])|([0-1]?[0-9]?[0-9])) |
| [^@]+@[^@]+\.[^@]+ | |
| Date MM/DD/YY | (\d+/\d+/\d+) |
| Integer (positive) | (?<![-.])\b[0-9]+\b(?!\.[0-9]) |
| Integer | [+-]?(?<!\.)\b[0-9]+\b(?!\.[0-9]) |
| Float | (?<=>)\d+.\d+|\d+ |
| Hexadecimal | \s–([0-9a-fA-F]+)(?:–)?\s |
| Regex | Description |
|---|---|
| \d | Matches any decimal digit; this is equivalent to the class [0-9] |
| \D | Matches any non-digit character; this is equivalent to the class [^0-9]. |
| \s | Matches any whitespace character; this is equivalent to the class [ \t\n\r\f\v]. |
| \S | Matches any non-whitespace character; this is equivalent to the class [^ \t\n\r\f\v]. |
| \w | Matches any alphanumeric character; this is equivalent to the class [a-zA-Z0-9_]. |
| \W | Matches any non-alphanumeric character; this is equivalent to the class [^a-zA-Z0-9_]. |
| \Z | Matches only at end of string |
| [..] | Match single character in brackets |
| [^..] | Match any single character not in brackets |
| . | Match any character except newline |
| $ | Match the end of the string |
| * | Match 0 or more repetitions |
| + | 1 or more repetitions |
| {m} | Exactly m copies of the previous RE should be matched. |
| | | Match A or B. A|B |
| ? | 0 or 1 repetitions of the preceding RE |
| [a-z] | Any lowercase character |
| [A-Z] | Any uppercase character |
| [a-zA-Z] | Any character |
| [0-9] | Any digit |

from sqlalchemy import * |
Execute with:
python tabledef.py |
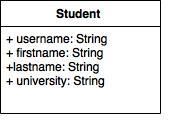
The ORM created the database file tabledef.py. It will output the SQL query to the screen, in our case it showed:
CREATE TABLE student ( |
Thus, while we defined a class, the ORM created the database table for us. This table is still empty.
Inserting data into the database
The database table is still empty. We can insert data into the database using Python objects. Because we use the SqlAlchemy ORM we do not have to write a single SQL query. We now simply create Python objects that we feed to the ORM. Save the code below as dummy.py
import datetime |
Execute with:
python dummy.py |
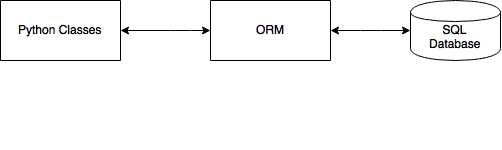
The ORM will map the Python objects to a relational database. This means you do not have any direct interaction from your application, you simply interact with objects. If you open the database with SQLiteman or an SQLite database application you’ll find the table has been created:
Query the data
We can query all items of the table using the code below. Note that Python will see every record as a unique object as defined by the Students class. Save the code as demo.py
import datetime |
On execution you will see:
James Boogie |
To select a single object use the filter() method. A demonstration below:
import datetime |
Output:
Eric York |
Finally, if you do not want the ORM the output any of the SQL queries change the create_engine statement to:
engine = create_engine('sqlite:///student.db', echo=False) |
pyqt qml
wxpython
The official wxPython site has several screenshots and downloads for these platforms. wxPython is based on wxWidgets.
Related course: Creating GUI Applications with wxPython
Install wxPython
First download and install WxPython, the Python bindings for wxWidgets.sudo apt-get install python-wxgtk2.8 python-wxtools wx2.8-doc wx2.8-examples wx2.8-headers wx2.8-i18n |
Then install a GUI creator called wxglade:
sudo apt-get install wxglade |
Using a GUI builder such as wxGlade will save you a lot of time, regardless of the GUI library you use. You can easily make complex graphical interfaces because you can simply drag and drop.
Creating our first GUI with Python and wxWidgets:
Start wxglade. You will see its user interface:
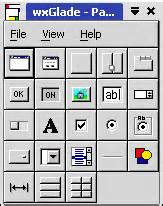
Press on tiny window on the top left, below the file icon.

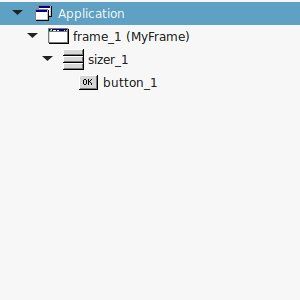
Press OK. An empty window will now appear. Press on the tiny [OK] button in the wxGlade panel and press on the frame. The button will now appear. Press on Application in the tree window.
Set the output file in the wxproperties window.
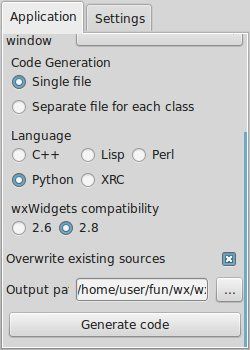
If you look at the window note you can select multiple programming languages and two versions of wxWidgets. Select Python and wxWidgets 2.8. Finally press Generate code. (Do NOT name the file wx.py because the import needs wx, save it as window.py or something else).
Running wxglade code:
Run:
python window.py |
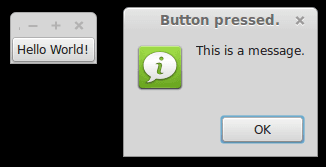
And a window with a button will appear. Pressing the button will not do anything. To start a function when pressing the button, we need to define a so called Callback. This can be as simple as:
def OnButton(self, Event, button_label): |
Finally we bind the button to the callback function using:
self.button_1.Bind(wx.EVT_BUTTON, self.OnButton ) |
Pressing the button will now write a message to the command line. Instead of the boring command line message, we want to show a message box. This can be done using this command:
wx.MessageBox( "This is a message.", "Button pressed."); |
wxPython example code
The full code below:
#!/usr/bin/env python |
Related course: Creating GUI Applications with wxPython