Category: pro
Python hosting: Host, run, and code Python in the cloud!
Python Web Development
Introduction
Web apps are often created using a framework. Frameworks make it easier to develop web apps that are scalable, reliable and maintainable. It avoids recreating the same code over and over again.
Common features are:
- URL Routing
- Output templates
- Database management
- Session management
- Security against common attacks
A framework may offer some or all of these features.
For example, the Flask web application framework does not have database support and you would need a separate module to use a database. The Django web application framework supports databases by default.
Why use a web framework?
As you are doing web development, you want to avoid spending time on programming things that have already been solved. On the other hand, if you are an experienced web developer a web framework may not offer everything you need.
What Python web frameworks exist?
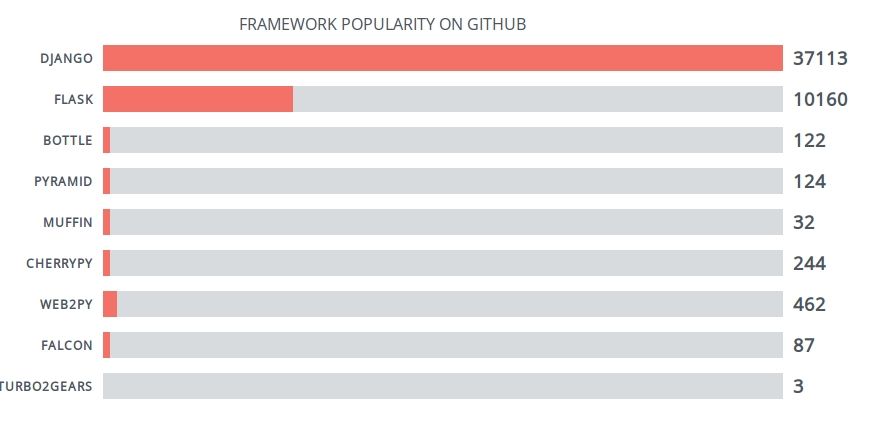
Django and Flask are the most popular web frameworks. However, you may want to evaluate the frameworks. An overview:
The most popular python web application framework is Django, followed by Flask.
Django
Django is the most used Python web framework. It takes care of many things so you can focus on the web app development. Sites built withDjango have dealt with high traffic spikes such as 50 thousands hits per second.
Database access is achieved through an Object-relational mapper: You define your data models in Python and Django deals with the actual database management systems (SQL). However, if you need to you can write your own SQL Queries with Django. URL routing is supported by Django. It encourages beautiful URL design such as ending without .php or .asp.
Features:
- Object-relational mapper
- URLs routing and views
- Template engine
- Forms
- Authentication
- Admin
- Internationalization
- Security
If you want to know more about Django, read here.
Flask

Flask is a Python micro framework which is modular by design. The framework is intended to build web apps. Flask does not have a specific database system or ORM system. If you want to use a database, you’ll have to use extensions. Flask is often combined with SQLAlchemy for database use.
Flask is very easy to get running, a minimal app would be:
from flask import Flask app = Flask(__name__) @app.route('/') def hello_world(): return 'Hello World!' if __name__ == '__main__': app.run() |
The framework supports URL routing, template (using Jinja2), session management and has some out of the box security.
Features:
- URL Routing and views
- Template engine
- Session management
- Logging
If you want to know more about Flask, read here.
Python Hosting
To run your app on the web, you will need hosting. Unless you want to do hosting yourself, you need a party to host.
Hosting servers:
Django Getting started
Django is a high-level Python Web framework that takes care of much of the hassle of Web development, so you can focus on writing your app without needing to reinvent the wheel.
In this tutorial you will learn how to setup a basic Django web app.
Related course
Intro to Django Python Web Apps
Django tutorial
Install Django using:
pip install Django==1.7.1 |
Once installed, create the directory /django-hello/ for your app. In this directory create the file hello.py with this contents:
#!/usr/bin/env python import sys from django.conf import settings from django.conf.urls import patterns from django.http import HttpResponse from django.core.management import execute_from_command_line settings.configure( DEBUG=True, SECRET_KEY='asecretkey', ROOT_URLCONF=sys.modules[__name__], ) def index(request): return HttpResponse('Hello, World') urlpatterns = patterns('', (r'^hello/$', index), ) if __name__ == "__main__": execute_from_command_line(sys.argv) |
Execute the script using:
python hello.py runserver |
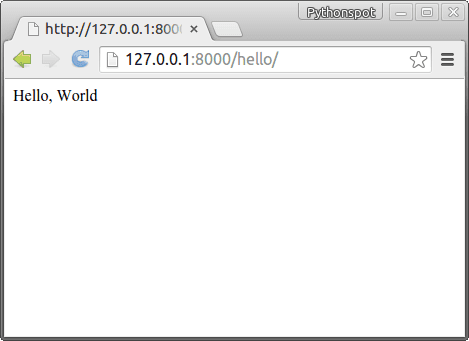
A HTTP Django server will start and if you open http://127.0.0.1:8000/hello/
Django code explanation:
The top lines import the Django library:
from django.conf import settings from django.conf.urls import patterns from django.http import HttpResponse from django.core.management import execute_from_command_line |
If you open the link /hello/, the webserver will call the index() function. We map the url to the function using:
urlpatterns = patterns('', (r'^hello/$', index), ) |
In Django we have url friendly urls. This means you do not have a url that ends in /id=1359835, but instead we have the directory as name. Finally, we set some default settings using settings.configure.
Flask getting started: Hello World
In this tutorial you’ll learn how to build a web app with Python.
We’ll use a micro-framework called Flask. It has a small core but is extensible with many plugins such as SQLAlchemy, Babel, CouchDB, MongoDB etc.
Some Flask example apps are:
- flaskr — a microblog
- minitwit — a twitter clone
- flask website — static pages + mailinglist archives
Related course
Python Flask: Make Web Apps with Python
Installing Flask
Install Flask using the command below:
pip install Flask |
Flask hello world app
Create a file called hello.py
from flask import Flask app = Flask(__name__) @app.route("/") def hello(): return "Hello World!" if __name__ == "__main__": app.run() |
Finally run the web app using this command:
$ python hello.py * Running on http://localhost:5000/ |
Open http://localhost:5000/ in your webbrowser, and “Hello World!” should appear.
Flask with static html files
You can use the Flask framework and use static files together.
Flask will give you URL routing, many features and all the Python benefits.
You may want an application that is partly dynamic and partly static. Or you may simply want to browse with URL routing. In this article we will teach you how to load static HTML files with Flask.
Related course
Python Flask: Make Web Apps with Python
from flask import Flask, render_template app = Flask(__name__) @app.route('/<string:page_name>/') def render_static(page_name): return render_template('%s.html' % page_name)</string:page_name> if __name__ == '__main__': app.run() |
This application initializes a Flask app with the method:
app.run() |
The app creates an URL route for any possible page and links that to static html files with:
@app.route('/<string:page_name>/') def render_static(page_name): return render_template('%s.html' % page_name) |
Create a directory /templates/ and add the file hello.html:
<title>Hello World Template</title> Hello World |
Start the server with:
$ python app.py * Running on http://127.0.0.1:5000/ |
Then any .html file is accesible using URL routing.
For example the static file hello.html can be accessed using http://127.0.0.1:5000/hello. You can store any css file in the /static/ directory.
Jinja2 Template engine
Jinja2 is a template engine for Python. You can use it when rendering data to web pages. For every link you visit, you want to show the data with the formatting. By using a template engine we can seperate display logic (html, css) from the actual Python code. Let’s start with an example
Related course
Python Flask: Make Web Apps with Python
- /app
- /app/templates
And create the file user.html in /app/templates:
<title>{% block title %}{% endblock %}</title> <ul> {% for user in users %} <li>{{ user }}</li> {% endfor %}</ul> |
Then create the code app.py in /app/app.py:
from flask import Flask, flash, redirect, render_template, request from random import randint app = Flask(__name__) @app.route("/") def index(): return "Flask App!" @app.route("/user/") def hello(): users = [ "Frank", "Steve", "Alice", "Bruce" ] return render_template( 'user.html', **locals()) if __name__ == "__main__": app.run(host='0.0.0.0', port=8080) |
Finally execute with:
python app.py * Running on http://0.0.0.0:8080/ |
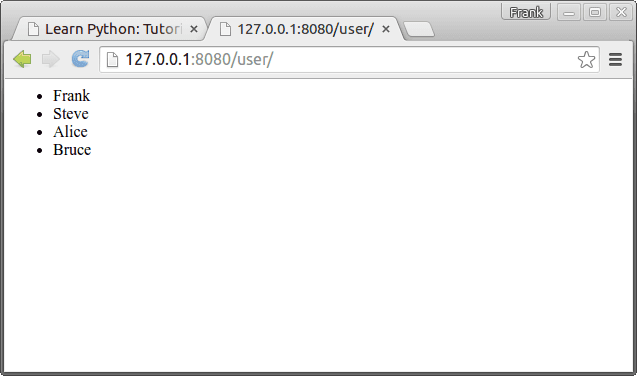
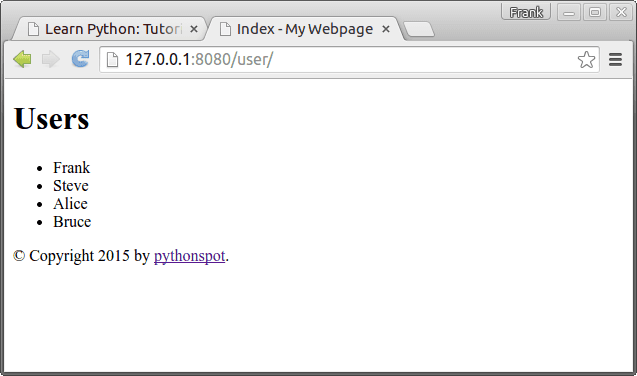
You can then open http://127.0.0.1:8080/user/ in your browser. This will output the data formatted according to html:
About Jinja
A Jinja2 template is simply a text file that does not need to have a specific extension such as .html, .xml.
A template may contain tags and special delimiters:
| Delimiters | Usage |
|---|---|
| {% … %} | Statements |
| {{ … }} | Expressions to print to the template output |
| {# … #} | Comments not included in the template output |
| # … ## | Line Statements |
In the example above we have two statements and one expression. We have not included any comments.
Base template and child templates
A Jinja2 template can extend a base template. On a webpage with many sites you may want these pages look similar. In /templates/ create a file called base.html with this code:
{% block head %} <link rel="stylesheet" href="style.css"> <title>{% block title %}{% endblock %} - My Webpage</title> {% endblock %} <div id="content">{% block content %}{% endblock %}</div> <div id="footer"> {% block footer %} Copyright 2015 by <a href="https://pythonspot.com/">pythonspot</a>. {% endblock %}</div> |
We did not set a style.css, but you could set one. Change /templates/user.html to:
{% extends "base.html" %} {% block title %}Index{% endblock %} {% block head %} {{ super() }} <style type="text/css"> .important { color: #336699; }<br /> </style> {% endblock %} {% block content %} <h1>Users</h1> <p class="important"></p> <ul> {% for user in users %} <li>{{ user }}</li> {% endfor %}</ul> {% endblock %} |
Restart the app with:
python app.py * Running on http://0.0.0.0:8080/ |
Output:
Matplotlib scatterplot
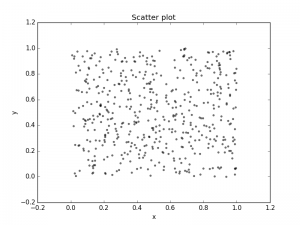
Matplot has a built-in function to create scatterplots called scatter(). A scatter plot is a type of plot that shows the data as a collection of points. The position of a point depends on its two-dimensional value, where each value is a position on either the horizontal or vertical dimension.
Related course
Scatterplot example
Example:
import numpy as np import matplotlib.pyplot as plt # Create data N = 500 x = np.random.rand(N) y = np.random.rand(N) colors = (0,0,0) area = np.pi*3 # Plot plt.scatter(x, y, s=area, c=colors, alpha=0.5) plt.title('Scatter plot pythonspot.com') plt.xlabel('x') plt.ylabel('y') plt.show() |
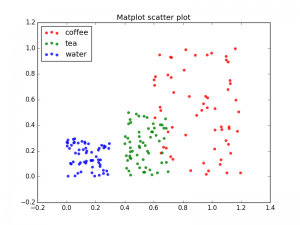
Scatter plot with groups
Data can be classified in several groups. The code below demonstrates that:
import numpy as np import matplotlib.pyplot as plt # Create data N = 60 g1 = (0.6 + 0.6 * np.random.rand(N), np.random.rand(N)) g2 = (0.4+0.3 * np.random.rand(N), 0.5*np.random.rand(N)) g3 = (0.3*np.random.rand(N),0.3*np.random.rand(N)) data = (g1, g2, g3) colors = ("red", "green", "blue") groups = ("coffee", "tea", "water") # Create plot fig = plt.figure() ax = fig.add_subplot(1, 1, 1, axisbg="1.0") for data, color, group in zip(data, colors, groups): x, y = data ax.scatter(x, y, alpha=0.8, c=color, edgecolors='none', s=30, label=group) plt.title('Matplot scatter plot') plt.legend(loc=2) plt.show() |
