Category: pro
Python hosting: Host, run, and code Python in the cloud!
Login authentication with Flask

In this tutorial you will learn how to build a login web app with Python using Flask.
Related course
Python Flask: Make Web Apps with Python
$ pip install Flask |
Create a file called hello.py
from flask import Flask app = Flask(__name__) @app.route("/") def index(): return "Hello World!" if __name__ == "__main__": app.run(host='0.0.0.0', port=4000) |
Finally run the web app using this command:
$ python hello.py |
Open http://localhost:4000/ in your webbrowser, and “Hello World!” should appear.
Building a Flask login screen
Create this Python file and save it as app.py:
from flask import Flask from flask import Flask, flash, redirect, render_template, request, session, abort import os app = Flask(__name__) @app.route('/') def home(): if not session.get('logged_in'): return render_template('login.html') else: return "Hello Boss!" @app.route('/login', methods=['POST']) def do_admin_login(): if request.form['password'] == 'password' and request.form['username'] == 'admin': session['logged_in'] = True else: flash('wrong password!') return home() if __name__ == "__main__": app.secret_key = os.urandom(12) app.run(debug=True,host='0.0.0.0', port=4000) |
There are two routes (paths you can see in your browser URL bar) created here:
@app.route('/') @app.route('/login', methods=['POST']) |
The first one displays the login screen or the home screen, based on the condition if you are logged in. The second route validates the login variables on login.
We create the directory /templates/. Create the file /templates/login.html with this code:
{% block body %} {% if session['logged_in'] %} You're logged in already! {% else %} <form action="/login" method="POST"> <input type="username" name="username" placeholder="Username"> <input type="password" name="password" placeholder="Password"> <input type="submit" value="Log in"> </form>{% endif %} {% endblock %} |
Run the web app using this command:
$ python hello.py |
Open http://localhost:4000/ in your webbrowser, and the login screen should appear. The login credentials are shown in the do_admin_login() function.
Making it look amazing
While functional, the login screen looks like an early 90s User Interface (UI). We picked a random login template from codepen.io. We create the directory /static/ with the file style.css.
* { box-sizing: border-box; } *:focus { outline: none; } body { font-family: Arial; background-color: #3498DB; padding: 50px; } .login { margin: 20px auto; width: 300px; } .login-screen { background-color: #FFF; padding: 20px; border-radius: 5px } .app-title { text-align: center; color: #777; } .login-form { text-align: center; } .control-group { margin-bottom: 10px; } input { text-align: center; background-color: #ECF0F1; border: 2px solid transparent; border-radius: 3px; font-size: 16px; font-weight: 200; padding: 10px 0; width: 250px; transition: border .5s; } input:focus { border: 2px solid #3498DB; box-shadow: none; } .btn { border: 2px solid transparent; background: #3498DB; color: #ffffff; font-size: 16px; line-height: 25px; padding: 10px 0; text-decoration: none; text-shadow: none; border-radius: 3px; box-shadow: none; transition: 0.25s; display: block; width: 250px; margin: 0 auto; } .btn:hover { background-color: #2980B9; } .login-link { font-size: 12px; color: #444; display: block; margin-top: 12px; } |
Modify the login.html template as:
<link rel="stylesheet" href="/static/style.css" type="text/css"> {% block body %} {% if session['logged_in'] %} You're logged in already! {% else %} <form action="/login" method="POST"> <div class="login"> <div class="login-screen"> <div class="app-title"> <h1>Login</h1> </div> <div class="login-form"> <div class="control-group"> <input type="text" class="login-field" value="" placeholder="username" name="username"> <label class="login-field-icon fui-user" for="login-name"></label></div> <div class="control-group"> <input type="password" class="login-field" value="" placeholder="password" name="password"> <label class="login-field-icon fui-lock" for="login-pass"></label></div> <input type="submit" value="Log in" class="btn btn-primary btn-large btn-block"> </div> </div> </div> </form>{% endif %} {% endblock %} |
Once you restart the application this screen should appear:
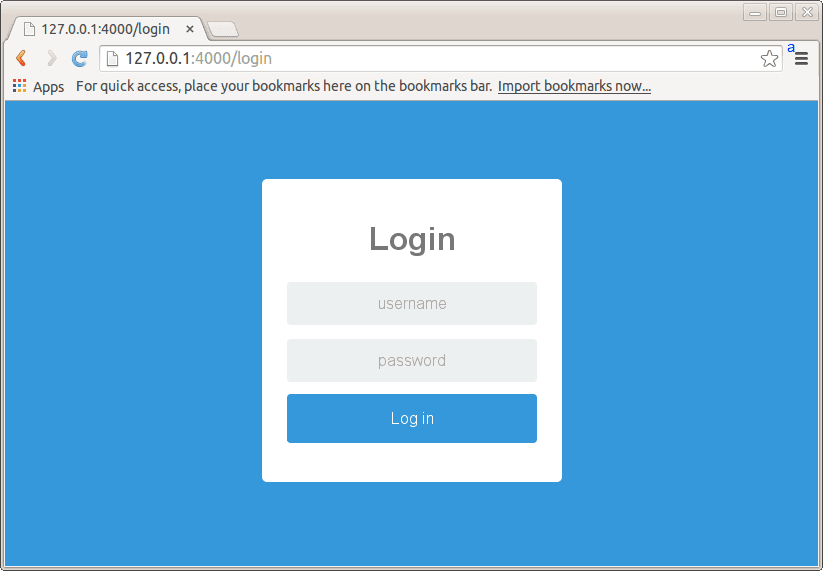
Awesome, ain’t it? 🙂
What about logout?
As you may have seen, there is no logout button or functionality. Creating that is very easy. The solution proposed below is only one of the many solutions. We create a new route /logout which directs to the function logout(). This function clears the session variable and returns to the login screen.
@app.route("/logout") def logout(): session['logged_in'] = False return home() |
The full code:
from flask import Flask from flask import Flask, flash, redirect, render_template, request, session, abort import os app = Flask(__name__) @app.route('/') def home(): if not session.get('logged_in'): return render_template('login.html') else: return "Hello Boss! <a href="/logout">Logout</a>" @app.route('/login', methods=['POST']) def do_admin_login(): if request.form['password'] == 'password' and request.form['username'] == 'admin': session['logged_in'] = True else: flash('wrong password!') return home() @app.route("/logout") def logout(): session['logged_in'] = False return home() if __name__ == "__main__": app.secret_key = os.urandom(12) app.run(debug=True,host='0.0.0.0', port=4000) |
Connecting a database
If you want a multi-user login system, you should add a database layer to the application. Flask does not have out of the box database support. You have to use a third party library if you want database support. In this tutorial we will use SqlAlchemy. If you do not have that installed type:
$ sudo pip install Flask-SqlAlchemy |
SQLAlchemy is an SQL toolkit and object-relational mapper (ORM) for the Python programming language. It has support for MySQL, Microsoft SQL Server and many more relational database management systems. If all of these terms are unfamiliar to you, just keep reading.
Create the file tabledef.py:
from sqlalchemy import * from sqlalchemy import create_engine, ForeignKey from sqlalchemy import Column, Date, Integer, String from sqlalchemy.ext.declarative import declarative_base from sqlalchemy.orm import relationship, backref engine = create_engine('sqlite:///tutorial.db', echo=True) Base = declarative_base() ######################################################################## class User(Base): """""" __tablename__ = "users" id = Column(Integer, primary_key=True) username = Column(String) password = Column(String) #---------------------------------------------------------------------- def __init__(self, username, password): """""" self.username = username self.password = password # create tables Base.metadata.create_all(engine) |
Execute it with:
python tabledef.py |
This file will create the database structure. Inside the directory you will find a file called tutorial.db. Create a file called dummy.py which will contain this code:
import datetime from sqlalchemy import create_engine from sqlalchemy.orm import sessionmaker from tabledef import * engine = create_engine('sqlite:///tutorial.db', echo=True) # create a Session Session = sessionmaker(bind=engine) session = Session() user = User("admin","password") session.add(user) user = User("python","python") session.add(user) user = User("jumpiness","python") session.add(user) # commit the record the database session.commit() session.commit() |
Execute:
$ python dummy.py |
This will put dummy data into your database. Finally we update our app.py
Validating the login credentials with SqlAlchemy
The next step is to write the functionality that validates the user and password exist in the database. Using SqlAlchemy we can do this (dummy/pseudo code):
@app.route('/test') def test(): POST_USERNAME = "python" POST_PASSWORD = "python" Session = sessionmaker(bind=engine) s = Session() query = s.query(User).filter(User.username.in_([POST_USERNAME]), User.password.in_([POST_PASSWORD]) ) result = query.first() if result: return "Object found" else: return "Object not found " + POST_USERNAME + " " + POST_PASSWORD |
We use SqlAlchemys Oject Relational Mapping (ORM). We map the objects to relational database tables and vice versa. The definition (User) is given in tabledef.py. The s.query function is where the query is build. We have two conditions: the username and password must match. The query.first() returns true if the object exists, false if it does not. This gives us this total code:
from flask import Flask from flask import Flask, flash, redirect, render_template, request, session, abort import os from sqlalchemy.orm import sessionmaker from tabledef import * engine = create_engine('sqlite:///tutorial.db', echo=True) app = Flask(__name__) @app.route('/') def home(): if not session.get('logged_in'): return render_template('login.html') else: return "Hello Boss! <a href="/logout">Logout</a>" @app.route('/login', methods=['POST']) def do_admin_login(): POST_USERNAME = str(request.form['username']) POST_PASSWORD = str(request.form['password']) Session = sessionmaker(bind=engine) s = Session() query = s.query(User).filter(User.username.in_([POST_USERNAME]), User.password.in_([POST_PASSWORD]) ) result = query.first() if result: session['logged_in'] = True else: flash('wrong password!') return home() @app.route("/logout") def logout(): session['logged_in'] = False return home() if __name__ == "__main__": app.secret_key = os.urandom(12) app.run(debug=True,host='0.0.0.0', port=4000) |
You can now login with any user defined in the database table.
What about security?
We have demonstrated a simple login app above. However, it is your job to properly secure it. There are many guys out there that are going to try to break into your app.
Best practices:
- Hash your database passwords. Don’t store them in plain text.
- Secure the connection, use HTTPS.
- Log the failed login attempts.
- Use captcha to prevent brute force of logins.
- Others? write them in comments.
Flask web forms
In this tutorial you will learn how to do form validation with Flask. Forms play an important role in all web applications.
We use WTForms, a module for validation of forms. We will start with a simple form containing one field asking for a name.
Related course:
Python Flask: Make Web Apps with Python
from flask import Flask, render_template, flash, request from wtforms import Form, TextField, TextAreaField, validators, StringField, SubmitField # App config. DEBUG = True app = Flask(__name__) app.config.from_object(__name__) app.config['SECRET_KEY'] = '7d441f27d441f27567d441f2b6176a' class ReusableForm(Form): name = TextField('Name:', validators=[validators.required()]) @app.route("/", methods=['GET', 'POST']) def hello(): form = ReusableForm(request.form) print form.errors if request.method == 'POST': name=request.form['name'] print name if form.validate(): # Save the comment here. flash('Hello ' + name) else: flash('All the form fields are required. ') return render_template('hello.html', form=form) if __name__ == "__main__": app.run() |
We then create the template hello.html in the /templates/ directory:
<title>Reusable Form Demo</title> {% with messages = get_flashed_messages(with_categories=true) %} {% if messages %} <ul> {% for message in messages %} <li>{{ message[1] }}</li> {% endfor %}</ul> {% endif %} {% endwith %} <form action="" method="post"> {{ form.csrf }} <div class="input text"> {{ form.name.label }} {{ form.name }}</div> <div class="input submit"> <input type="submit" value="Submit"></div> </form> |
Start the application and open it in your webbrowser at http://127.0.0.1:5000.
python miniapp.py * Running on http://127.0.0.1:5000/ * Restarting with reloader |
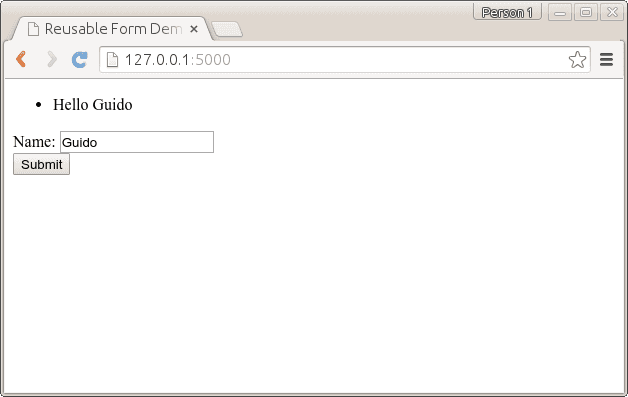
If you will submit an empty form, you will get an error. But if you enter your name, it will greet you. Form validation is handled by the wtforms module, but because we gave the argument
name = TextField('Name:', validators=[validators.required()]) |
the field cannot be empty. Other parameters can be given here.
css with Flask
We use bootstrap to style the form.Bootstrap is a popular HTML, CSS, and JS framework for developing responsive, mobile first projects on the web. It makes front-end web development faster and easier. The output will be:
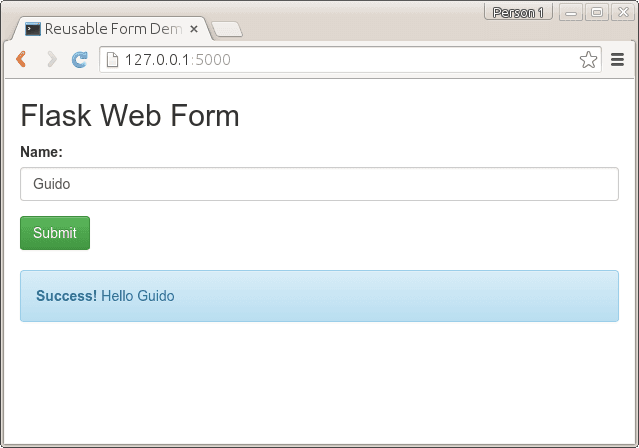
You can get the bootstrap files from http://getbootstrap.com/getting-started/#download and extract them in a new directory /static/. The code remains almost the same, but the template is changed. Code:
from flask import Flask, render_template, flash, request from wtforms import Form, TextField, TextAreaField, validators, StringField, SubmitField # App config. DEBUG = True app = Flask(__name__) app.config.from_object(__name__) app.config['SECRET_KEY'] = '7d441f27d441f27567d441f2b6176a' class ReusableForm(Form): name = TextField('Name:', validators=[validators.required()]) @app.route("/", methods=['GET', 'POST']) def hello(): form = ReusableForm(request.form) print form.errors if request.method == 'POST': name=request.form['name'] print name if form.validate(): # Save the comment here. flash('Hello ' + name) else: flash('Error: All the form fields are required. ') return render_template('hello.html', form=form) if __name__ == "__main__": app.run() |
We added bootstrap to the template hello.html:
<title>Reusable Form Demo</title> <link rel="stylesheet" media="screen" href="static/bootstrap.min.css"> <link rel="stylesheet" href="static/bootstrap-theme.min.css"> <meta name="viewport" content="width=device-width, initial-scale=1.0"> <div class="container"> <h2>Flask Web Form</h2> <form action="" method="post" role="form"> {{ form.csrf }} <div class="form-group"> <label for="name">Name:</label> <input type="text" class="form-control" id="name" name="name" placeholder="What's your name?"></div> <button type="submit" class="btn btn-success">Submit</button> </form>{% with messages = get_flashed_messages(with_categories=true) %} {% if messages %} {% for message in messages %} {% if "Error" not in message[1]: %} <div class="alert alert-info"> <strong>Success! </strong> {{ message[1] }}</div> {% endif %} {% if "Error" in message[1]: %} <div class="alert alert-warning"> {{ message[1] }}</div> {% endif %} {% endfor %} {% endif %} {% endwith %} </div> |
Flask registration form
We use the same principle to create a registration form asking for name, email and password. We update the Form class:
class ReusableForm(Form): name = TextField('Name:', validators=[validators.required()]) email = TextField('Email:', validators=[validators.required(), validators.Length(min=6, max=35)]) password = TextField('Password:', validators=[validators.required(), validators.Length(min=3, max=35)]) def reset(self): blankData = MultiDict([ ('csrf', self.reset_csrf() ) ]) self.process(blankData) |
And we can get the variables passed using:
name=request.form['name'] password=request.form['password'] email=request.form['email'] |
Full code:
from flask import Flask, render_template, flash, request from wtforms import Form, TextField, TextAreaField, validators, StringField, SubmitField # App config. DEBUG = True app = Flask(__name__) app.config.from_object(__name__) app.config['SECRET_KEY'] = '7d441f27d441f27567d441f2b6176a' class ReusableForm(Form): name = TextField('Name:', validators=[validators.required()]) email = TextField('Email:', validators=[validators.required(), validators.Length(min=6, max=35)]) password = TextField('Password:', validators=[validators.required(), validators.Length(min=3, max=35)]) @app.route("/", methods=['GET', 'POST']) def hello(): form = ReusableForm(request.form) print form.errors if request.method == 'POST': name=request.form['name'] password=request.form['password'] email=request.form['email'] print name, " ", email, " ", password if form.validate(): # Save the comment here. flash('Thanks for registration ' + name) else: flash('Error: All the form fields are required. ') return render_template('hello.html', form=form) if __name__ == "__main__": app.run() |
Update the template hello.html with this code:
<title>Reusable Form Demo</title> <link rel="stylesheet" media="screen" href="static/bootstrap.min.css"> <link rel="stylesheet" href="static/bootstrap-theme.min.css"> <meta name="viewport" content="width=device-width, initial-scale=1.0"> <div class="container"> <h2>Flask Web Form</h2> <form action="" method="post" role="form"> {{ form.csrf }} <div class="form-group"> <label for="name">Name:</label> <input type="text" class="form-control" id="name" name="name" placeholder="What's your name?"> <label for="email">Email:</label> <input type="text" class="form-control" id="email" name="email" placeholder="Your email will be used to contact you."> <label for="password">Password:</label> <input type="password" class="form-control" id="password" name="password" placeholder="Enter a password."> </div> <button type="submit" class="btn btn-success">Sign Up</button> </form>{% with messages = get_flashed_messages(with_categories=true) %} {% if messages %} {% for message in messages %} {% if "Error" not in message[1]: %} <div class="alert alert-info"> <strong>Success! </strong> {{ message[1] }}</div> {% endif %} {% if "Error" in message[1]: %} <div class="alert alert-warning"> {{ message[1] }}</div> {% endif %} {% endfor %} {% endif %} {% endwith %} </div> |
Output:
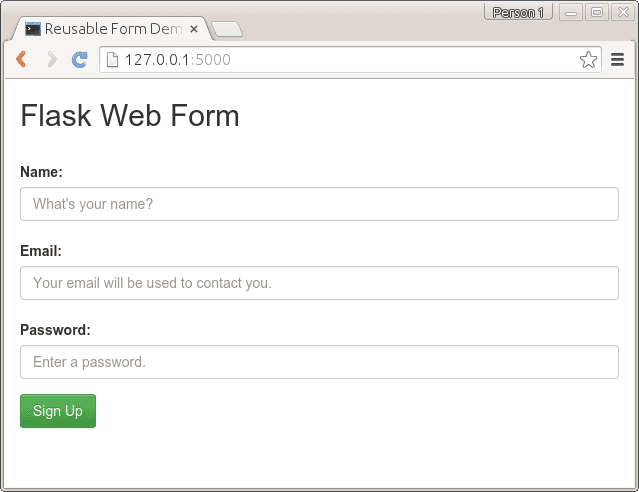
WTForms can validate email, password, numbers and many more. For a list of validators see: http://wtforms.readthedocs.org/latest/validators.html
Login to Flask App with Twitter
In this tutorial you will learn how to use Twitter for login authentication in a Flask app. Instead of using a custom user login system, you could useTwitter to authenticate with your website. Your visitors may already have an account on Twitter, so why not use it to login?
To do so, we use a protocol called OAuth. From wikipedia:
OAuth is a protocol that utilizes tokens in order to access resources on behalf of a resource owner. Think giving a user the ability to give out a valet key to certain portions of your site. Many sites, such as Google, Facebook, and Twitter use OAuth for authenticating third party clients in order to access certain user resources.
Don’t worry if that sounds vague, we’ll take you through the steps.
Related course
Python Flask: Make Web Apps with Python
Go to https://apps.twitter.com/ and create a new app.
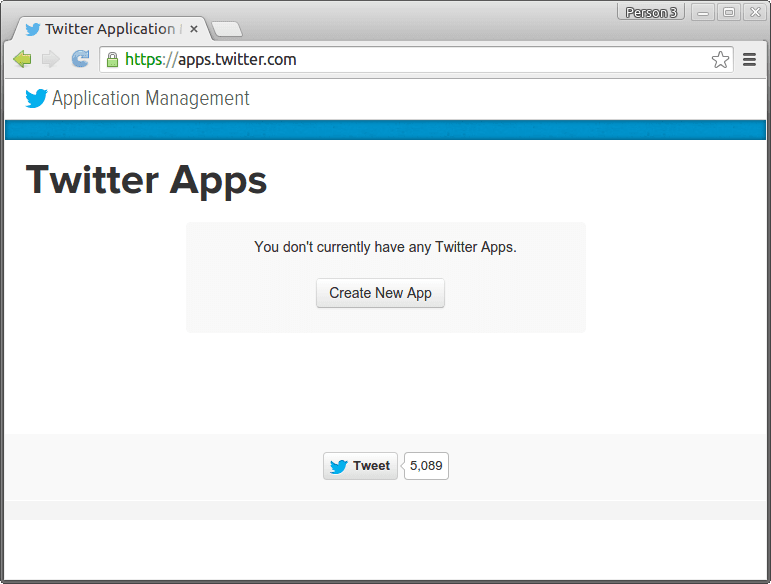
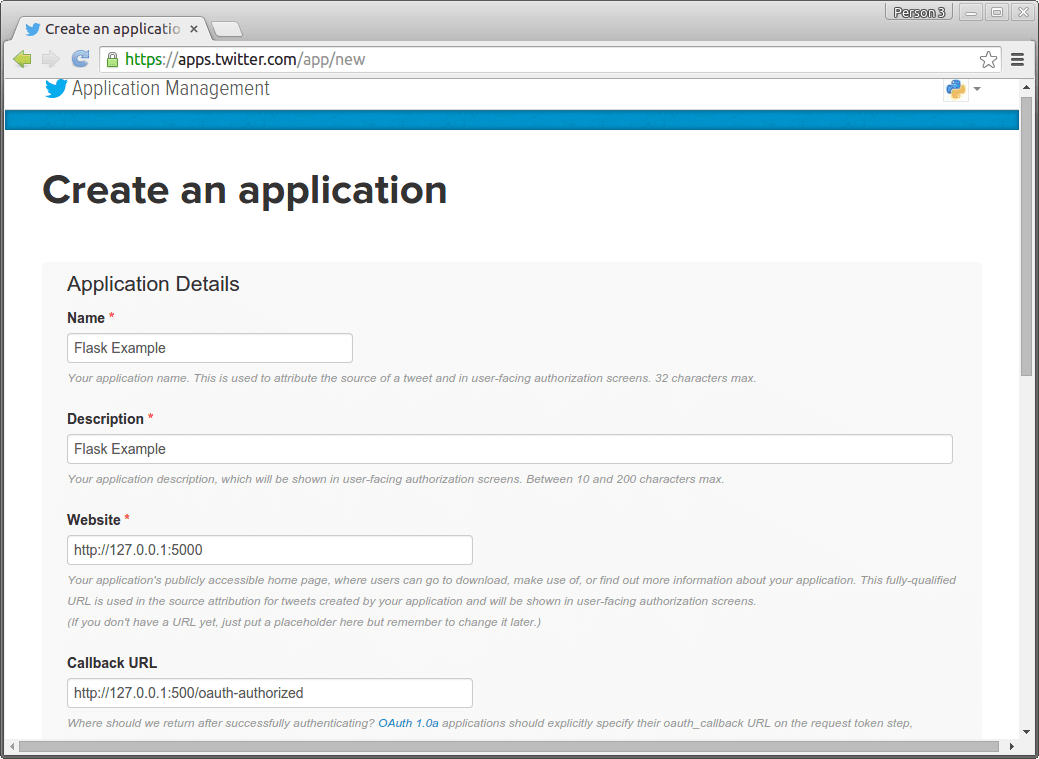
Specify your app details:
You will then see this screen:
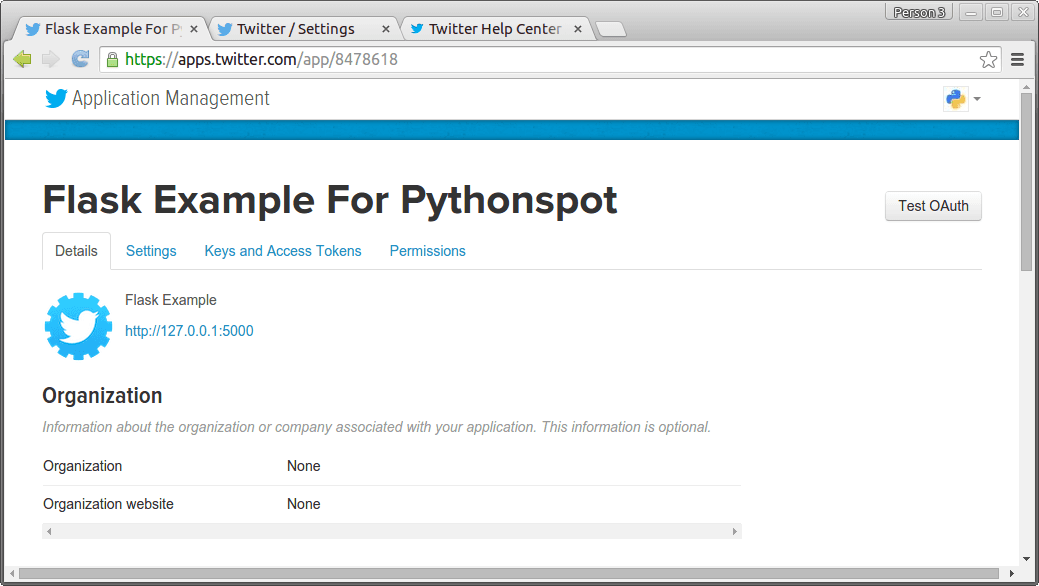
Press Keys and Access Tokens. Finally you will see your consumer_key and consumer_secret which you will need for your app.
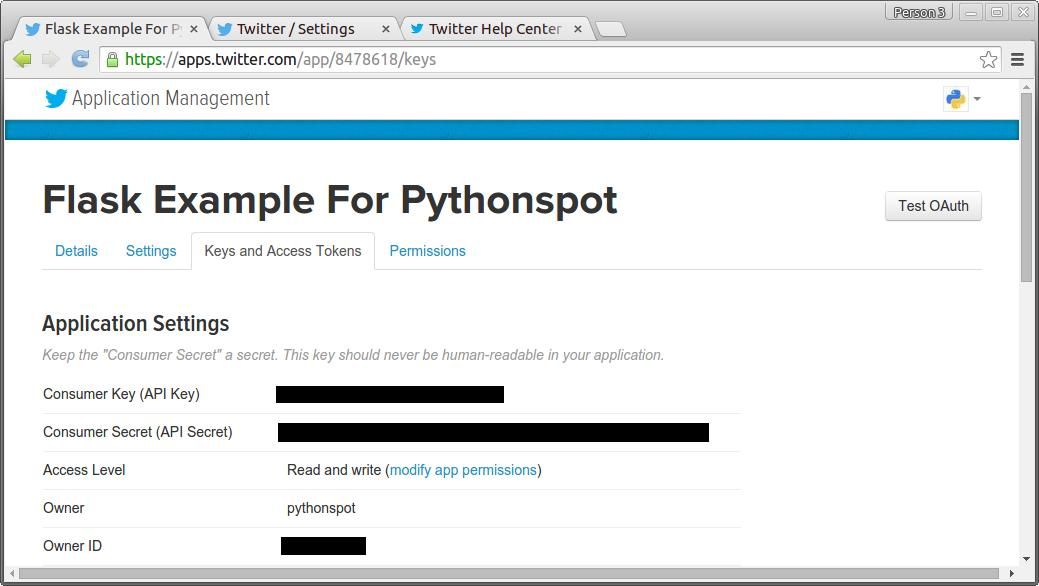
The code
Create the file app.py and set your consumer_key and consumer_secret that you got from twitter.
from flask import Flask, request, redirect, url_for, session, g, flash, \ render_template from flask_oauth import OAuth from sqlalchemy import create_engine, Column, Integer, String from sqlalchemy.orm import scoped_session, sessionmaker from sqlalchemy.ext.declarative import declarative_base # configuration SECRET_KEY = 'development key' DEBUG = True # setup flask app = Flask(__name__) app.debug = DEBUG app.secret_key = SECRET_KEY oauth = OAuth() # Use Twitter as example remote application twitter = oauth.remote_app('twitter', # unless absolute urls are used to make requests, this will be added # before all URLs. This is also true for request_token_url and others. base_url='https://api.twitter.com/1/', # where flask should look for new request tokens request_token_url='https://api.twitter.com/oauth/request_token', # where flask should exchange the token with the remote application access_token_url='https://api.twitter.com/oauth/access_token', # twitter knows two authorizatiom URLs. /authorize and /authenticate. # they mostly work the same, but for sign on /authenticate is # expected because this will give the user a slightly different # user interface on the twitter side. authorize_url='https://api.twitter.com/oauth/authenticate', # the consumer keys from the twitter application registry. consumer_key='ADD TWITTER CONSUMER KEY', consumer_secret='ADD TWITTER CONSUMER SECRET' ) @twitter.tokengetter def get_twitter_token(token=None): return session.get('twitter_token') @app.route('/') def index(): access_token = session.get('access_token') if access_token is None: return redirect(url_for('login')) access_token = access_token[0] return render_template('index.html') @app.route('/login') def login(): return twitter.authorize(callback=url_for('oauth_authorized', next=request.args.get('next') or request.referrer or None)) @app.route('/logout') def logout(): session.pop('screen_name', None) flash('You were signed out') return redirect(request.referrer or url_for('index')) @app.route('/oauth-authorized') @twitter.authorized_handler def oauth_authorized(resp): next_url = request.args.get('next') or url_for('index') if resp is None: flash(u'You denied the request to sign in.') return redirect(next_url) access_token = resp['oauth_token'] session['access_token'] = access_token session['screen_name'] = resp['screen_name'] session['twitter_token'] = ( resp['oauth_token'], resp['oauth_token_secret'] ) return redirect(url_for('index')) if __name__ == '__main__': app.run() |
Create the directory /templates/ with the file index.html
{% block body %} <h2>Flask Login App</h2> {% if session['screen_name'] %} Hello {{ session['screen_name'] }}! {% else %} Sign in with twitter. <a href="{{ url_for('login') }}"><img src="{{ url_for('static', filename='sign-in.png') }}" alt="sign in"></a> {% endif %} {% endblock %} |
Finally create the directory /static/ with the image sign-in.png:
Start your app with:
python app.py |
Open the app in your web-browser. Then your users can simply follow the steps to login:
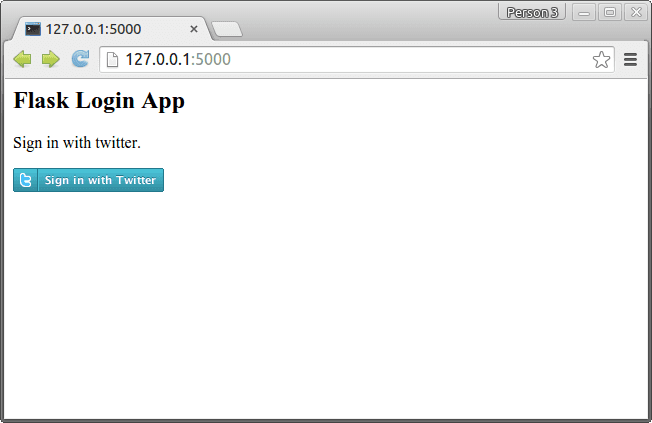
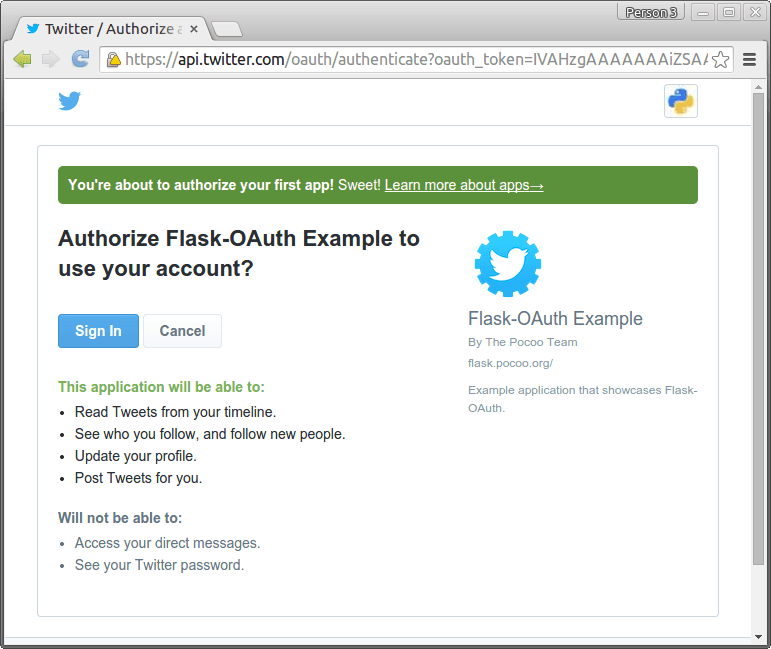
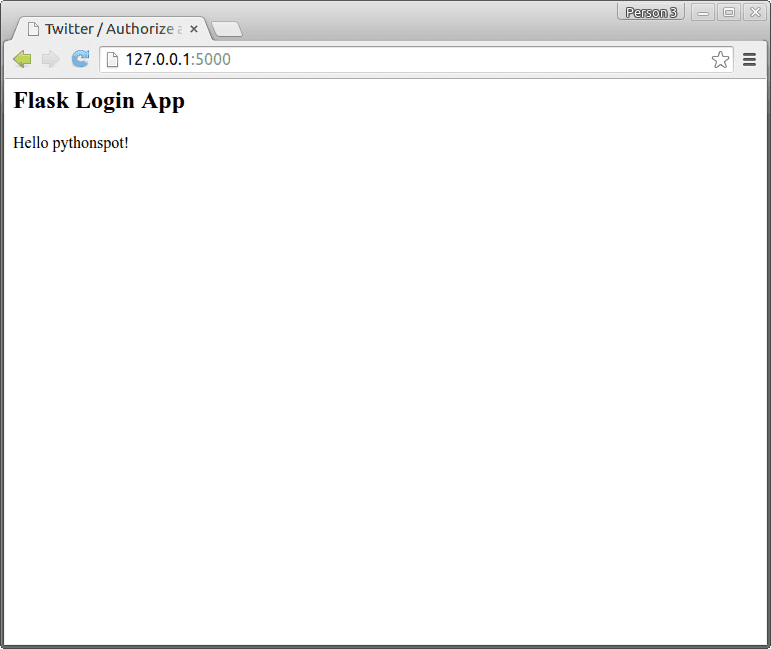
Image data and operations
OpenCV (cv2) can be used to extract data from images and do operations on them. We demonstrate some examples of that below:
Related courses:
Image properties
We can extract the width, height and color depth using the code below:
import cv2 import numpy as np # read image into matrix. m = cv2.imread("python.png") # get image properties. h,w,bpp = np.shape(m) # print image properties. print "width: " + str(w) print "height: " + str(h) print "bpp: " + str(bpp) |
Access pixel data
We can access the pixel data of an image directly using the matrix, example:
import cv2 import numpy as np # read image into matrix. m = cv2.imread("python.png") # get image properties. h,w,bpp = np.shape(m) # print pixel value y = 1 x = 1 print m[y][x] |
To iterate over all pixels in the image you can use:
import cv2 import numpy as np # read image into matrix. m = cv2.imread("python.png") # get image properties. h,w,bpp = np.shape(m) # iterate over the entire image. for py in range(0,h): for px in range(0,w): print m[py][px] |
Image manipulation
You can modify the pixels and pixel channels (r,g,b) directly. In the example below we remove one color channel:
import cv2 import numpy as np # read image into matrix. m = cv2.imread("python.png") # get image properties. h,w,bpp = np.shape(m) # iterate over the entire image. for py in range(0,h): for px in range(0,w): m[py][px][0] = 0 # display image cv2.imshow('matrix', m) cv2.waitKey(0) |
To change the entire image, you’ll have to change all channels: m[py][px][0], m[py][px][1], m[py][px][2].
Save image
You can save a modified image to the disk using:
cv2.imwrite('filename.png',m) |
HTTP download file with Python
The urllib2 module can be used to download data from the web (network resource access). This data can be a file, a website or whatever you want Python to download. The module supports HTTP, HTTPS, FTP and several other protocols.
In this article you will learn how to download data from the web using Python.
Related courses
Download text
To download a plain text file use this code:
import urllib2 response = urllib2.urlopen('https://wordpress.org/plugins/about/readme.txt') data = response.read() print(data) |
We get a response object using the urllib2.urlopen() method, where the parameter is the link. All of the file contents is received using the response.read() method call. After calling this, we have the file data in a Python variable of type string.
Download HTML
This will request the html code from a website. It will output everything to the screen.
import urllib2 response = urllib2.urlopen('http://en.wikipedia.org/') html = response.read() print html |
Download file using Python
You can save the data to disk very easily after downloading the file:
import urllib2 response = urllib2.urlopen('https://wordpress.org/plugins/about/readme.txt') data = response.read() # Write data to file filename = "test.txt" file_ = open(filename, 'w') file_.write(data) file_.close() |
The first part of the code downloads the file contents into the variable data:
import urllib2 response = urllib2.urlopen('https://wordpress.org/plugins/about/readme.txt') data = response.read() |
The second part stores it into a file (this file does not need to have the same filename)
# Write data to file filename = "test.txt" file_ = open(filename, 'w') file_.write(data) file_.close() |
The ‘w’ parameter creates the file (or overwrites if it exists). You can read more about writing files here.
wxPython window
wxPython is a GUI toolkit for the Python programming language. wxPython can be used to create graphical user interfaces (GUI).
Applications made with wxPython have a native appearance on all platforms. The application will appear as native application unlike QT or Tk which have a custom QT or Tk look. It runs on all major desktop platforms.
Currently supported operating systems are Microsoft Windows (32-bit), most Unix or unix-like systems, and Macintosh OS X.
You can view screenshots of applications made with wxPython.
The wxPython module is based on the C++ GUI library wxWidgets.
wxPython window
To open a window with wxPython, run the code below:
#!/usr/bin/python import wx app = wx.App() frame = wx.Frame(None, -1, 'win.py') frame.Show() app.MainLoop() |
The line wx.App() creates an application object. Each wx program needs to have one .App() object.
The method wx.Frame() returns a new window which can contain widgets.
app.Mainloop() puts the application in the main loop and listens for events.
Window size and position
You can set the position and size with the SetDimensions() function:
#!/usr/bin/python import wx app = wx.App() frame = wx.Frame(None, -1, 'win.py') frame.SetDimensions(0,0,640,480) frame.Show() app.MainLoop() |
The parameters of the function are: x (left), y (top), width and height. The function not only sets the screen resolution but also the position on the screen.
Center a window
To put the window in the center of the screen call:
frame.Centre() |
